Building an Automated ML Pipeline with a Feature Store Using Iguazio & Snowflake
Adi Hirschtein | September 20, 2022
When operationalizing machine and deep learning, a production-first approach is essential for moving from research and development to scalable production pipelines in a much faster and more effective manner. Without the need to refactor code, add glue logic and spend significant efforts on data and ML engineering, more models will make it to production and with less issues like drift. In this blog post, we’ll demonstrate how to use Iguazio & Snowflake to create a simple, seamless, and automated path to production at scale.
This post is based on a talk I gave at MLOps NYC Summit. Prefer to see the video? You can watch the whole thing here:

The MLOps Pipeline: A Short Intro
Before diving into how the Iguazio feature store and Snowflake operate together, let’s review why we need a solution for automating the ML pipeline in the first place. Deploying machine learning models to production introduces four main challenges:
1. Siloed Work - The machine learning pipeline requires collaboration between data scientists, data engineers and DevOps. Today, these teams often work in silos and use different tools and frameworks. As a result, code and models that were developed in the lab need to be technologically converted so they match the production environment’s requirements. This process creates friction that results in some models not making it to production.
2. Lengthy Processes - The route from the lab to production is long and time-consuming. It constitutes multiple phases, including testing, security, versioning, tuning, ensuring scalability, CI/CD and more. This takes time and resources and can inhibit deployment velocity.
3. Access to Features - Feature engineering is usually the longest and most complex part of the pipeline. Generating a new feature takes a lot of engineering effort. If online and offline features don’t match, it could also result in model inaccuracy. A feature store can help by enabling the sharing and monitoring of features so all features that were used in development are available out of the box for deployment. In this post, we’ll dive into more details about this challenge and the feature store solution.
4. Model Accuracy - When models are deployed, they need to be monitored and analyzed to ensure there are no issues, for example with latency or drift. If there are, data professionals need to be alerted and these models need to be retrained and deployed.
In this blog post, we will focus on challenge number three: enabling access to features, by showing how to use Iguazio’s Feature Store with Snowflake.
How to Deploy Features with the Iguazio Feature Store and Snowflake
The Role of the Feature Store
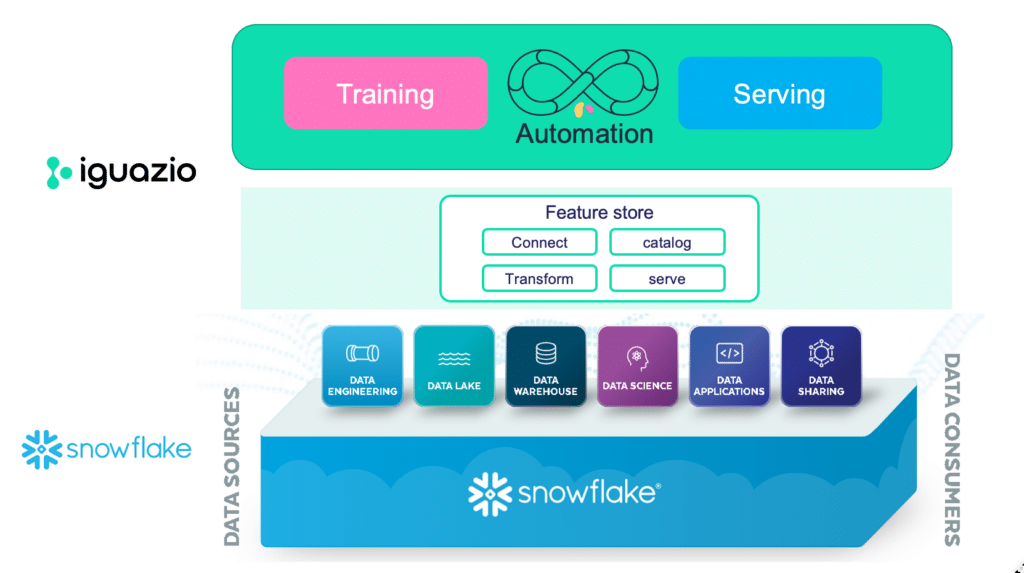
A machine learning pipeline is made up of a database and an MLOps platform, among other components. But to connect these two, we need another component. This is where the feature store comes into play. A feature store acts as the interface between the database and the MLOps platform.
What does the feature store do? To consume database data in the model, the data needs to be turned into features. This is done through the feature store, which enables training and serving the models. The feature store also helps prevent data leakage and skewness, by creating a single transformation that is applicable for both training and serving. Finally, a feature store also provides a robust catalog that enables feature collaboration. In the store, features can be searched for through contextual search and metadata.
Integrating the Feature Store with Snowflake
Now let’s see how to create an end-to-end MLOps pipeline by integrating the Snowflake database with the Iguazio feature store.
Snowflake and Iguazio: Step-by-Step
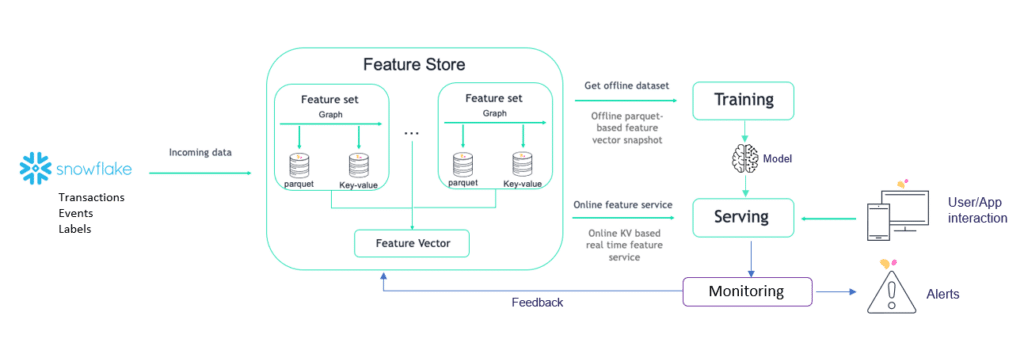
Now let’s see how we can take tables that reside in Snowflake and ingest them in the Iguazio feature store. When ingested, the data will go to a parquet file for training and to a key value database to serve the features.
In addition, the data that is taken from Snowflake can also be enriched for training and serving. In this case, we will be adding aggregations on top of transactions to create a sliding window aggregation. Finally, the model will be monitored to ensure everything is running properly.
Here I’m sharing a step-by-step tutorial. You can also follow the explanation I give in my video demo session, here.
Step 1: The Snowflake GUI
The Snowflake GUI has data stored in various forms, including tables. In our example, we are looking at three tables: transactions, labels and events. Each table has information about the data stored.
We'll ingest this data into the Iguazio feature store.
Step 2: Defining the Project in Iguazio
To define the project in Iguazio, we’ll use MLRun, which is an open source orchestration framework for MLOps. First, name your project. Then, run imports and create feature sets.
Step 3: Creating Feature Sets
Now it’s time to create feature sets based on the Snowflake tables. The feature set also needs to be named. Then, create the sliding window aggregation. Once defined, adjust the data so the ingestion happens by using the ingest command.
Going back to the Iguazio UI, you will be able to see your project under the Feature Sets tab, including the aggregations, all the features involved, a data preview and the statistics - for monitoring purposes.
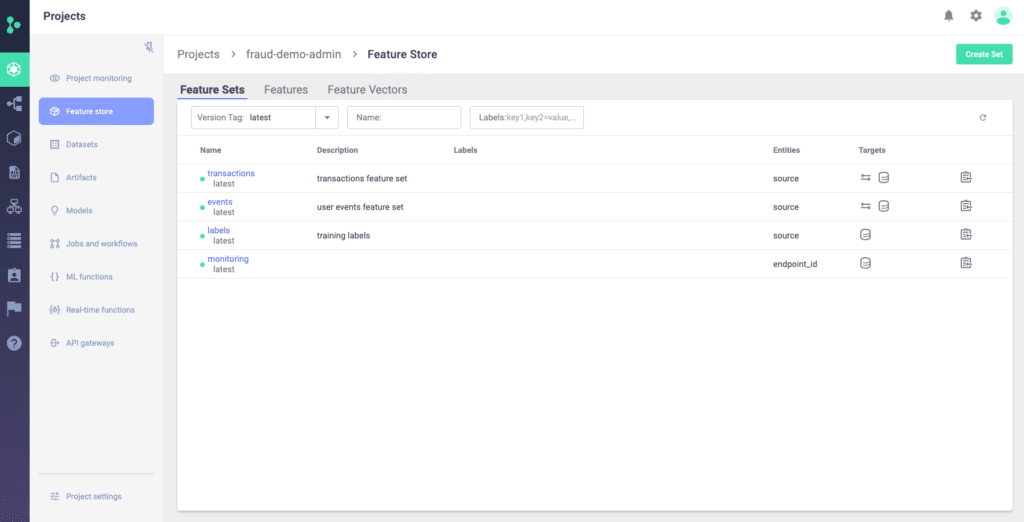
Be sure to create individual Feature Sets for all the tables you are using.
Step 4: Creating a Feature Vector
The feature vector will be consumed by the models for training it and later on for serving. To create the features, define the list of features.
Now it’s time to access the data.
Step 5: Previewing the Feature Vector Data
To view the data, run a command for getting the offline features. You will see a data frame with the aggregated columns from the feature sets, which is finally ready for training!
Step 6: Training Models
To train the model, run the scikit-learn based command and set up the relevant columns. The input for the job will be the feature vector, which is the data from Snowflake.
That’s it! The training job is now running!
Step 7: Your Training Job
You can look at the training job in the Iguazio UI or in Jupyter. By drilling down into the job, you can see the metadata, including who is running the job, which data was brought from Snowflake, artifacts, processing iterations, and more.
After the training, a model will be created. You can see it in the Model Registry. The Model Registry view shows the model’s metadata, artifact, statistics and more.
Step 8: Model Deployment
It’s now time to deploy the model. You can either deploy it from the UI or programmatically. To do it programmatically, use the serving function. This function will get the request from the feature, enrich it with the feature vector as an input in real-time, and send the response back to the application.
Before deployment, you can also use a mock server to run the model locally on Jupyter and ensure everything is working. If it is, the model can be deployed. This means creating an endpoint with all the required configurations. Once deployed, it’s recommended to test the endpoint to ensure it’s working.
If you go back to the Iguazio UI, you will be able to see the model endpoints with their operational statistics, including uptime, last prediction, latency, error count, and more.
Iguazio also has a built-in drift analysis, which is based on a comparison between the data in training and in production. The drift analysis looks at the actual value versus the expected value by running calculations like KLD and others and sends an alerts about any anomalies.
Step 9: Pipeline Automation
Our goal is to automate this entire process, from feature selection to training to deployment, while enabling drilling down into metadata information. This can also be done with MLRun, which uses Kubeflow under the hood. To automate the pipeline, create a workflow file with the relevant functions, register it as part of your project and it will run once scheduled or triggered.
Interested in how you can activate your Snowflake data with a feature store? Learn more about our integration with Snowflake here.

