Introduction to TF Serving
Guy Lecker | November 21, 2021
Machine learning (ML) model serving refers to the series of steps that allow you to create a service out of a trained model that a system can then ping to receive a relevant prediction output for an end user.
These steps typically involve required pre-processing of the input, a prediction request to the model, and relevant post-processing of the model output to apply business logic.
Out of the vast spectrum of tools and techniques that enable model serving, we will focus on TensorFlow Serving in this blog post.

Still, serving machine learning models is not a solo act. For a full-scale production system, other external processes perform a vital support role to model serving: services that fetch and ensure consistency of features between serving and training time, services that monitor and log requests, services that automatically deploy the latest model(s), to name a few.
If you are solely interested in technical guidance on TF Serving and TensorFlow production deployment, you can jump to the What TensorFlow Serving Can Do for You section for a hands-on guide tailored to different levels of experience.
However, if you are also curious about how model serving fits into the intertwined scene of MLOps and how to move toward MLOps maturity, you’ll be interested in what’s coming next.
The Need for MLOps and the Central Role of Model Serving
The history of machine learning has been marked by a few major game-changing events, with the 2012 deep learning revolution being one of the first to come to mind.
2020 was no different, with a new transformational topic becoming the top priority for all big companies and at conferences of all sizes: MLOps.
For many years, the focus of data science teams had been on collecting data and iterating through increasingly complex modeling techniques, with the aim of proving the value of investing in ML.
Once the offline value had been proven, data scientists and engineering teams found themselves with a new challenge: serving the models in production to prove their online value.
We didn’t know it then, but at that moment, the need for MLOps was born.

MLOps, i.e., DevOps for machine learning, is a discipline that aims to orchestrate and maintain the end-to-end machine learning lifecycle.
This lifecycle encompasses everything from defining the experimentation framework and automating training pipelines to CI/CD with feature drift monitoring and canary deployment; it also includes how engineering and science teams coordinate and model explainability.
While some of these terms exist in standard DevOps practices, others are entirely new since with MLOps, you not only need to put the code into production but two additional artifacts as well—data and models.
In the even-greater spectrum of tools and techniques that have emerged to tackle these unique MLOps needs, one pitfall teams should try to avoid is settling on a hybrid and disjointed catalog of tools and techniques that are hard to connect and maintain. In machine learning, more than in any other software discipline, the interplay between experimentation/development and production pipelines is circular and demands a unified MLOps infrastructure.
The only way to reach MLOps maturity is to keep it simple and manageable within a well-defined set of best practices so your teams can focus on inter-communication and business value.
Tools such as Iguazio and Kubeflow with TFX are examples of unified MLOps frameworks that you may want to explore to reach your full MLOps potential.
What TensorFlow Serving Can Do for You
TensorFlow Serving is one of the most classic serving systems for ML and has evolved over the years to cover an ever-wider range of production requirements.
The longevity and vast adoption of this tool are worth highlighting since these have yielded a lot of online support and inspiration for users, both new and old alike, which can make a real difference for developers.
Another important aspect to mention before diving into the technicalities is that TF Serving is for online serving—not batch serving. While the latter is performed offline with multiple data entries (e.g., scoring the probability that your customer base will respond positively to an email campaign), the former is performed online with single requests sent live (e.g., scoring an online transaction and stopping it if it is fraudulent).
You can typically perform batch serving using the same pipeline code and logic of training. With a bit of a simplification, you can just use a .predict() instead of a .fit() method.
Online serving, on the other hand, requires that you create an endpoint that can be pinged in real time within an often stringent latency budget and high availability requirements. This endpoint also needs to be hosted on a server outside the TF Serving offering.
Which server to use typically boils down to one question: managed or unmanaged? While it is typically recommended to go with managed tools such as AWS SageMaker or Iguazio, there are some reasons to prefer unmanaged solutions such as TensorFlow Serving on Kubernetes or virtual machines.
When SLAs are very strict or very specific settings are required, you can only obtain the customization required for optimization via unmanaged solutions. Hence, the need and beauty of ML tools such as TF Serving.
With this general understanding of where to host your server in mind, we can now discuss how to create the model server itself with TensorFlow Serving.
How Does TensorFlow Serving Work?
TensorFlow Serving has a flexible and high-performant architecture that allows performing real-time model serving at scale and with varying degrees of customization.
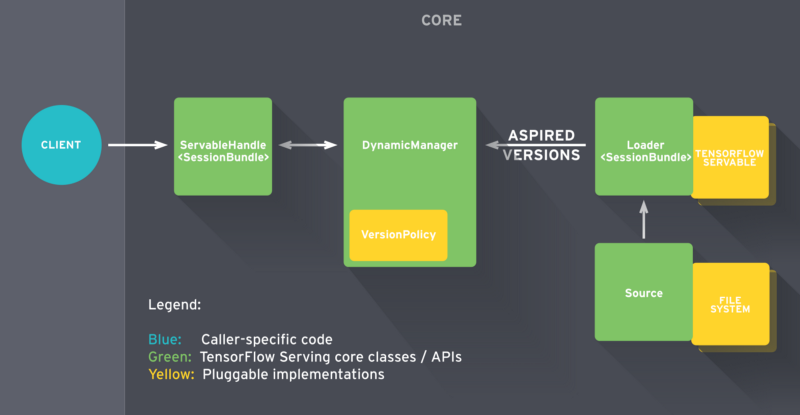
This architecture is composed of a few abstractions, as seen in Figure 3, each implementing its own API, highlighted in bold below.
The first abstraction is the Source component. It identifies model servables or differences in model servables on the filesystem (S3, local, custom, and more) by listening to a specific file path. Any model deployment needs one SavedModelBundle (or more if it is a composite model) and any relevant lookup tables for embeddings or vocabulary.
When a new model is identified, a Loader is created for that version to collect metadata, estimate system resources such as RAM, and output an Aspired Version. Once the DynamicManager receives the Aspired Version, it either creates a new deployment with the specified parameters if resources are available or requests an update for the existing model following the Version Policy.
The Version Policy can either preserve availability, i.e., have the two models coexist until the new one is fully loaded to guarantee continuity of service, or preserve resources, i.e. retire the old model and then load the new model afterward when resources are limited.
When the client sends a request, it will seamlessly receive the ServableHandle from the Manager with the requested model version loaded. The sequence of versions, in increasing order per their number, of a servable can be accessed via the servable stream. Finally, the Core manages the above lifecycle and metrics.
Now that you’ve had an overview of TF Serving’s powerful and user-friendly model journey, we can dive into the details of how to set up your model serving.
As previously mentioned, the framework has varying levels of customization that can be mapped to increasing levels of complexity in deployment. For this reason, we will arrange the how-to guide into Beginner, Intermediate, and Expert sections that build on top of each other to address increasingly complex functionalities.
Note: All sections assume a good base knowledge of TensorFlow.
A Beginner’s How-To Guide to Serving Models with TF Serving
Installing the Required Libraries
From an Ubuntu machine, run:
apt-get update && apt-get install tensorflow-model-server
pip install tensorflow==2.6.0
pip install tensorflow-serving-api==2.6.0 # match distribution of tensorflow
pip install requests==2.26.0 # for prediction requests via Python
Note: If you are using a Ubuntu virtual machine, you’ll need to provide the TF Serving distribution URI as a package source first by running:
echo "deb [arch=amd64] http://storage.googleapis.com/tensorflow-serving-apt stable tensorflow-model-server tensorflow-model-server-universal" | sudo tee /etc/apt/sources.list.d/tensorflow-serving.list && \
curl https://storage.googleapis.com/tensorflow-serving-apt/tensorflow-serving.release.pub.gpg | sudo apt-key add -
This installation flow should typically work. For any unexpected requirements, please refer to the official TensorFlow installation guide and make sure to be working in a clean Python3 virtual environment.
Creating the Model Servables
While TF Serving can also support frameworks other than TensorFlow, it is highly recommended to use TensorFlow for training your models when deploying with TF Serving.
After model training, TF Serving requires you to export the model in the SavedModel format. This TF-specific serialization format lets you save and restore a model’s weights in a protocol buffer file (saved_model.pb) along with variables/, assets/, and assets.extra/.
For a keras model, run: tf.keras.models.save_model(trained_model, export_path)
For other models, run: tf.saved_model.save(trained_model, export_path)
Here, trained_model is the model variable, and export_path is the file path to where you will save the model. It’s as simple as this.
Note: The above functionalities belong to Tensorflow 2.x. For TensorFlow 1.x models, which we recommend migrating from, you need to use SavedModelBuilder with SignatureDefs to export the model. Just use the following code:
sess = tf.compat.v1.InteractiveSession()
tensor_info_x = tf.saved_model.utils.build_tensor_info(model_input)
tensor_info_y = tf.saved_model.utils.build_tensor_info(model_output)
prediction_signature = tf.saved_model.predict_signature_def(
inputs={input_name: tensor_info_x},
outputs={output_name: tensor_info_y}
)
builder = tf.saved_model.builder.SavedModelBuilder(export_path)
builder.add_meta_graph_and_variables(
sess,
[tf.saved_model.SERVING],
signature_def_map={
tf.saved_model.DEFAULT_SERVING_SIGNATURE_DEF_KEY: prediction_signature
}
)
builder.save()
Here, model_input is the input variable to your model, and model_output is the output variable to your model, while input_name (e.g., ‘example’), and output_name (e.g., ‘predictions’) are how the model server expects input and output data to be addressed.
In both cases:
- You should concatenate a model version number to the export_path for traceability.
- You can explore the saved SignatureDef(s) by running
saved_model_cli show --dir $export_path.
Serving the Model
Given the model is accessible in a specified model_base_path folder, tensorflow-model-server will create a local server for you that can be accessed with the specified model_name via a gRPC request at the specified port (8500 by default) or via a REST API at the specified rest_api_port (anything different from the port).
So, input the following code:
tensorflow_model_server \
--port=8500 \
--rest_api_port=8501 \
--model_name=$model_name \
--model_base_path=$model_path
Here, $model_name and $model_path should be replaced by the relevant values.
For more information on available flags, please review the documentation you can find by inputting tensorflow_model_server --help.
Sending a Request to Your Model
You can send requests to your model server in different ways, typically either via Python or cURL. (There’s also a server API in C++.)
By default, tensorflow-model-server expects a gRPC request, which is preferred over a REST API because it is typically faster and more robust.
For cURL, run:
curl -X POST http://localhost:8501/v1/models/$model_name -d '{\"$input_name\": $input_example}'
For Python, run:
import requests
import json
API_ENDPOINT = "http://localhost:8501/v1/models/$model_name"
data = {"$input_name": $input_example}
response = requests.post(url = API_ENDPOINT, data = data)
Here, $input_name is the input name specified in the prediction_signature_def, and $input_example is an input value that matches the features the model has been trained on.
Shutting Down Our Server
To shut the server down, run:
ps aux | grep -i "tensorflow_model_server"
kill -9 PID
This will retrieve the PID of the tensorflow-model-server process and kill it. It’s not gracious, but it does the job.
An Intermediate How-To Guide to Serving Models with TF Serving
Containerizing the Model Application
When building any application, you should really be using Docker. So, assuming Docker is already correctly installed on your system, run the following code to create your server as a container in the background:
docker pull tensorflow/serving:2.6.0
docker run -t --rm -p 8500:8500 -p 8501:8501 -v $model_path -e $model_name -d tensorflow/serving &
You should replace $model_name and $model_path with the relevant values.
The container will run in detached mode (-d) with an allocated pseudo-tty (-t) and will be removed when it exits or when the daemon exits (--rm).
Note: If using GPUs can lead to better performance for your application, you may want to install tensorflow/serving:2.6.0-gpu instead and make sure your NVIDIA and nvidia-docker installation works as expected.
You should then serve the model on Kubernetes, or a managed Kubernetes version, for scalability and resilience.
Defining the Right Model Server Configuration
Your --model_name and --model_base_path allow you to serve a model quickly, but only one.
For more complex scenarios with multiple models where you need to configure options such as rollout strategies or polling frequency for new versions, you need to provide a ModelServer config file.
Your model’s config should contain something similar to:
model_config_list {
config {
name: 'my_first_model'
base_path: '/tmp/my_first_model/'
model_platform: 'tensorflow'
}
config {
name: 'my_second_model'
base_path: '/tmp/my_second_model/'
model_platform: 'tensorflow'
}
}
You can then provide the config file by adding the --model_config_file and --model_config_poll_wait_seconds flags to your TF Server start-up command. The latter simply instructs the server to periodically check for updated config files in the specified model_config_file file path.
One important consideration is that, by default, the server will serve the model with the latest version. You can, however, also define the --model_version_policy field to change this. For example, to serve two versions, you would input:
model_version_policy {
specific {
versions: 1
versions: 2
}
}
version_labels {
key: 'stable'
value: 1
}
version_labels {
key: 'canary'
value: 2
}
Then, the client would need to update their request to provide either a versions/<version number>, i.e., the value, or a labels/<version label>, i.e., the key, for the model.
An Expert How-To Guide on Serving Models With TF Serving
Batching Our Requests
Batching online requests together can be a good idea to optimize throughput performance and unlock the potential of accelerators such as GPUs that are I/O bound.
TF Serving allows you to perform request batching by setting the --enable_batching and --batching_parameters_file flags, where the batching.config file may look like:
max_batch_size { value: 64 }
batch_timeout_micros { value: 0 }
max_enqueued_batches { value: 100000 }
num_batch_threads { value: 4 }
Refer to TF’s Batching Guide for more information on how to set up these parameters.
Note: The scheduling for batching is done globally for all models and versions to ensure optimal resource utilization.
Monitoring the Server
TensorFlow Serving gives you the capability to connect to Prometheus to monitor metrics from your model server.
Simply provide the --monitoring_config_file flag to reference a MonitoringConfig, i.e., a protocol buffer file, which you can call “monitoring.config.” It would look like:
prometheus_config {
enable: true,
path: "/monitoring/prometheus/metrics"
}
Next, configure Prometheus Server to listen to your model server by providing the following to its deployment manifest:
containers:
- image: tensorflow/serving:latest
args:
- --port=8500
- --rest_api_port=8501
- --model_config_file=/models/models.config
- --monitoring_config_file=/etc/monitoring.config
You will also be able to check if the metrics are correctly exported at http://localhost:8501/monitoring/prometheus/metrics.
Customizing TF Serving
TF Serving lets you customize almost every service it has, including to:
- Serve TensorFlow models with custom ops
- Create a new kind of servable
- Build a custom ModelServer
- Define model warm-up via user-provided PredictionLogs in assets.extra/
- Package pre-processing (no post-processing) in the model servable via the estimator package
However, once you find yourself wanting to customize TF Serving, it could be time to look for something new.
What Comes After TF Serving?
Remember, model serving is only one part of the end-to-end machine learning lifecycle.
While TensorFlow Serving performs well as a standalone model server, other steps are usually required for putting models in production, such as data pre-/post-processing, lineage, monitoring, and automation.
You will need other tools to provide these capabilities to TensorFlow Serving. We recommend taking a look at open-source options like TensorFlow Extended and MLRun as a next step. The former is tailored for model training. The latter provides an end-to-end serverless MLOps orchestration framework—from development to deployment—that works anywhere, manages both data and models from any framework, and comes with a user-friendly interface as well. You can check out the quick start guide here.