The Complete Guide to Using the Iguazio Feature Store with Azure ML - Part 2
Nick Schenone | January 19, 2022
Part 2: Data Ingestion + Transformation into Iguazio's Feature Store
Recap
Last time, we discussed why organizations might require the functionality of a feature store like Iguazio's. In this blog, we will actually get into the project and cover the following:
- Detailed overview of Iguazio feature store functionality
- How to ingest and transform datasets into the feature store
- How to retrieve features in batch, ingest and transform the datasets into feature store, in real time
Overview of Iguazio's Feature Store
While some feature stores are more focused in their functionality, Iguazio's feature store is designed to facilitate the entire end-to-end workflow:

In the previous blog post, we discussed the Iguazio feature store at a high level. The functionalities include (but are not limited to) the following:
- Ingest and transform data sources in batch or real-time
- Easily retrieve features in batch or real-time
- Dual storage formats to facilitate batch and real-time workloads
- Complex real-time feature engineering (e.g., sliding window aggregations)
- Integration with model monitoring
- Integration with model serving
We will be exploring all of this functionality in this blog series.
Iguazio Terminology: FeatureSet and FeatureVector
The Iguazio feature store introduces two new terms:
FeatureSet: group of features from one data source (file, data frame, table, etc.)FeatureVector: group of features from one or moreFeatureSets (i.e. a few columns from here, a few columns from there)
These act as the building blocks of the Iguazio feature store and will be used heavily throughout this blog series. They fit into the overall picture as described in this diagram:
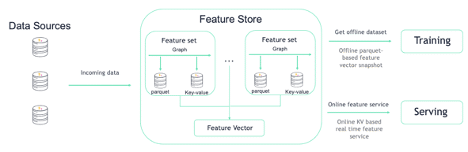
Each data source will be ingested as a FeatureSet with an optional transformation graph. Once ingested, the data will be stored as parquet for offline usage and KV for online usage.
From there, a FeatureVector is created as a combination of multiple FeatureSets. This allows for simple joining of multiple FeatureSets during retrieval using either the offline or online file format.
You can read more about the Feature Store, FeatureSet and FeatureVector in the MLRun documentation.
Feature Store Transformation Engines
Not only is the Iguazio feature store useful for ingesting and cataloging features, it can also be used to perform data transformations in batch and real time. These transformations will be added to the FeatureSet in the form of a transformation graph, where each step is a Python class. The Python class itself can be a pre-built class or a custom implementation.
What exactly the Python class does depends on the desired transformation engine. Currently, the feature store supports:

- Pandas
- Batch transformations that fit into memory
- Input Pandas data frame → transform → output pandas dataframe
- Spark
- Batch transformations that to not fit into memory
- Input Spark data frame → transform → output Spark data frame
- MLRun
- Real-time transformations (one record at a time)
- Input OrderedDict → transform → output OrderedDict
Implementing each of the different engines is quite simple and explained fully in the Feature Set transformation documentation.
Dataset Overview
In this blog series, we will use the Heart Disease Dataset from the UCI Machine Learning Repository to train a model that detects whether a given patient has heart disease.
For the purposes of this blog, I have generated a unique ID per record called patient_id, separated the features into a file titled features.csv, and separated the target into a file titled target.csv. We will be using these CSV files as the inputs for our feature store ingestion.
Feature Store Resources to Create
For this project, we will be creating the following resources in the feature store:
- FeatureSet #1:
heart_disease_features- Ingest data from local features.csv file
- Perform transformations in real-time to incoming data
- FeatureSet #2:
heart_disease_target- Ingest data from local target.csv file
- No transformations
- FeatureVector:
heart_disease_vec- Combine all features from
heart_disease_featuresand target variable fromheart_disease_targetinto singular dataset for training and serving
- Combine all features from
Ingest and Transform Feature Sets
Let's get into the actual code, starting with imports and creating the project:
# MLRun imports
import mlrun.feature_store as fstore
from mlrun.feature_store.steps import MapValues, OneHotEncoder
from mlrun.datastore.sources import CSVSource
from mlrun import get_or_create_project

# Create MLRun project
project = get_or_create_project(name="azure-fs-demo", context="./")
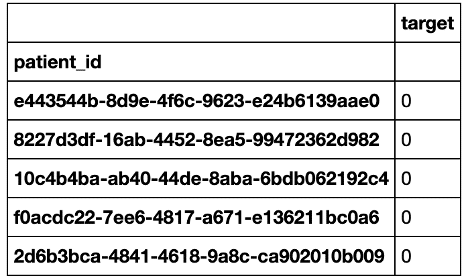
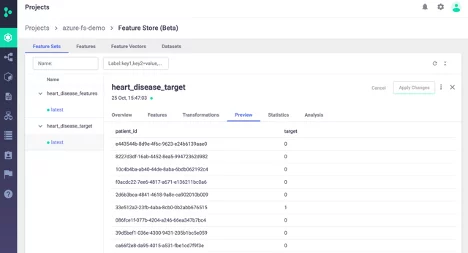
FeatureSet #2 Ingestion: heart_disease_target
The FeatureSet ingestion itself is fairly straightforward. We will start with heart_disease_target as there is no transformation component.
The raw target.csv dataset looks like this:

First, create desired FeatureSet:
# Create feature set with name and entity (primary key)
heart_disease_target = fstore.FeatureSet(name="heart_disease_target",
                                         entities=[fstore.Entity("patient_id")])

# Set default parquet/KV targets
heart_disease_target.set_targets()
To ingest, we simply pass in our newly created FeatureSet and desired source:
# CSV source - customizable
source = CSVSource("mycsv", path="target.csv")

# Ingest into feature store - returns transformed dataframe
resp = fstore.ingest(featureset=heart_disease_target, source=source)

# Print top 5 rows of newly ingested data
resp.head()
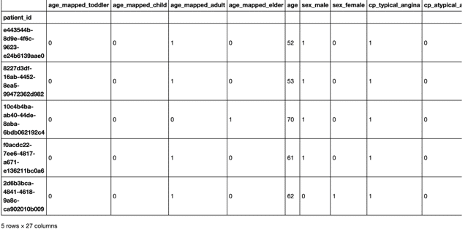
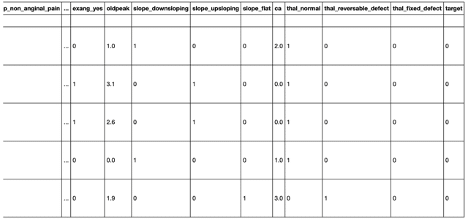
FeatureSet #1 Ingestion/Transformation: heart_disease_features
Next, we will ingest heart_disease_features and specify a transformation graph using the real-time engine. This will allow us to transform records as we ingest (in addition to re-using this graph later in the project during model serving).
The raw features.csv dataset looks like this:

First, create desired FeatureSet with transformation graph:
# Create feature set with name and entity (primary key)
heart_disease_features = fstore.FeatureSet(name="heart_disease_features",
                                           entities=[fstore.Entity("patient_id")])

# Set default parquet/KV targets
heart_disease_features.set_targets()

# Transformation mapping - specific to MapValues component
age_mapping = {'age': {'ranges': [{'range': [0, 3], "value": "toddler"},
                                  {'range': [3, 18], "value": "child"},
                                  {'range': [18, 65], "value": "adult"},
                                  {'range': [65, 120], "value": "elder"}]}}

# Transformation mapping - specific to OneHotEncoder component
one_hot_encoder_mapping = {'age_mapped': ['toddler', 'child', 'adult', 'elder'],
                           'sex': ['male', 'female'],
                           'cp': ['typical_angina', 'atypical_angina', 'non_anginal_pain', 'asymtomatic'],
                           'exang': ['no', 'yes'],
                           'fbs': [False, True],
                           'slope': ['downsloping', 'upsloping', 'flat'],
                           'thal': ['normal', 'reversable_defect', 'fixed_defect']}

# Add Python classes to transformation graph (with configuration)
heart_disease_features.graph.to(MapValues(mapping=age_mapping, with_original_features=True))\
                            .to(OneHotEncoder(mapping=one_hot_encoder_mapping))

# Print out transformation graph
heart_disease_features.plot(rankdir='LR', with_targets=True)

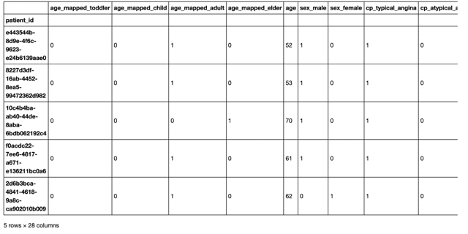
Like before, to ingest we simply pass in our newly created FeatureSet and desired source:
# CSV source - customizable
source = CSVSource("mycsv", path="features.csv")

# Ingest into feature store - returns transformed dataframe
resp = fstore.ingest(featureset=heart_disease_features, source=source)

# Print top 5 rows of newly ingested data
resp.head()
Create FeatureVector
Now that we have two FeatureSets, we will combine them into a singular dataset called a FeatureVector. The backend API will handle joining multiple data sources for us.
Creating the FeatureVector is quite simple as well:
# Create feature vector with list of features + desired label
# Specify in format of FEATURE_SET.FEATURE (or * for all)
vector = fstore.FeatureVector(
    name="heart_disease_vec",
    features=["heart_disease_features.*"],
    label_feature="heart_disease_target.target",
    with_indexes=True
)
That's it.
Retrieve Offline Features
To retrieve the FeatureVector using the offline (parquet) format, use this:
# Retrieve feature vector as pandas dataframe
# Specify in format of PROJECT/FEATURE_VECTOR
fstore.get_offline_features("azure-fs-demo/heart_disease_vec").to_dataframe().head()
Retrieve Online Features
In addition to offline features, we can utilize the online feature service that uses the online (KV) format:
# Retrieve online feature service
# Specify in format of PROJECT/FEATURE_VECTOR
feature_service = fstore.get_online_feature_service("azure-fs-demo/heart_disease_vec")
This allows us to do things like retrieve statistical information:
feature_service.vector.get_stats_table().head()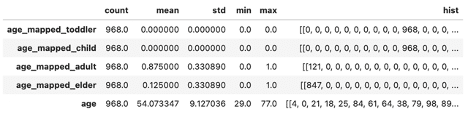
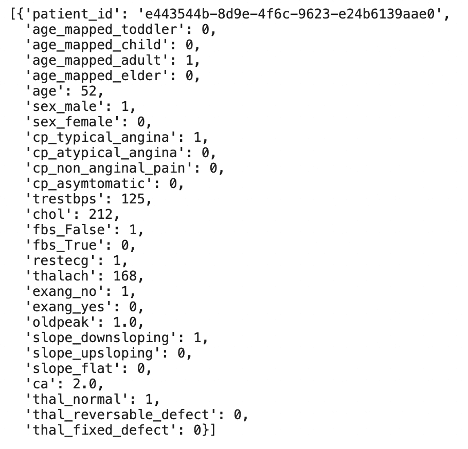
Or retrieve individual records with real-time speed:
# Retrieve record via entity (primary key)
feature_service.get([{"patient_id" : "e443544b-8d9e-4f6c-9623-e24b6139aae0"}])
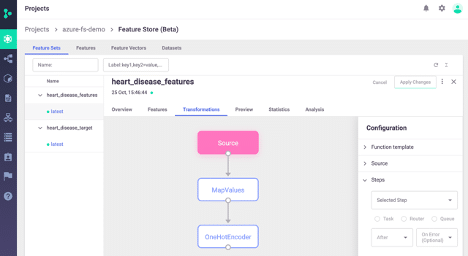
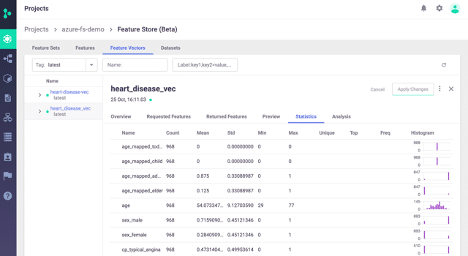
Feature Store UI
Finally, we can view everything we've done in the Iguazio project UI:
Next Steps
In the next two blogs, we will build upon the features we just ingested to build out a full end-to-end ML workflow using features from Azure and from Iguazio:
- E2E Hybrid Cloud ML Part 3: Model Training via Azure AutoML
- Upload/register features from Iguazio feature store into Azure ML
- Orchestrate Azure AutoML training job from Iguazio platform
- Download trained model(s) + metadata from Azure back into Iguazio platform
- E2E Hybrid Cloud ML Part 4: On-Premise Model Serving + Model Monitoring
- Deploy models to real-time HTTP endpoint
- Combine multiple models into voting ensemble
- Integrate model serving with real-time feature retrieval
- Integrate model serving with model-monitoring and drift-detection
If you would like to try this out for yourself or have any questions about this guide, feel free to ping me on the 

