The Complete Guide to Using the Iguazio Feature Store with Azure ML - Part 3
Nick Schenone | January 25, 2022
Part 3: Model Training with Azure ML and Iguazio
Recap
In part one and two, we introduced Iguazio's feature store and discussed the benefits of using one in the ML workflow. Additionally, we ingested and transformed the data that we will be using to train our model.
In this blog, we will do the following:
- Upload data from Iguazio into Azure and register dataset in Azure ML
- Train several models in Azure using Auto ML
- Retrieve trained models from Azure back to Iguazio
- Log trained models with experiment tracking and metrics
MLRun Function - Overview
Before running any code, we need to take a moment to discuss one of the core tenants of the Iguazio platform: the MLRun function.
This abstraction allows for simple containerization and deployment of code. Users are able to execute workloads on Kubernetes by specifying code and configuration options via high level Python syntax. An MLRun function will look something like this:
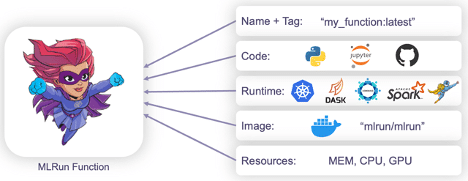
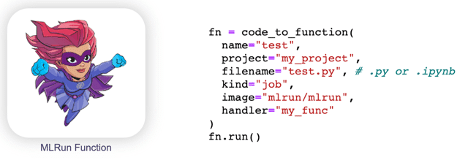
The function will have its own name/tag, code, docker image, resources, and runtime. The syntax for creating an MLRun function looks like the following:
From there, the code can be executed locally in Jupyter or on the cluster using several runtime engines including Job, Spark, Dask, Horovod, and Nuclio real-time functions.
Create Azure MLRun Function from Python File
Now that we have the background on what an MLRun function is, we are going to create one with our Azure code. I have written a Python file called azure_automl.py that performs several tasks such as:
- Upload the dataset from the feature store
- Register the dataset in AzureML
- Execute a training job using Azure AutoML
- Download the trained models back to Iguazio
- Log models with experiment tracking metadata such as labels and metrics
First we will configure our code to use the same project that our features reside in:
import mlrun
from mlrun import get_or_create_project, code_to_function, build_function, run_function

project = get_or_create_project(name="azure-fs-demo", context="./")
Next, we will use code_to_function from the MLRun library to convert our Python file into an MLRun function:
azure_automl = code_to_function(
    name="azure",                       # Name for function in project
    filename="azure_utils.py",          # Python file where code resides
    kind="job",                         # Kubernetes Job
)
azure_automl.save()                     # Save function in project
This will create our MLRun function and store it in the project. Now, we can execute our code on top of the Kubernetes cluster with ease.
Build Docker Image
However, the code requires some Python packages for Azure services that are not included in the default mlrun/mlrun Docker image. We can easily build our docker image and update our function with the following:
build_function(
    function="azure",                # Name of MLRun function we created
    skip_deployed=False,             # Force rebuild
    with_mlrun=False,                # MLRun already installed - no need to reinstall
    base_image="mlrun/mlrun:0.8.0",  # Base Docker image
    requirements="requirements.txt"  # Required packages
)
Because of how we configured our MLRun function, this one line of code will do the following:
- Fetch the function titled
azurefrom our project - Start building an image with the base image
mlrun/mlrun:0.8.0 - Install packages specified in
requirements.txt - Update the
azurefunction in the project with the newly built image
View MLRun Function in Project
Now that we have created our MLRun function and built the required Docker image, we can see what we built in the MLRun UI:
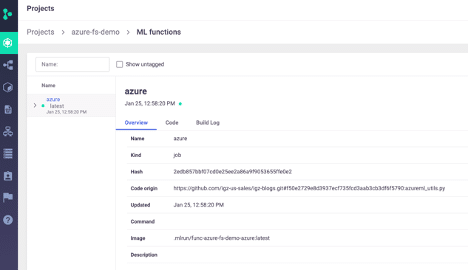
Here we can see some of the high level information including the name, code origin, runtime, and image. Additionally, we can see the code itself:

Note that these MLRun functions can be versioned. This is not a replacement for version control software like Git, but is a useful tool to track which models are tied to which version and how your code has changed over time.
Add Kubernetes Secrets
An additional step before executing our code is to create some project secrets. This will allow us to securely retrieve the Azure credentials without storing sensitive information in the code itself. We can easily do this like so:
mlrun.get_run_db().create_project_secrets(
    project.name,
    provider=mlrun.api.schemas.SecretProviderName.kubernetes,
    secrets={
        "AZURE_TENANT_ID": "XXXXXXXX",
        "AZURE_SERVICE_PRINCIPAL_ID": "XXXXXXXX",
        "AZURE_SERVICE_PRINCIPAL_PASSWORD": "XXXXXXXX",
        "AZURE_SUBSCRIPTION_ID": "XXXXXXXX",
        "AZURE_RESOURCE_GROUP": "XXXXXXXX",
        "AZURE_WORKSPACE_NAME": "XXXXXXXX",
        "AZURE_STORAGE_CONNECTION_STRING": "XXXXXXXX"
    }
)
This only ever needs to be run once to store the credentials in a Kubernetes secret. Do not commit these secrets to version control as they will allow anyone to spin up Azure resources.
To insert our secrets into the MLRun function, we will create a MLRun task like so:
secrets_spec = mlrun.new_task().with_secrets(
    kind='kubernetes',
    source=[
        'AZURE_TENANT_ID',
        'AZURE_SERVICE_PRINCIPAL_ID',
        'AZURE_SERVICE_PRINCIPAL_PASSWORD',
        'AZURE_SUBSCRIPTION_ID',
        'AZURE_RESOURCE_GROUP',
        'AZURE_WORKSPACE_NAME',
        'AZURE_STORAGE_CONNECTION_STRING'
    ]
)
We will use this when executing the code itself. Notice that we are only specifying the names of the secrets we want to retrieve—the values are stored securely as a Kubernetes secret.
Configure AutoML Job
Before executing our job, we need to specify what we want to run. Because we have wrapped all the functionality in our MLRun function, we only need to pass in some configuration parameters to our function.
There are many configuration parameters in this MLRun function including:
- Which FeatureVector or dataset to use
- Registered dataset name and description in Azure
- Azure experiment and compute settings
- Registered model name and AutoML settings in Azure
- How many models to save to Iguazio
For simplicity's sake, we will be using many of the default values for this function regarding Azure experiment name, compute settings, dataset/model names, etc.
The most important settings for configuring the job itself are specified here:
# Azure ML settings for model training
automl_settings = {
    "task": 'classification',
    "enable_early_stopping" : False,
    "allowed_models": ['LogisticRegression', 'SGD', 'SVM'],
    "iterations" : 5,
    "n_cross_validations": 5,
    "primary_metric": 'accuracy',
    "featurization": 'off',
    "model_explainability": False,
    "enable_voting_ensemble": False,
    "enable_stack_ensemble": False
}


# MLRun input for dataset - FeatureVector that we previously created
inputs = {
    "dataset" : "store://feature-vectors/azure-fs-demo/heart_disease_vec:latest"
}


# MLRun parameters for job
params = {
    "experiment_name" : "azure-iguazio-blog",
    "cpu_cluster_name" : "azureml-cpu",
    "dataset_name" : "iris",
    "dataset_description" : "iris training data",
    "register_model_name": "iris-model",
    "label_column_name" : "target",
    "save_n_models" : 3,
    "automl_settings" : automl_settings
}
From this configuration, we can see:
- We are doing a classification task
- We are using the FeatureVector from the previous blog
- The label for the training set is titled target
- We will train 5 models total without early stopping
- The models will be of type LogisticRegression, SGD, or SVM
- We will save the top 3 models based on accuracy back to Iguazio
There are many options that we can specify in automl_settings—an exhaustive list can be found in the Azure documentation.
Run Azure Auto ML
Last but certainly not least, we can run our AutoML job on Azure. The culmination of all our work so far can be expressed in a single line of code:
run_function(
    function="azure",                    # MLRun function in project
    handler="train",                     # Entrypoint Python function
    inputs=inputs,                       # Feature Vector input
    params=params,                       # Configuration parameters
    base_task=secrets_spec               # Insert secrets
)
As explained above, this will:
- Upload the dataset from the feature store
- Register the dataset in AzureML
- Execute a training job using Azure AutoML
- Download the trained models back to Iguazio
- Log models with experiment tracking metadata such as labels and metrics
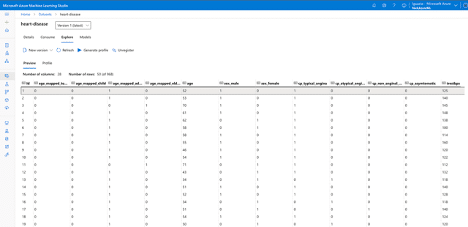
View Azure ML Training Job
Once our Azure job kicks off, we can use the Microsoft Azure Machine Learning Studio UI to keep track of everything.
This includes the registered dataset:
Also the completed job output:
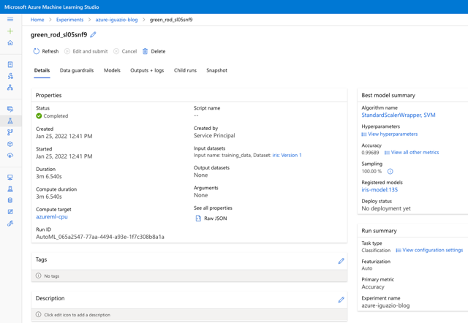
This page displays a lot of useful information including the time taken, the best model, evaluation metrics, and more. We can also view the individual child runs for the model training:
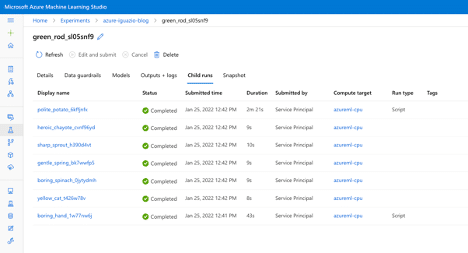
We can see there are 6 jobs total: one setup job and the five training jobs we specified. Each of these child runs has additional information on time taken, evaluation metrics, and more.
View MLRun Job
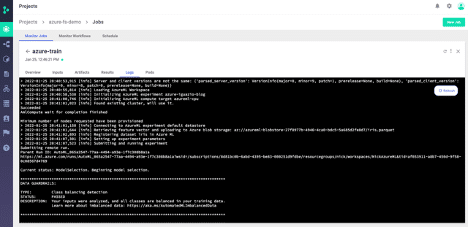
Although Azure ML is incredibly powerful and robust, the goal of this blog series is to integrate with Iguazio and bring the models back into the platform. Within the Iguazio UI, we can also view information about the job that ran.
This includes an overview of the job with parameters, results, and even a link to the function code itself:

Additional tabs include the model artifacts:

And Function logs:
All of this information is stored per run and can be retrieved via the UI as seen here or programmatically through a Python SDK.
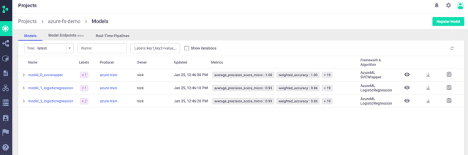
View Logged Models
Finally, we can view the models that were logged as part of this training run. We are storing the model itself plus metadata on the algorithm, evaluation metrics, and custom labels:
We can also view more detailed information per model:

This allows us to relate metrics, models, runs, code, and custom metadata all within the experiment tracking UI.
Overall, this combination allows for powerful integration between Iguazio's feature store and Azure's highly customizable AutoML training jobs—something that no single tool can do on its own.
Next Steps
In the final blog of this series, we will deploy the newly trained models on the Iguazio platform:
- E2E Hybrid Cloud ML Part 4: Hybrid Cloud + On-Premise Model Serving + Model Monitoring
- Deploy models to real-time HTTP endpoint
- Combine multiple models into voting ensemble
- Integrate model serving with real-time feature retrieval
- Integrate model serving with model-monitoring and drift-detection
Questions? Feel free to ping me on the 

