Best Practices
Learn how to configure your clusters and manage the cluster resources when running jobs and pipelines. Additional considerations are Spot vs. On-demand Usage, and Jupyter Service and Jupyter Image.
-
Provisioning of the servers is handled automatically by the platform installer (Provazio).
Don't attempt to provision the servers manually prior to the deployment. -
The data-node instances include Non-Volatile Memory Express (NVMe) SSD-based instance storage, which is optimized for low latency, very high random I/O performance, and high sequential read throughput. The data doesn't persist on the NVMe if the instance is stopped.
Don't attempt to shut down any of the data nodes, as it will erase the data.
App Cluster Configuration
It's recommended to separate the Iguazio system components and the user workload such that they run on different pools of servers. In managed Kubernetes clusters, the separation is done by using different node groups, which are called node pools in Azure.
In vanilla Kubernetes clusters, you can create the separation by labeling groups of application nodes. Users that are assigned the
It's strongly recommend to separate the development and production environments into different clusters.
When running on Kubernetes, consider the fundamentals of Kubernetes architecture and optimize the usage of resources in the cluster.
Development Cluster
The development environment’s compute resource requirements are usually more lenient in comparison to the production environment requirements, due to different availability needs. Nevertheless, development environments that support a substantial number of data scientists may end up using more resources than their production counterparts. Such environments typically have dedicated node groups for development work and for jobs. Recommendations for the development environment:
-
An initial node group that hosts the Iguazio core services. The core services enable users to access the cluster’s dashboards, and they provide the infrastructure to run and monitor the workloads. These services include MLRun, Nuclio, ML Pipelines, and Grafana.
- Mandatory minimum of 1 instance. Minimum of 2 instances are recommended for high availability.
- The size of the node group must be static (min = max).
- The instances must be on-demand (cannot be spot instances).
-
A development workload node group for Jupyter services:
- The size of the group and instances type can vary, depending on the workload.
- Can autoscale.
-
A development workload node group for MLRun jobs and Nuclio functions:
- The size of the group and instances type can vary, depending on the workload.
- Can autoscale.
If GPUs are needed, use a dedicated node group for the GPUs.
Production Cluster
The production cluster is comprised of a minimum of 2 node groups:
- An initial node group that hosts the Iguazio core services. The core services enable users to access the cluster’s dashboards, and they provide
the infrastructure to run and monitor the workloads. These services include MLRun, Nuclio, ML Pipelines, and Grafana.
- A minimum of 2 instances are required for high availability.
- The size of the node group must be static (min = max).
- Instances must be on-demand (cannot be spot instances).
- A user workloads node group that runs the application services that serve specific users, such as Jupyter, as well as MLRun jobs, and Nuclio functions.
- A minimum of 1 instance is recommended.
- The maximum number of instances depends on the anticipated workload.
- On-demand (not spot) instances are recommended. Heterogeneous node groups are optional.
If GPUs are needed, use a dedicated node group for the GPUs.
Node Selector (Node Groups)
Kubernetes Node selection can be used to specify where to run workloads (e.g. specific node groups, instance types, etc.). This is a more advanced parameter mainly used in production deployments to isolate platform services from workloads. It is supported for all cloud platforms and is relevant for:
- Jupyter
- Trino (The node selection also affects any additional services that are directly affected by Trino, for example hive and mariadb, which are created if Enable hive is checked in the Trino service.)
- Grafana
- Shell
- MLRun
- Nuclio
Node Selection for MLRun
Configuration
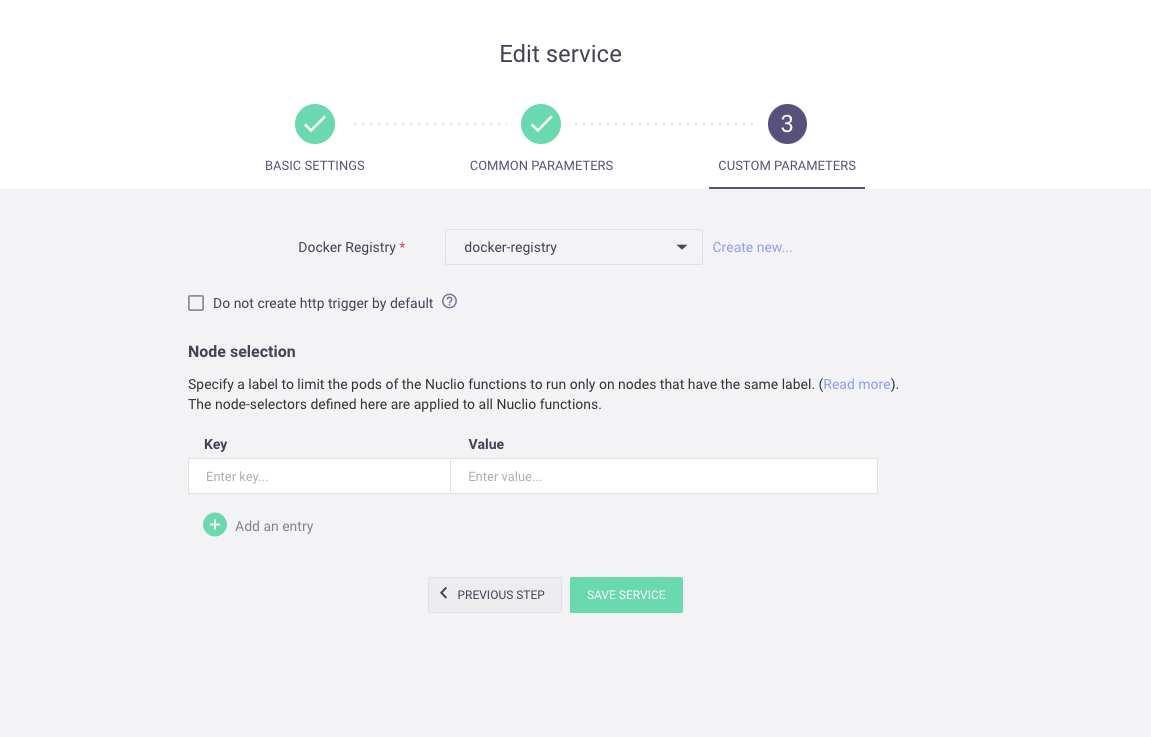
- Configure node selection on the service level in the service's Custom Parameters tab, under Node selection, by adding or removing Key:Value pairs.
For MLRun jobs and Nuclio functions, this is the default node selection.
- MLRun projects: Configure node selection on the projects level in the Projects | Settings, by adding or removing Key:Value pairs.
- MLRun jobs: Configure node selection for individual MLRun jobs when creating a Batch run by going to Platform dashboard | Projects | New Job | Resources | Node selector, and adding or removing Key:Value pairs.
- Nuclio function: Configure the node selection for individual Nuclio functions when creating a function in the Confguration tab, under Resources, by adding Key:Value pairs.
Requests and Limits
Before getting into the recommendations, take a moment to understand how the CPU/GPU/Memory requests and limits for a pod (the underlying running entity of every function/job/service) affect the pod.
Requests and Limits define how much memory, CPU, and GPU, the pod must have to be able to start to work, and its maximum allowed consumption. However, for different resources it may have other implications.
-
Memory:
- Requests: Mainly affects scheduling but also affects the eviction decision in case of Node memory pressure.
- Limits: When a pod’s memory consumption crosses its limit, the pod is killed. Whether or not it gets rescheduled to a new one depends on other factors. A good rule of thumb is that Nuclio functions and Iguazio services do get rescheduled to a new pod, and MLRun jobs (other than Nuclio) do not.
-
CPU:
- Request: Affects the size of the CPU slice (runtime) that the pod gets every minute. This is used with respect to other pods running in the system. Avoid changing this value except in cases where your workload requires Guaranteed QoS (see note), or if you are using CPU request as a metric for scaling up a function. The Iguazio system sets the same CPU request for all user workloads by default, making them equal in the eyes of Linux.
-
GPU: GPU does not have the notion of request vs. limit. In this case, request = limit. Even if you don't configure this, it is done implicitly by the system.
For workloads whose completion must be guaranteed, the “Kubernetes Guaranteed QoS” class is recommended. With this QoS class, the pod’s resources are secured to it and only in rare cases would it be affected by other workloads (that have exhausted the node resources). To create a pod with a guaranteed QoS,set the memory request to equal its limits, and the same for its CPU. (Remember, GPU has no notion of request vs. limit). This ensures that the pod preserves its required resources.
When using guaranteed QoS:
- This pod has higher priority than other pods that are not assigned with guaranteed QoS with respect to two important aspects: CPU time and eviction, and when the node is overloaded.
- Pods with high requests (memory/CPU) might not find a node to run on and thus can remain in “Pending state” for a long time. One way to overcome this is to use auto-scaling that provisions additional nodes to run these jobs.
- It’s a good idea to require more resources from your cluster, as these resources are reserved for this pod even if they are not used by it.
If your cluster is configured according to these guidelines, and separates the workloads and Iguazio core services, then you should consider using guaranteed QoS for all your workloads, thereby avoiding the risk of getting the nodes into an OOM scenario and which increases the chances of your workload being evicted.
Though guaranteed QoS is mainly targeted for production systems, it can also be applicable for development environments, especially when running a large cluster with many Jupyter services, to avoid issues during critical development processes.
In a development environment, resource consumption may vary on a regular basis and users may employ different strategies. Be aware that any configuration where the resources are not equal to the limit increases the risk of pods eviction. Guaranteed QoS, however, is more expensive in terms of resources, and you need to balance your needs with your available resources.
Configure the service's requests and limits in the service's Common Parameters tab under Resources. Configure the default function limits in the in the service's Common Parameters tab under User jobs defaults, and function-specific limits in the Configuration tab of the function.
See more details in the Kubernetes documentation: Resource Management for Pods and Containers.
Auto-scaling
In environments where node auto-scaling is available, auto-scaling is triggered in situations where pods cannot be scheduled to any existing node due to lack of resources. In situations where pod requests for CPU/Memory are low, auto-scaling may not be triggered since pods could still be placed on existing nodes (per their low requests), even though in practice they do not have the needed resources as they near their (much higher) limits and might be in danger of eviction due to OOM situations.
Auto-scaling works best when jobs are created with limit=request. In this situation, once resources are not sufficient, new jobs are not scheduled to any existing node, and new nodes are automatically added to accommodate them.
When working with a different strategy, as mentioned above for development environments, additional attention is required to ensure auto-scaling is effective in the environments.
Auto-scaling is a node-group configuration.
Pod Priorities
Priority classes are a mechanism in Kubernetes to control the order in which pods are scheduled and evicted — to make room for other, higher priority pods. Priorities also affect the pods’ evictions in case the node’s memory is pressured (called Node-pressure Eviction).
Iguazio pre-installs several priority classes in the Kubernetes cluster. Some classes are reserved for Iguazio system’s services usage.
There are 3 priority classes reserved for user workloads that are named low, medium and high. By default, all jobs created by MLRun
and nuclio have a medium priority. It's recommended to assign a higher priority class to jobs with higher priority.
Configure pod priority in the service's Common Parameters tab or in the Configuration tab of the function.
Spot vs. On-demand Usage
Node selector is relevant for MLRun and Nuclio only. It is supported for all cloud platforms.
When running ML functions you might want to control whether to run on spot nodes or on-demand nodes. Preemption mode controls whether pods can be scheduled on preemptible (spot) nodes. Preemption mode is supported for all functions.
Preemption mode uses Kubernetes Taints and Tolerations to enforce the mode selected.
On-demand instances provide full control over the instance lifecycle. You decide when to launch, stop, hibernate, start, reboot, or terminate it. With Spot instances, you request capacity from specific available zones, though it is susceptible to spot capacity availability, and spot instances may be interrupted and removed on a short notice. This is a viable choice if you can be flexible about when your applications run and if your applications can be interrupted.
Here are some questions to consider when choosing the type of node:
- Is the function mission critical? Must it be operational at all times?
- Is the function a stateful function or stateless function?
- Can the function recover from unexpected failure?
- Is this a job that should run only when there are inexpensive resources available?
When an MLRun job is running on a spot node and it fails, it is not automatically restarted. However, if Nuclio goes down due to a spot issue, it is brought up by Kubernetes.
Best practice
Avoid running any stateful applications (e.g. training job, Spark job) on spot instances. If you do run a stateful
application using a spot instance, you need to have a manual mitigation to start up the job again if spot failure should occur.
Kuberenetes has a few methods for configuring which nodes to run on. To get a deeper understanding, see Pod Priority and Preemption. Also, you must understand the configuration of the spot nodes as specified by the cloud provider.
Configure spot nodes in the Configuration tab of the function.
Jupyter Service and GPUs
A Jupyter service that is using GPUs should be configured with the scale to zero option.
Jupyter Image and Installing Packages
The platform allows new system packages installation within the Jupyter image by running the apt-get command. However, those packages are
not persistently stored on the V3IO and exist only within the container, meaning that they are deleted upon restart of the Jupyter
service. If persistence for those packages is needed, the installation commands for those packages can be added to startup hook script,
which runs before Jupyter is launched. You can also add jupyter extensions or other modifications. The jupyter startup script is in /User/.igz/startup-hook.sh.
If it exists, it is executed just before Jupyter is launched (after all other launch steps and configurations). Any failure of the script
is ignored in order to avoid unnecessary Jupyter downtime.
You can use Conda and pip, which are available as part of the Jupyter Notebook service, to easily install Python packages such as Dask and machine-learning and computation packages. Your choice of pip or conda depends on your needs; the platform provides you with a few options.
Jupyter comes with a few prebaked conda environments:
- base:
*/conda - jupyter:
/conda/envs/jupyter - mlrun-base:
/conda/envs/mlrun-base - mlrun-extended:
/conda/envs/mlrun-extended
The prebaked environments are consistent for pip, but are not persistent for Conda. If you are only using pip, you can use the prebaked Conda environments. If you need to use Conda, create or clone an environment. When you create or clone an environment, it is saved to the V3IO fuse mount by default (/User/.conda/envs/<env name>) and is persistent for both pip and Conda. Since MLRun is pip-based, it's recommended to use pip whenever possible to avoid dependency-conflicts.
See full details and examples in Creating Python Virtual Environments with Conda.