Installing the Platform on Google Cloud Platform (GCP)
Overview
This guide outlines the required steps for installing (deploying) an instance of the Iguazio AI Platform ("the platform") to Google Cloud Platform (GCP). When you complete the procedure, you'll have a platform instance running under your GCP account. Install the platform with the Provazio installer, with your GCP credentials.
-
Provisioning of the servers is handled automatically by the platform installer (Provazio).
Don't attempt to provision the servers manually prior to the deployment. -
The data-node instances include Non-Volatile Memory Express (NVMe) SSD-based instance storage, which is optimized for low latency, very high random I/O performance, and high sequential read throughput. The data doesn't persist on the NVMe if the instance is stopped.
Don't attempt to shut down any of the data nodes, as it will erase the data.
Prerequisites
Before you begin, ensure that you have the following:
- A Provazio API key and a Provazio vault URL, received from Iguazio.
- Iguazio Platform version provided by Iguazio Support (for example, 3.6.0-nnnnn ).
- Administrative access to a GCP account.
- A machine running Docker.
- Access to the internet, or a preloaded Provazio Docker image (
gcr.io/iguazio/provazio-dashboard:stable ), received from Iguazio as an image archive (provazio-latest.tar.gz ). - The Kubernetes Engine in your GCP account is enabled.
Deployment Steps
To deploy an instance of the platform to an AWS cloud, execute the following steps.
Step 1: Create a Service Account | Step 2: Configure the installation environment | Step 3: Run the platform installer | Step 4: Access the installer dashboard | Step 5: Choose the AWS scenario | Step 6: Configure general parameters | Step 7: Configure cluster parameters | Step 8: Configure cloud parameters | Step 9: Review the settings | Step 10: Wait for completion
Step 1: Create a Service Account
Follow the Creating a GCP Service Account guide to create a service account with the required credentials for performing the installation.
Step 2: Configure the Installation Environment
Create a <...> placeholders with the information for your environment:
dashboard:
  frontend:
    cloud_provider_regions:
      gcp:
        - <GCP Region>
client:
  infrastructure:
    gcp:
      project_name: <Full Project Name>
      zone: <Zone>
      application_credentials: |


        <JSON Key File Content>


  vault:
    api_key: <Provazio API Key>
    url: <Provazio vault URL>
provisioning:
  whitelisted_services: ["*"]
- GCP Region
- The GCP region, for example, "us-east1".
- Full Project Name
- The full project name that the platform will be deployed in.
- Zone
- GCP zone , for example, "us-east1-b".
- JSON Key File Content
- The JSON key that was saved in Creating a GCP Service Account.
- Provazio API Key
- A Provazio API key, received from Iguazio (see the installation prerequisites).
- Provazio Vault URL
- A Provazio vault URL, received from Iguazio (see the installation prerequisites).
Step 3: Run the Platform Installer
Run the platform installer, Provazio, by entering the following command from a command-line shell:
docker pull gcr.io/iguazio/provazio-dashboard:stable && docker run --rm --name provazio-dashboard \
    -v /tmp/env.yaml:/tmp/env.yaml \
    -e PROVAZIO_ENV_SPEC_PATH=/tmp/env.yaml \
    -p 8060:8060 \
    gcr.io/iguazio/provazio-dashboard:stable
Step 4: Access the Installer Dashboard
In a web browser, browse to localhost:8060 to view the Provazio dashboard.
Select the plus-sign icon (
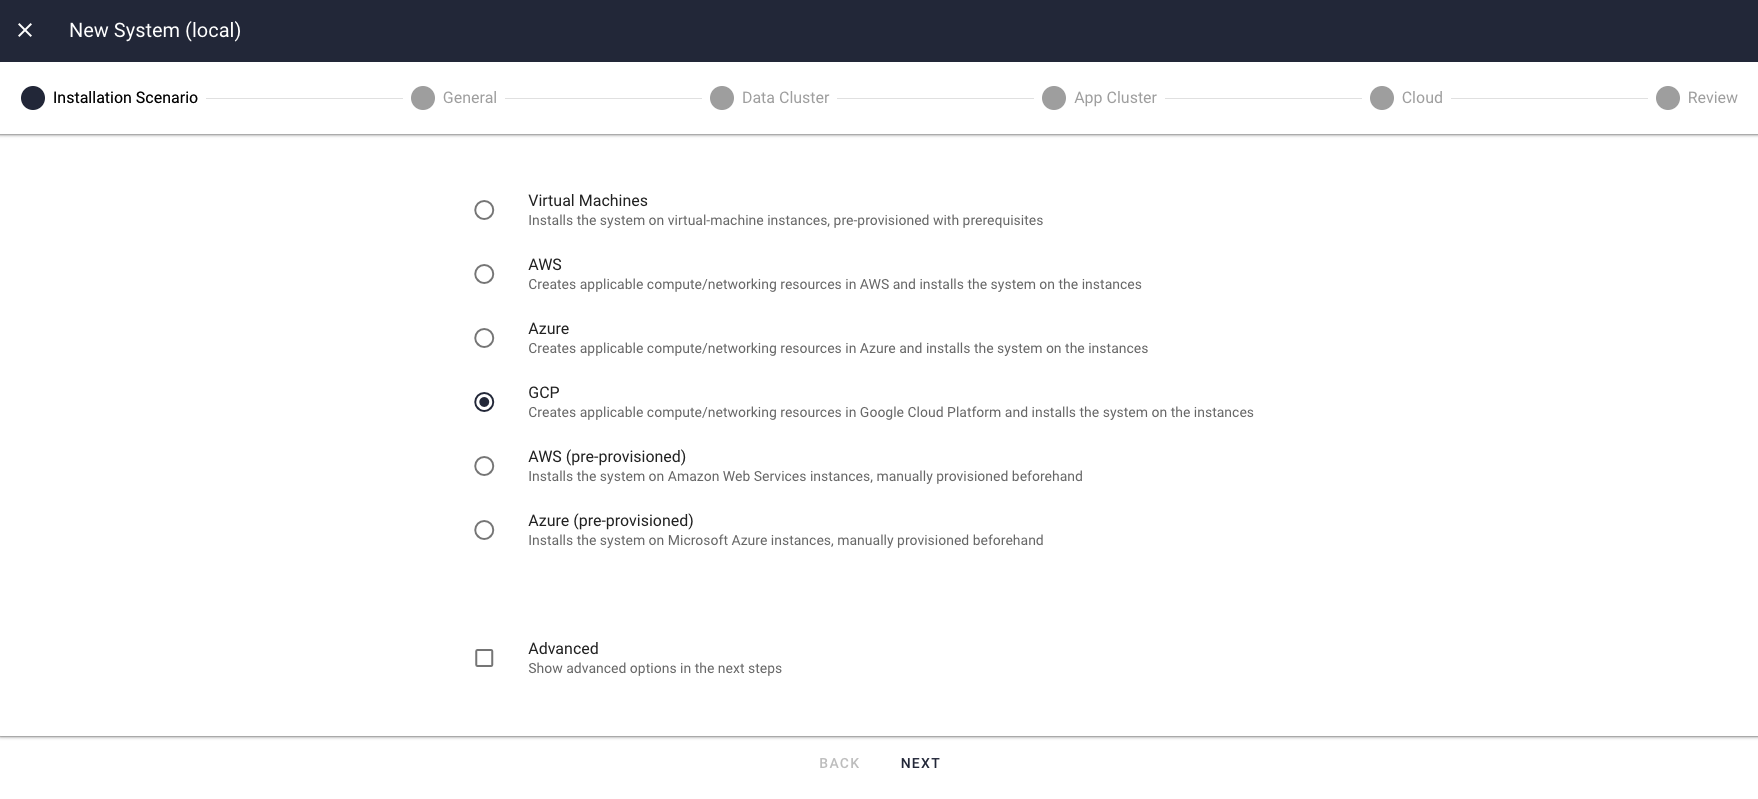
Step 5: Choose the GCP Scenario
In the
Step 6: Configure General Parameters
On the 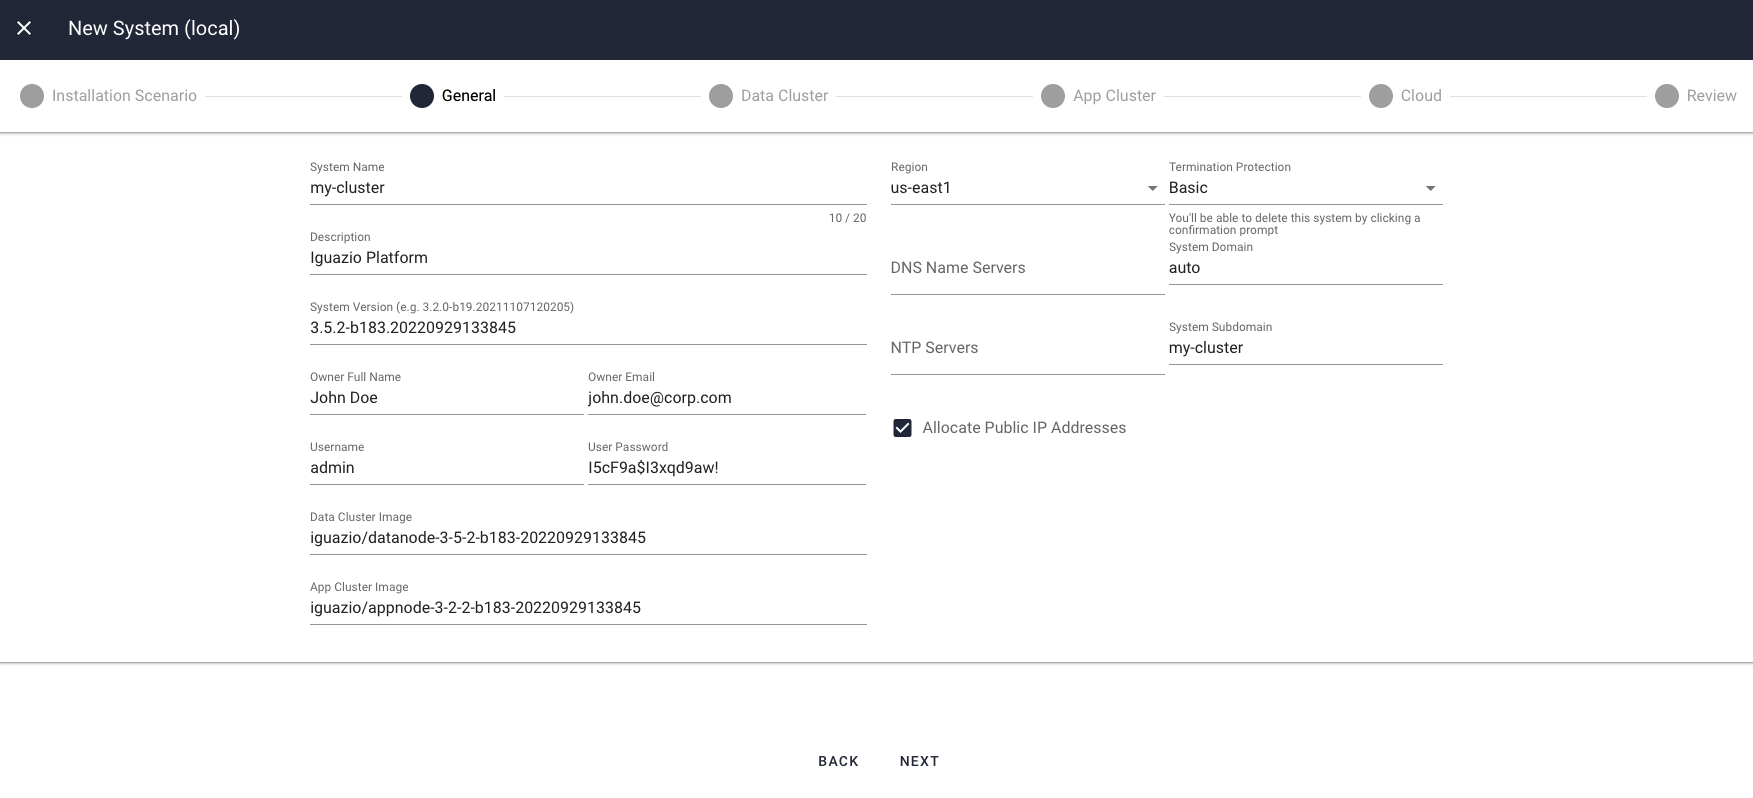
- System Name
A platform name (ID) of your choice (for example, "my-platform-0"). The installer prepends this value to the value of the
System Domain parameter to create the full platform domain.- Valid Values: A string of 1–12 characters; can contain lowercase letters (a–z) and hyphens (-); must begin with a lowercase letter.
- Default Value: A randomly generated lowercase string.
- Description
- A free-text string that describes the platform instance.
- System Version
- The platform version. Insert the release build number that you received from Iguazio (for example, "3.0_b51_20210308021033").
- Owner Full Name
- An owner-name string, containing the full name of the platform owner, for bookkeeping.
- Owner Email
- An owner-email string, containing the email address of the platform owner, for bookkeeping.
- Username
The username of a platform user to be created by the installation. This username will be used together with the configured
password to log into the platform dashboard. You can add additional users after the platform is provisioned.- User Password
A platform password for the user generated by the installation — to be used with the configured
username to log into platform dashboard; see the password restrictions. You can change this password after the platform is provisioned.- Region
- The region in which to install the platform.
- System Domain
A custom platform domain (for example, "customer.com"). The installer prepends the value of the
System Name parameter to this value to create the full platform domain.- Allocate Public IP Addresses
- Check this option to allocate public IP addresses to all of the platform nodes.
- # of Nodes
- The number of nodes to allocate for the cluster.
- Node Size
- The instance type, which determines the size of the clusters' nodes.
- Root Block Device Size
- The size of the OS disk.
- Kubernetes Kind
- Leave this set to
New GKE Cluster . - GKE Master Version
- The Kubernetes version that GCP is currently using by default to provision a GKE cluster. For instruction on how to get the current version, see the GKE page that describes checking versions.
- Location Type
One of:
- Zonal: Resources that are hosted in a zone are called per-zone resources. Zone-specific resources, or per-zone resources, are unique to that zone and are only usable by other resources in the same zone.
- Regional: Regional resources are accessible by any resources within the same region. See more details in GKE Regional clusters
- Root Block Device Size
- The size of the OS disk.
- Node Groups
The installer predefines a node group named, by default, "initial". You can configure the following parameters:
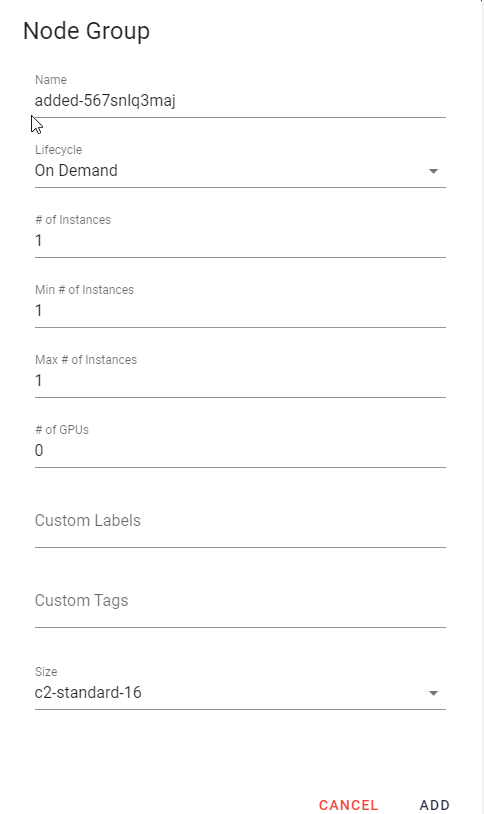
- Name—the name of the node group
- Lifecycle—the lifecycle of the node group:
- On Demand—recommended for applications with workloads that cannot be interrupted
- Spot—cost-effective instances that are flexible about when applications are run and if they can be interrupted. When creating Spot lifecycle type node groups, you need to configure the parameters for each node in the group.
- # of instances—the number of node instances in the group
- Min. # of instances—the minimum number node instances in the group when the group scales down
- Max. # of instances—the maximum number node instances in the group when the group scales up
- # of GPUs—the number of GPUs to be used in the group
- Custom Labels—user defined labels for the resources in the group
- Custom Tags—user defined tags for the resources in the group
- Size—the desired size of the node group
- Limit Services to Initial Node-Group
- Select this if you want all services that are running on the app cluster to be assigned to the initial node group.
- Use Loadbalancer
- Select if you want to use load balancing.
- Use System Registry URL (Optional)
Specify the GCR URL to store the container images used for installation of your system (mlrun api image, nuclio dashboard image, v3io image, flex-fuse image, etc.). This is useful if you need to store your system images on your own registry. You must ensure that the Kubernetes is deployed with a role that allows it to read/write to the specified registry.
Type in the registry URL, and select the Name Scheme from the drop-down list.
If not specified, managed Kubernetes deployments use the Iguazio default container registry: gcr.io/iguazio.
- Use Custom User Docker Registry
- The User Registry stores the user container images, for example, Nuclio container image, MLRun run function image. Operational clusters require a Custom User Docker Registry (that you provide). You can connect to it by specifying the URL and credentials either during installation, or post-installation. See more details in Docker Registry.
- Configure the cloud NAT that is attached to the VPC on which the cluster will be deployed.
- Configure the master IPv4, as required by the GCP/GKE, for example 10.0.0.0/28. Each subnet must be different than the subnet that is used by the resources in the VPC (cluster).
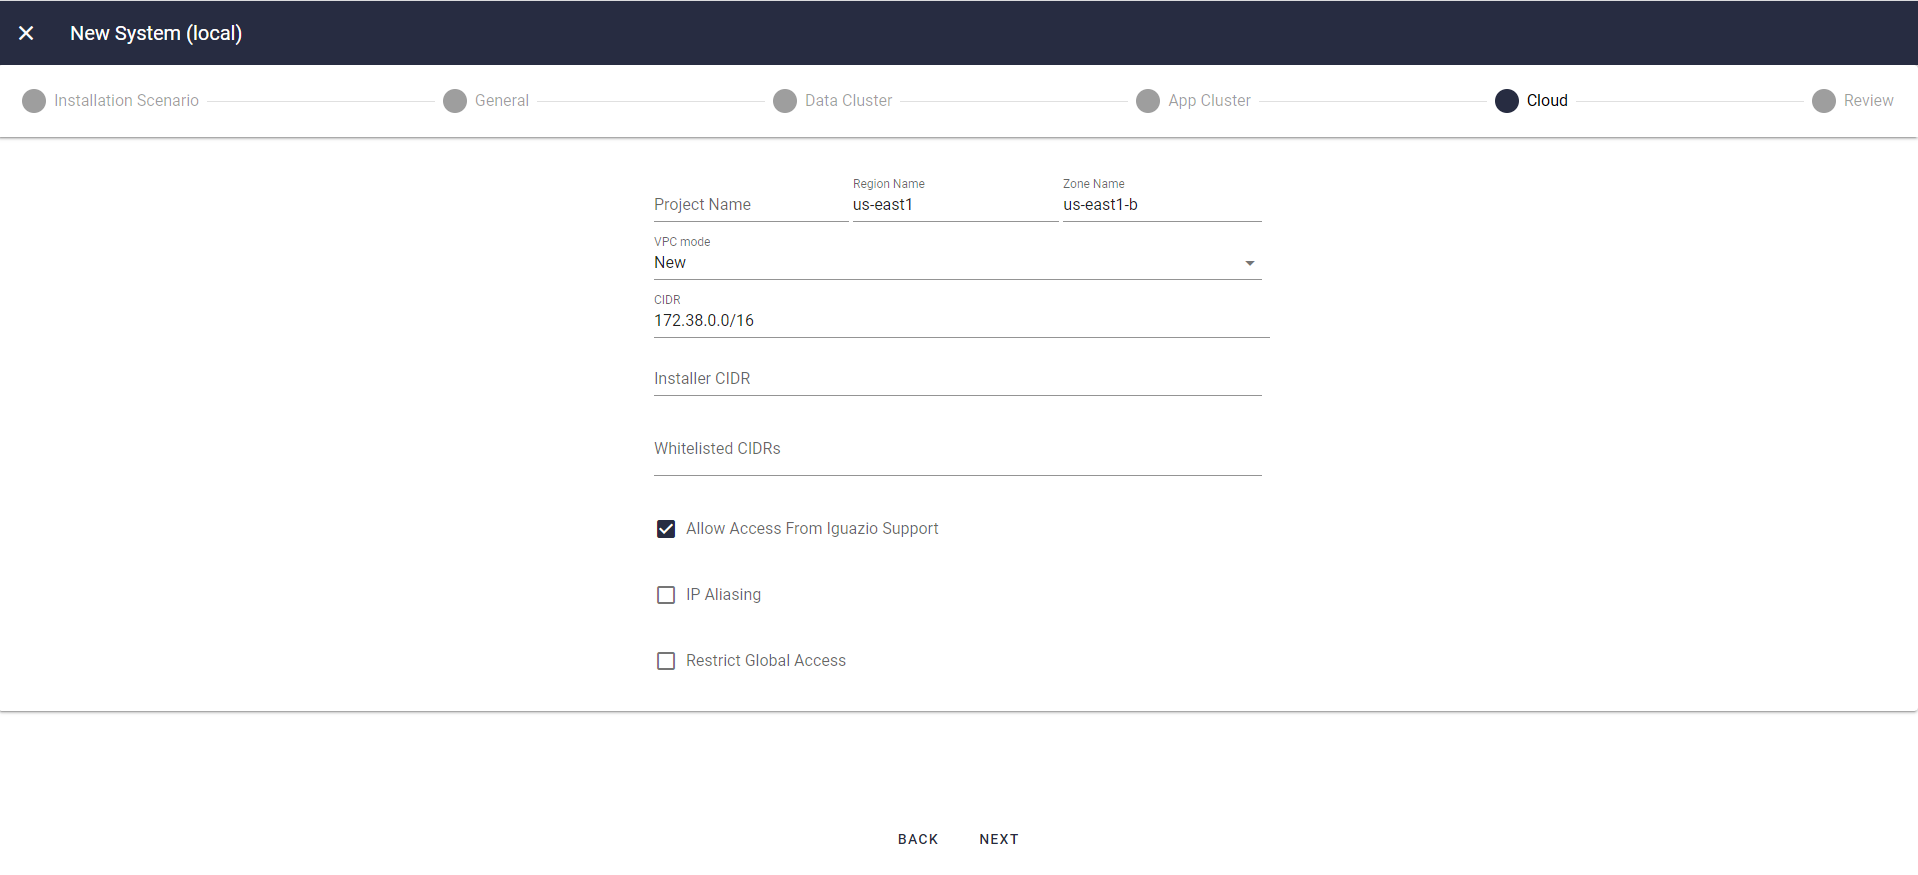
- IP Aliasing: When checked, it ensures a VPC-native cluster whose traffic is routed between pods using a VPC network, and that is able to route to other VPCs across network peerings.
- To make the cluster unavailable from the outside world, check the
Restrict Global Access checkbox. - You must use a load balancer when using public IPs.
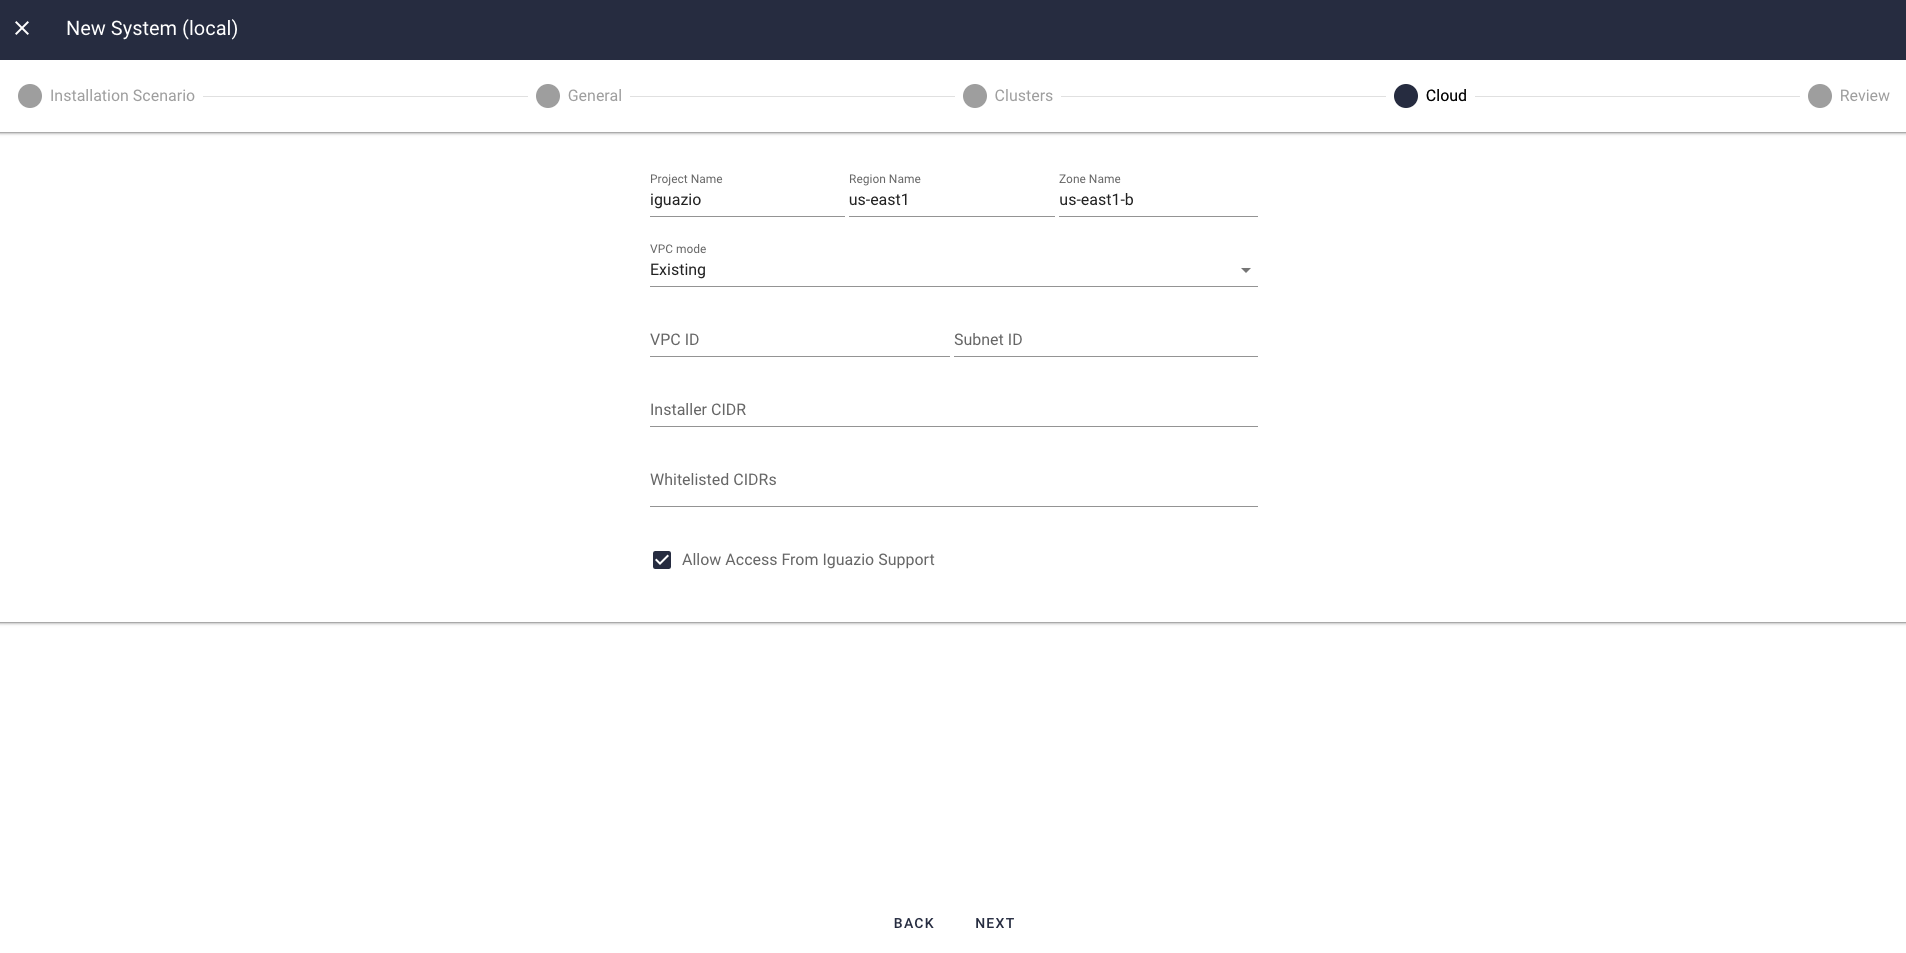
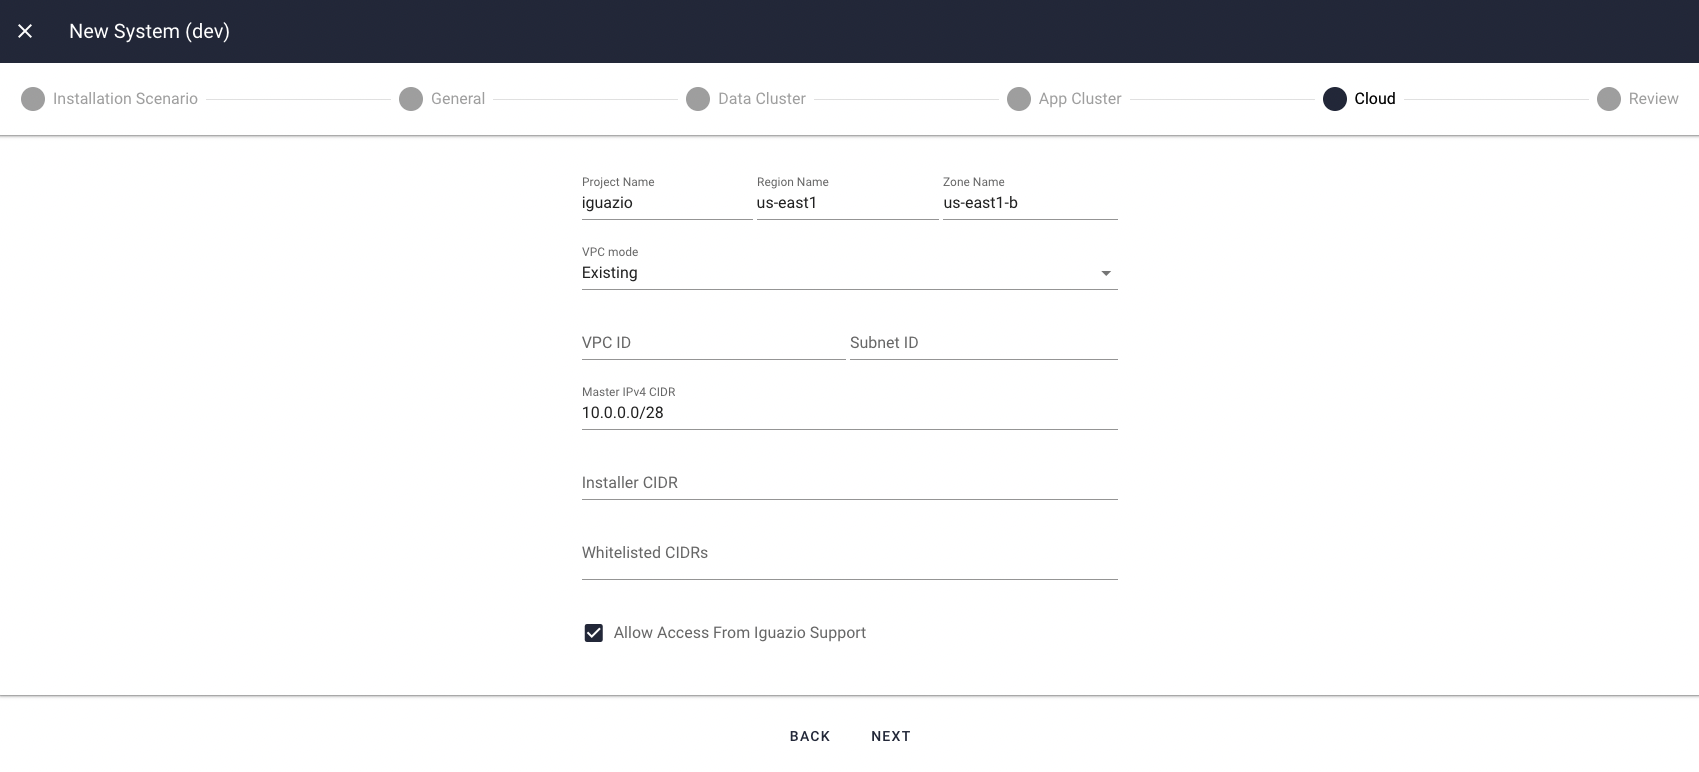
- Project Name
- The full name of your GCP Project.
- Region Name
- The GCP region, for example, "us-east1".
- Zone Name
- GCP zone, for example, "us-east1-b".
- VPC mode
The cloud configuration configures the platform's virtual private cloud (VPC) networking. You can select between two alternative VPC modes:
New — Create a new VPC and install the platform in this VPC.Existing — Install the platform in an existing VPC.
- Master IPv4 CIDR
- This is a subnet used internally by GKE. It must be different than the CIDR that is used for the cluster resources. This parameter appears only when the GKE is a private cluster.
- Whitelisted CIDRs
- A list of classless inter-domain routing (CIDR) addresses to be granted access to the platform's service port (for example, "200.40.0.1/32"). This parameter is typically relevant when the platform has public IP addresses. For a platform without public IP addresses, you can leave this parameter empty, assuming you have access to the VPC from your network.
- Installer CIDR
- The CIDR of the machine on which you're running the platform installer (for example, "10.0.0.1/32").
- Allow Access from Iguazio Support
Check this option to allow Iguazio's support team to access the platform nodes from the Iguazio network This parameter is applicable only when the platform has public IP addresses (see the
Allocate Public IP Addresses general-configuration parameter).- Restrict Global Access
- Check this option to restrict access to the web service (HTTP and HTTPS only) to only the IPs listed in Whitelisted CIDRs (does not open 0.0.0.0 over port 443,80). Access to the server is load-balanced.
Step 7: Configure Cluster Parameters
Common Parameters (Data and Application Clusters)
The following parameters are set for both the data and application clusters. Node references in the parameter descriptions apply to the platform's data nodes for the data cluster and application nodes for the application cluster (GKE).
Data-Cluster Parameters
On the 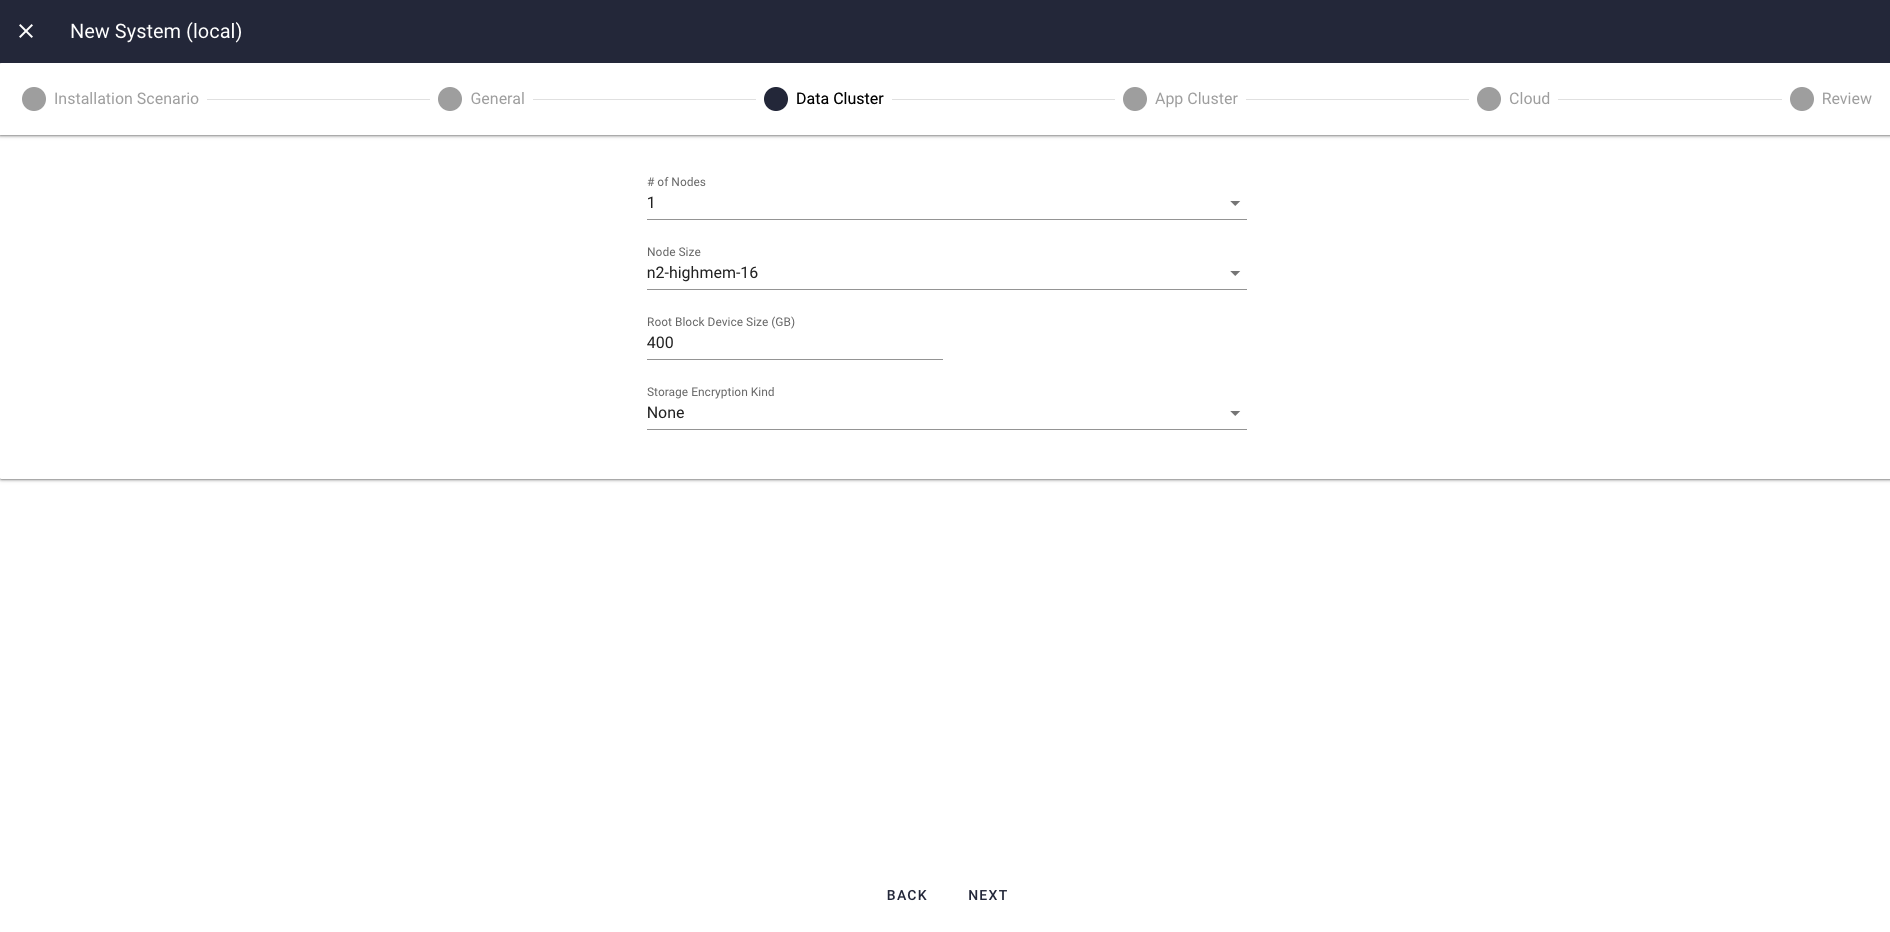
Application-Cluster Parameters
On the 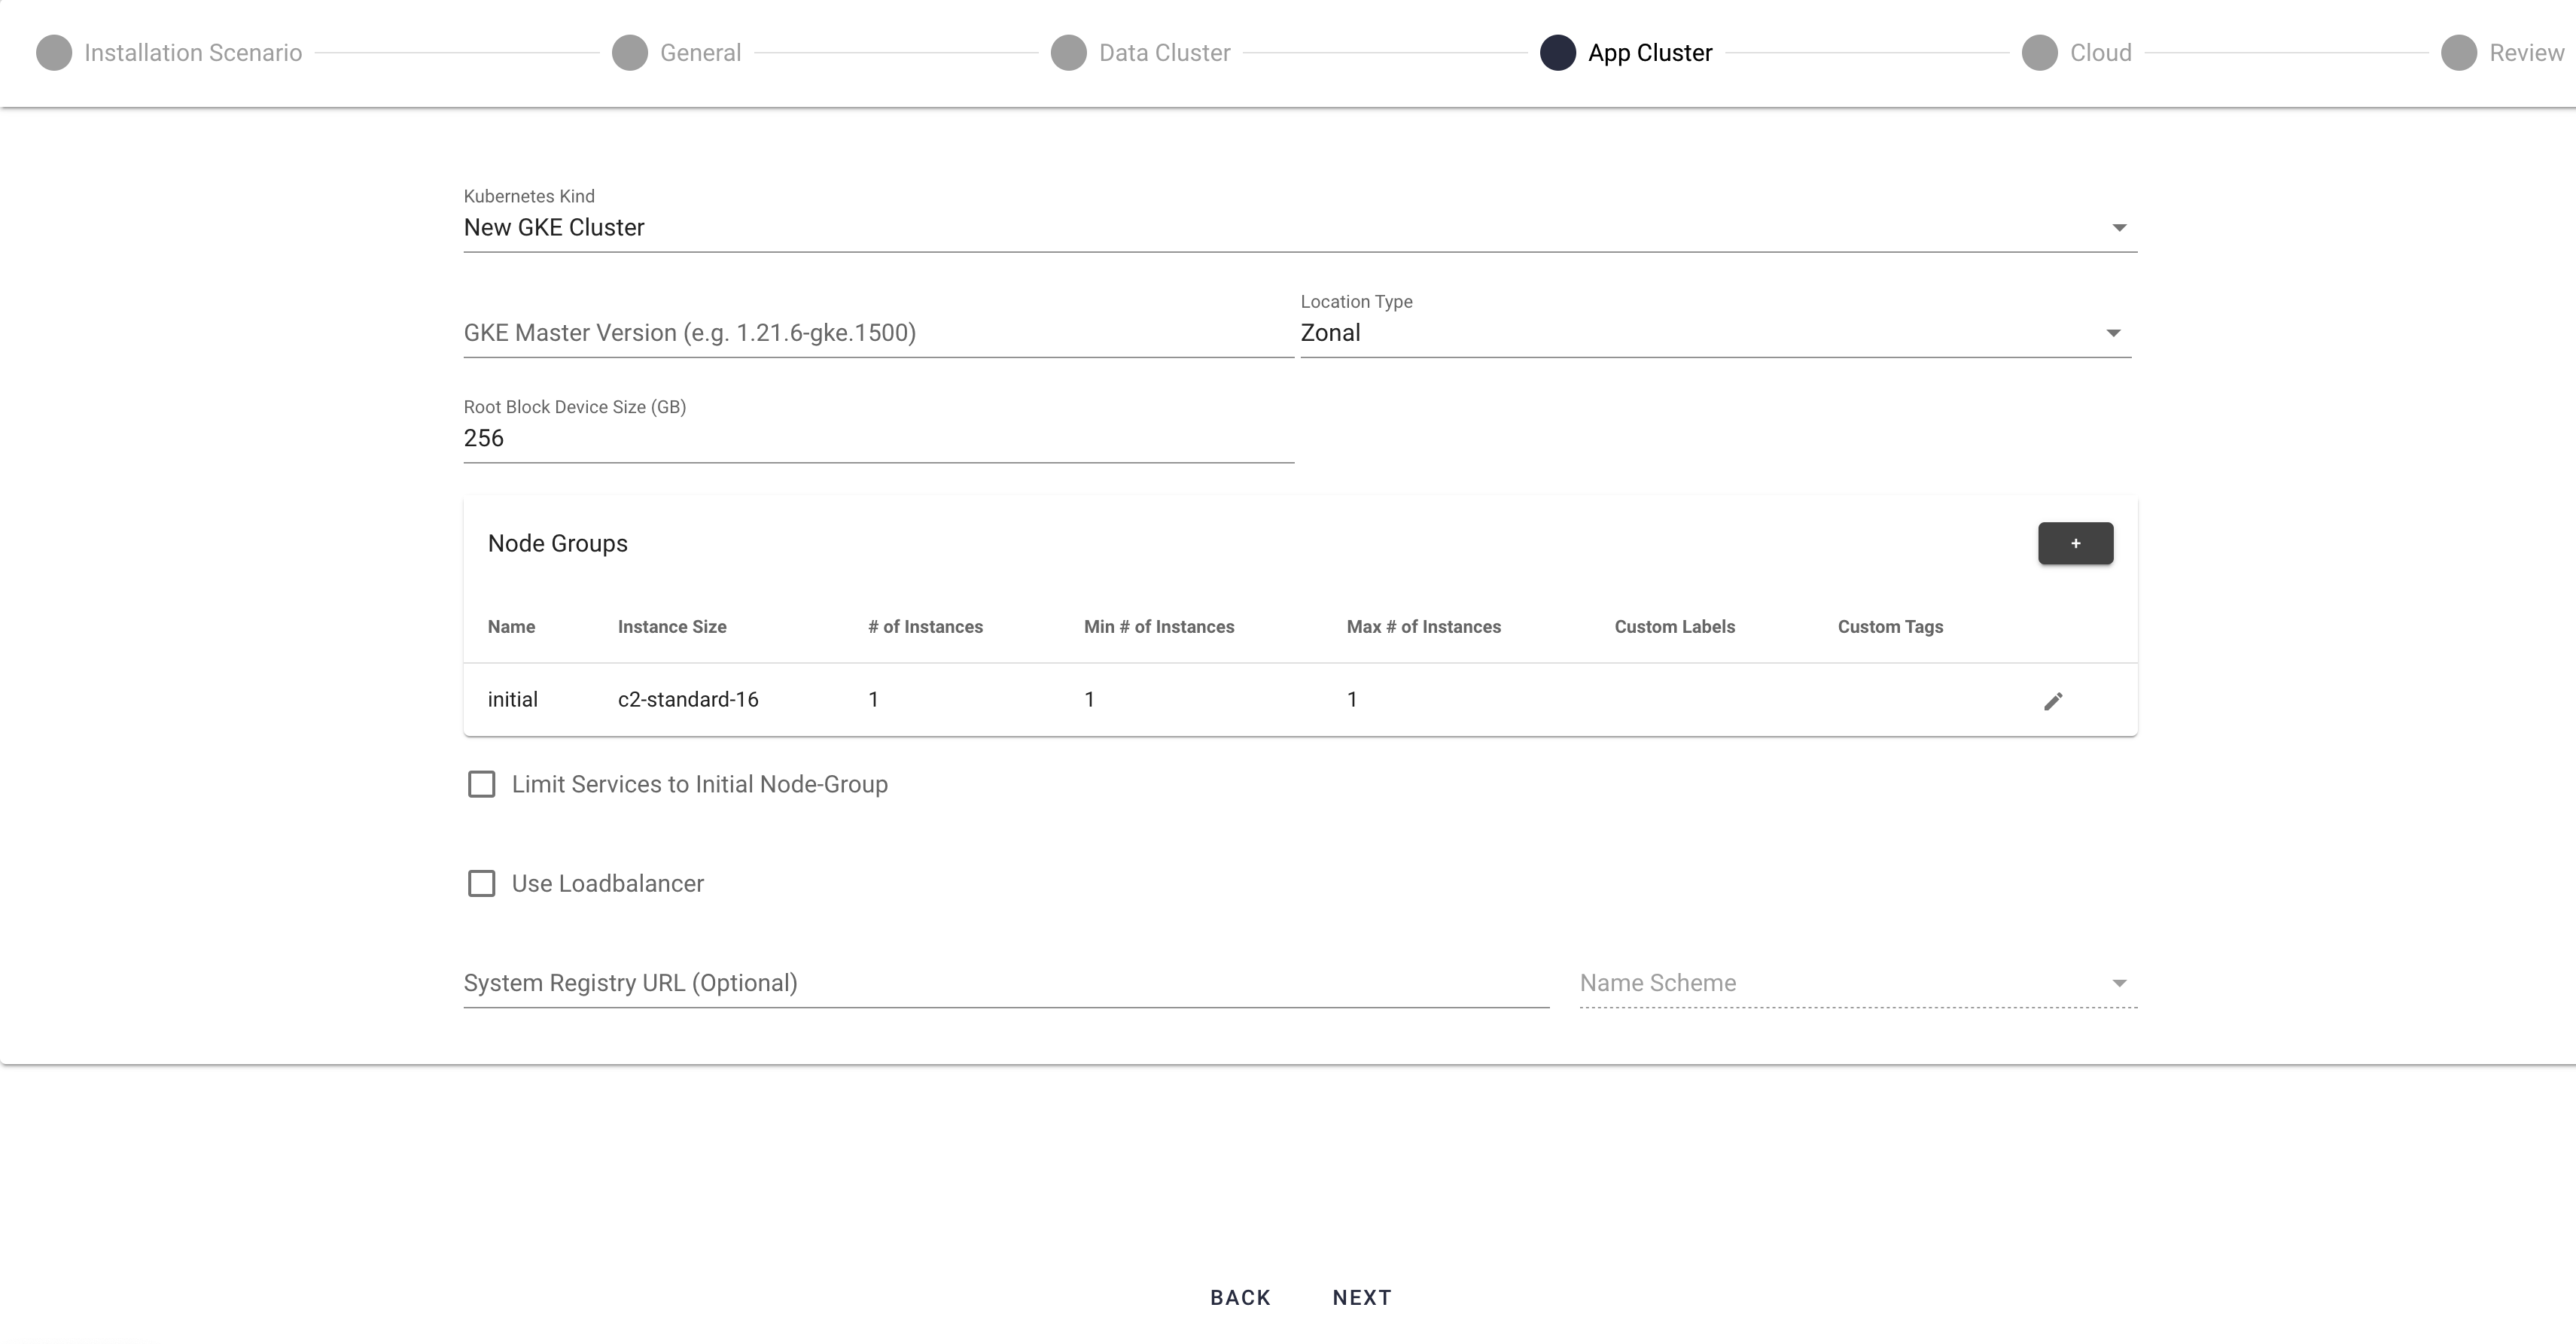
Step 8: Configure Cloud Parameters
On the
If using private IPs:
If using public IPs:
New-VPC Configuration
The following parameters are applicable only to the
- CIDR
- The CIDR of the VPC.
- Subnet CIDRs
- The CIDRs of the VPC's subnets. The number of CIDRs translates to the number of subnets.
Existing-VPC Configuration
The following parameters are applicable only to the
- VPC ID
- The ID of the VPC in which to install the platform.
- Subnet IDs
- The IDs of the subnets within the VPC or of a subset of these subnets.
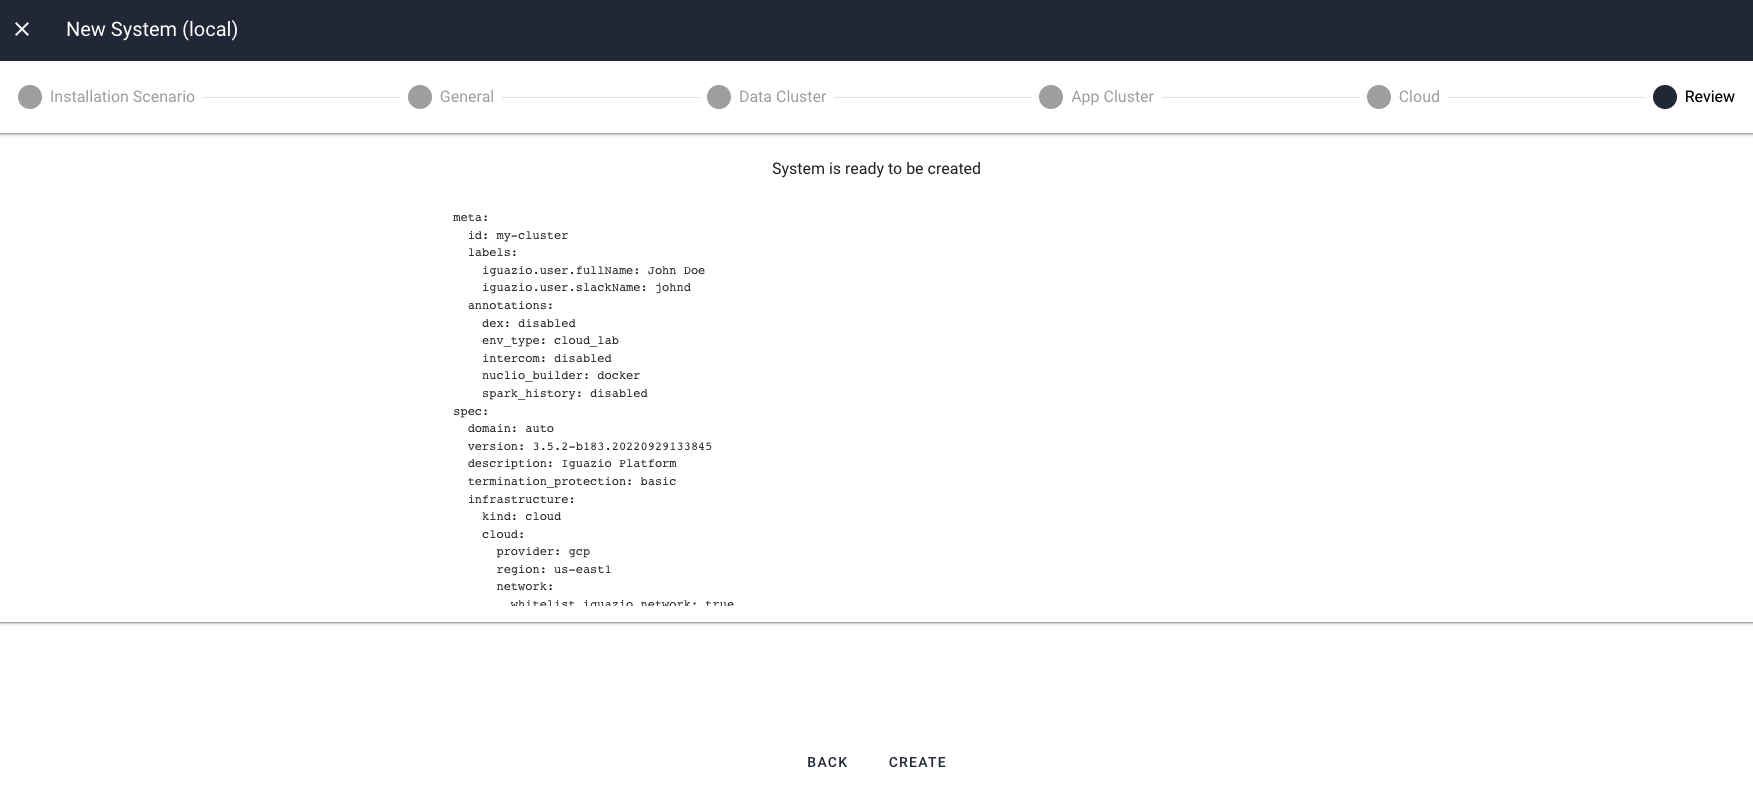
Step 9: Review the Settings
On the
Step 10: Wait for Completion
It typically takes around 30–40 minutes to provision a new platform instance, regardless of the cluster sizes.
You can download the provisioning logs, at any stage, by selecting
You can also follow the installation progress by tracking the Provazio Docker container logs.
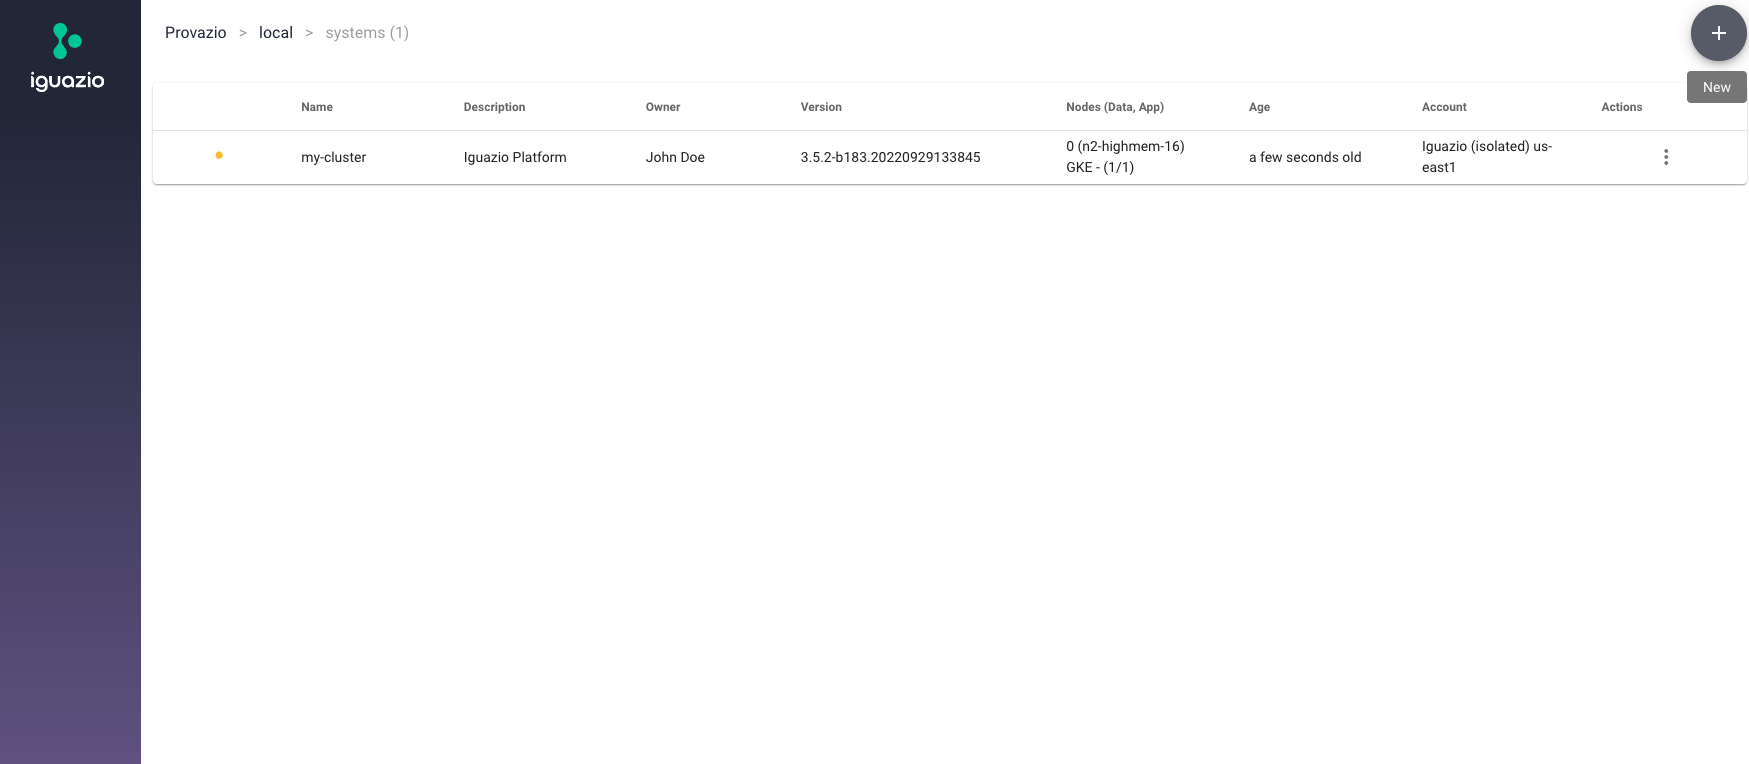
When the installation completes, you should have a running instance of the platform in your cloud. You can use the Provazio dashboard to view the installed nodes. Then, proceed to the post-deployment steps.
Post-Deployment Steps
When the deployment completes, follow the post-deployment steps.