Authorization
To support authorization, the platform uses policies and permissions that govern the ability to access resources. Authorization is the process of granting a user permission to perform a specific action or access a specific resource based on predefined authorization rules.
- Management policies are assigned to users and user groups to determine management-related permissions. For example, permission for viewing all projects, and performing any admin task on a project is reserved for users who have the Project Security Admin policy; and the permission to access the data is reserved for users who have the Data management policy.
- Project membership is assigned to users and user groups to control access to projects and the levels of access. Project membership does not include access to project data.
- Data-access policies define fine-grained rules for determining data-access permissions. These policies are used as part of a multi-layered data-access authorization scheme, which also involves the Data management policy and POSIX ACLs.
Management Policies
Every user and user group (whether locally created or imported) must be assigned one or more of the predefined management policies. These policies define resource-access permissions with management aspects that are applicable globally throughout the platform. The management policies are assigned by a security administrator, which is any user with the Security Admin management policy, including the predefined security_admin user. For more information about user management in the platform, see Platform Users.
Predefined Management Policies
These are the predefined management policies that a security administrator can assign to users and user groups:
-
Application Admin—full rights to all container operations, such as creating data containers, and defining data-access policies; view and use application services for the current user; view the pipelines dashboard.
All locally created and imported users in the platform (but not the predefined users) are automatically assigned this policy. -
Application Read Only—view all reports without editing; view and use application services for the current user; view the pipelines dashboard.
-
Data—access data and run application services. The specific access level is derived from the data-access policies and POSIX ACLs.
This policy allows the implicit creation of data sessions, which are used for securing access to data.
All locally created and imported users in the platform (but not the predefined users) are automatically assigned this policy. -
Developer—the only policy whose users can create projects, and manage and develop Nuclio serverless functions. Developers can manage the users of the projects they create. (Developers can only see the projects that they are members of.) All locally created and imported users in the platform (but not the predefined users) are automatically assigned this policy.
-
IT Admin—full rights for all IT operations, such as changing the cluster state from offline to online. This policy includes permissions for viewing event logs and for managing cluster support logs. See more information about logs in Logging, Monitoring, and Debugging.
The predefined tenancy_admin user is assigned this policy together with the Tenant Admin policy. -
IT Admin Read Only—read-only view of the Clusters, Storage, and Events pages, and from the App Cluster page has access to the Grafana dashboard of the app cluster metrics. See more information about logs in Logging, Monitoring, and Debugging.
-
Project Security Admin—view all projects, perform all admin tasks on the project, and change a project owner to any user. This policy does not give rights to modify the entities underneath such as features, jobs etc., and does not give rights to delete a project.
-
Project Read Only—view all projects. A user with the Project Read Only management policy that is not a member of the project cannot drill down to see the project objects such as function, jobs, and so on.
-
Security Admin—full rights for managing users and user groups. This includes creating and deleting users and user groups, assigning management policies, and integrating the platform with a supported identity provider (see Using an External Identity Provider (IdP)). (All users can view information for their own user profile and edit relevant properties, such as the password, email address, and first and last names.) This policy also includes permissions for viewing audit event logs. For more information, see Logging, Monitoring, and Debugging.
The predefined security_admin user is assigned this policy. -
Service Admin—full rights for managing application services, including creating, configuring, restarting, and deleting user-defined services, configuring and restarting relevant default services, and managing service logs. This policy also includes permissions for viewing the pipelines dashboard and for viewing application-service logs from the log-forwarder service. For more information, see Logging, Monitoring, and Debugging.
-
Tenant Admin—full rights for managing tenants, including creating and deleting tenants.
The predefined tenancy_admin user is assigned this policy together with the IT Admin policy.
- To view the
Services dashboard page, a user must have the Service Admin, Application Admin, or Application Read Only management policy.
The application policies enable viewing services that are owned by or shared with the logged-in user—i.e., services for which the user is the running user, shared services, and tenant-wide services without a running user.
The Service Admin policy enables viewing all services of the parent tenant. - To run services and be assigned as the running user of a service, a user must have the Data management policy.
- To manage (administer) services, a user must have the Service Admin management policy. A service administrator can create, delete, disable, enable, or restart services, change service configurations, and view service logs for all users.
Project members
Project membership provide segregation between the various projects and their users. You can specify project members (individual users or user groups) for each project. Each project members has a role that controls access to projects management and the levels of access. It ensures that only users that are members of a given project can view and manage the project.
To access the
An individual user's permissions (or a user group's permissions) for any one project are the sum of the management policy and the project membership role permissions for that user or group, for that project. Project membership can be managed by users with the Project Admin policy, and by the project's owner.
Project members have one of the following roles:
- Admin—View, and add and remove members, and change their member role, and all the privileges of the Editor role.
- Editor—Edit the project. The editor has management and configuration rights for the project, for example changing function code, and creating a job. It cannot modify members or change ownership.
- Viewer—View all project content, but cannot create, edit, or delete objects in the project.
These roles are control plane roles only. Project data is managed on a different layer. Data permissions for data that resides in Iguazio’s data layer are controlled by the data access policies and POSIX ACLs.
The user that creates the project is the owner and is also an admin member of the project. The owner has management and configuration rights for the project, for example: changing function code; creating a job; and adding and modifying admin, editor, and viewer members. The owner can change the ownership to another user. In this scenario the original owner remains an admin member.
To help understand the permissions, here are a few examples:
- User x has Project Admin management policy and is a Viewer member of project p. The viewer member gives read permissions and the Project Admin policy gives permission to update the owner of project p.
- User y has Developer management policy and is an Admin member of project p. The Developer policy gives permission to create projects, and the Admin member allows the user to add and remove members, and change their member role for project p.
- User z has Developer management policy and is a Viewer member on a project p. But user z is also part of a group that has an Editor role on that project. User z effectively has the Editor role on project p and can create projects with the Developer policy.
The project owner and the number of members are both displayed in the left pane of the individual project pages. Click 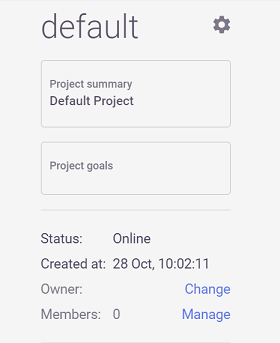
Upgrading from pre-v3.2.0
During the upgrade you must designate one user to own all of the migrated projects.
After upgrade to v3.2.0, all pre-existing projects are associated with a (dynamically updated) group of all users, named all_users, such that all users have access to all projects (this is the pre-upgrade behavior). After the upgrade you can assign members to each project.
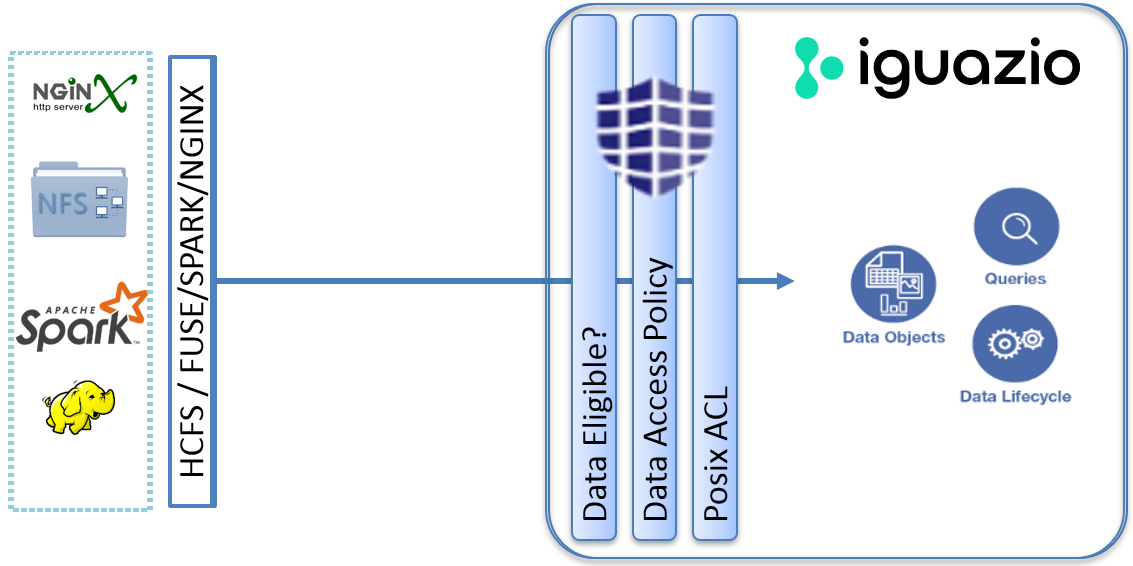
Data-Access Authorization
The platform uses a multi-layered data-authorization scheme: each data-service operation—read, write, update, delete, etc.—is processed and examined in three layers, to ensure that the environment is protected and secured. Each layer can add to the restrictions of the previous layer:
- The "Data" Management Policy
- As a preliminary step to accessing data in the platform, a user must have the Data management policy.
This policy enables the implicit creation of data sessions, which are used for securing access to data.
(The tenancy_admin and security_admin predefined users do not have this policy and therefore cannot access data or view the dashboard's
Data page.) - POSIX ACLs
- Use the portable operating-system interface access control lists (POSIX ACLs) to define file-system permissions.
- Data-Access Policies
- Use the Data-access policies to define fine-grained policies for restricting access to determine whether to grant or restrict access to a specific data resource and to what extent. For example, to create a subnetwork (subnet) whitelist, define interface data-access eligibility, restrict the right to read a payments table that contains sensitive data to members of your organization's finance group (restrict access to a table only to specific user groups), limit the write privileges for updating the online transactions stream to members of the operational team (give some users only read-only permissions for a specific file). See additional information in the Data-Access Policy Rules section.
The following diagram illustrates the platform's multi-layered data-authorization scheme:
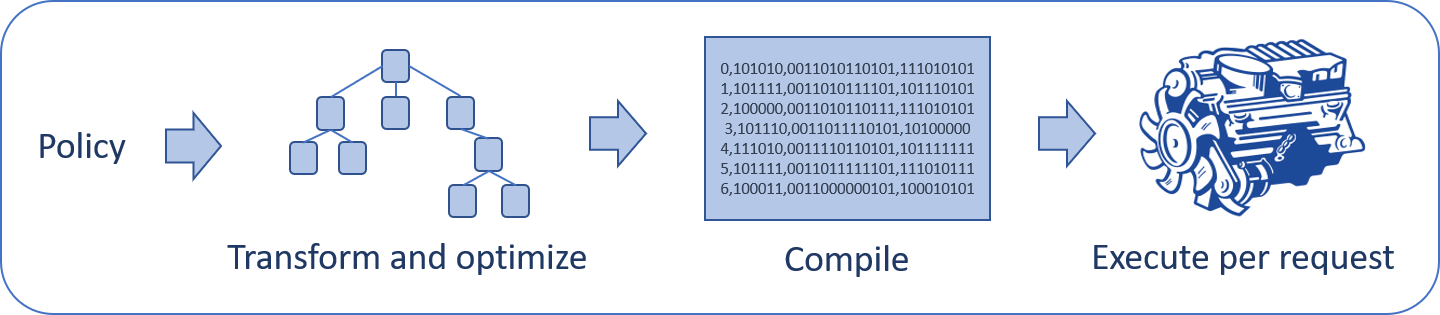
In most solutions, too many policy rules that need to inspect every data operation will come at a cost and may cause a performance degradation and low throughput, as the inspection takes time.
However, in the Iguazio AI Platform, the data-access policy rules are compiled and stored in an optimized binary format on every policy change—rule addition, removal, or update.
This allows the platform to process the rules in a fast and effective manner, resulting in high-performance processing for each data request, in line rate, while keeping the environment highly secured.
POSIX ACLs
When you create a project, a directory is created in the projects container for that project and it serves as the default path for project files. This directory is created by the user who is the owner of the project, and by default is accessible to users that belong to the same primary POSIX group as the owner. When other users attempt to access the project files, they need to belong to the same group as the project owner. To restrict access to specific users:
- Add specific users and/or groups to directories and files as relevant.
- Deny access to all users and groups.
Users must have the Data management policy, and they must have access to any other locations where related data is stored.
Data-Access Policy Rules
Users with the Application Admin management policy (such as the predefined security_admin user) can define a set of fine-grained data-access policy rules. These rules are checked for each data operation and are used to determine whether to allow or deny the data request. Data-access policy rules are defined in the context of a specific data container and apply to all data objects in the container, regardless of their type.
Defining Rules
Data-access policy rules are managed from the
A rule must belong to a data-access layer.
You can either add rules to one of the predefined layers for the parent data container or create your own layer: select the 
You can add rules directly to a layer or group multiple rules into one or more rule groups within a layer.
To add a new group, select the
The purpose of the layers and groups is to help you manage your rules and easily reorder rules to change the processing logic, as explained in the Rules Processing section. You can rename a layer or group by selecting and editing the name in the rules table, and you can delete it by selecting the delete icon () for the relevant table entry.
To add a new data-access policy rule, select the 
After you create a rule, select it from the rules table to display the rule pane and define the permissions for accessing the data based on one or more of the following characteristics (match criteria).
- Sources
A rule can be restricted to specific sources.
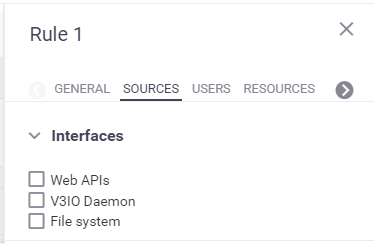
Currently, the platform support an
Interfaces source type, which is an interface for accessing the data:Web APIs —the platform's web-APIs, which are available via the web-APIs service (webapi)V3io Daemon —the platform's core daemon service ( v3io-daemon), which connects application services (such as Spark) to the platform's data layer.File system —Linux file-system operations.
- Users
A rule can be restricted to a specific list of predefined users or user groups, excluding the predefined group all_users. Note that user-group match criteria in data-access policy rules are applicable only to the primary group of the user who attempts to access the data.

- Resources
A rule can be restricted to specific data resources.
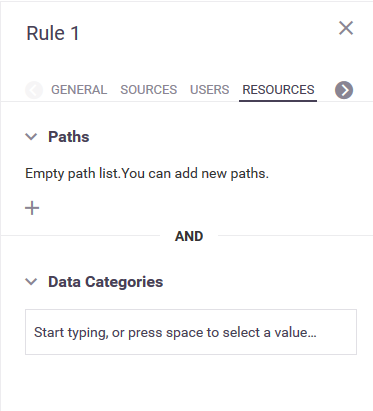
A resource can be defined as a path within the container, such as the path to a table or stream or to a subdirectory or file.
A resource can also be defined as a logical category of data—such as audio, video, logs, or documents. For a list of all resource data categories and the file extensions that they represent, see Data Categories.
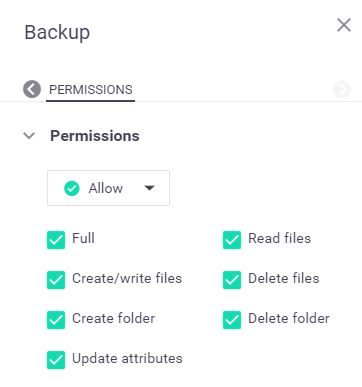
After defining the match criteria for the rule, you define the data-access permissions to be applied when there's a full match.
You can select whether to allow or deny access to the data and to what extent.
For example, you can grant only read permissions, deny only the create and delete permissions, or allow or deny full access.
The following image demonstrates full data-access permissions:
Rules Processing
The rules are processed for each data operation according to the order in which they appear in the dashboard. You can change the processing order, at any time, by changing the order of the data-access policy rules in the dashboard: you can change the order of the rules and rule groups within each container data-access layer; change the order of rules within each group; and change the order of the layers.
When a full match between the operation and a policy rule is found, the processing stops and the data accessibility is set according to the permissions of the first-matched rule. A match is identified by checking all components of the rule. All match-criteria rule sections are accumulative ("AND") but the values in each section are alternative ("OR"), except where otherwise specified. See the examples for a better understanding.
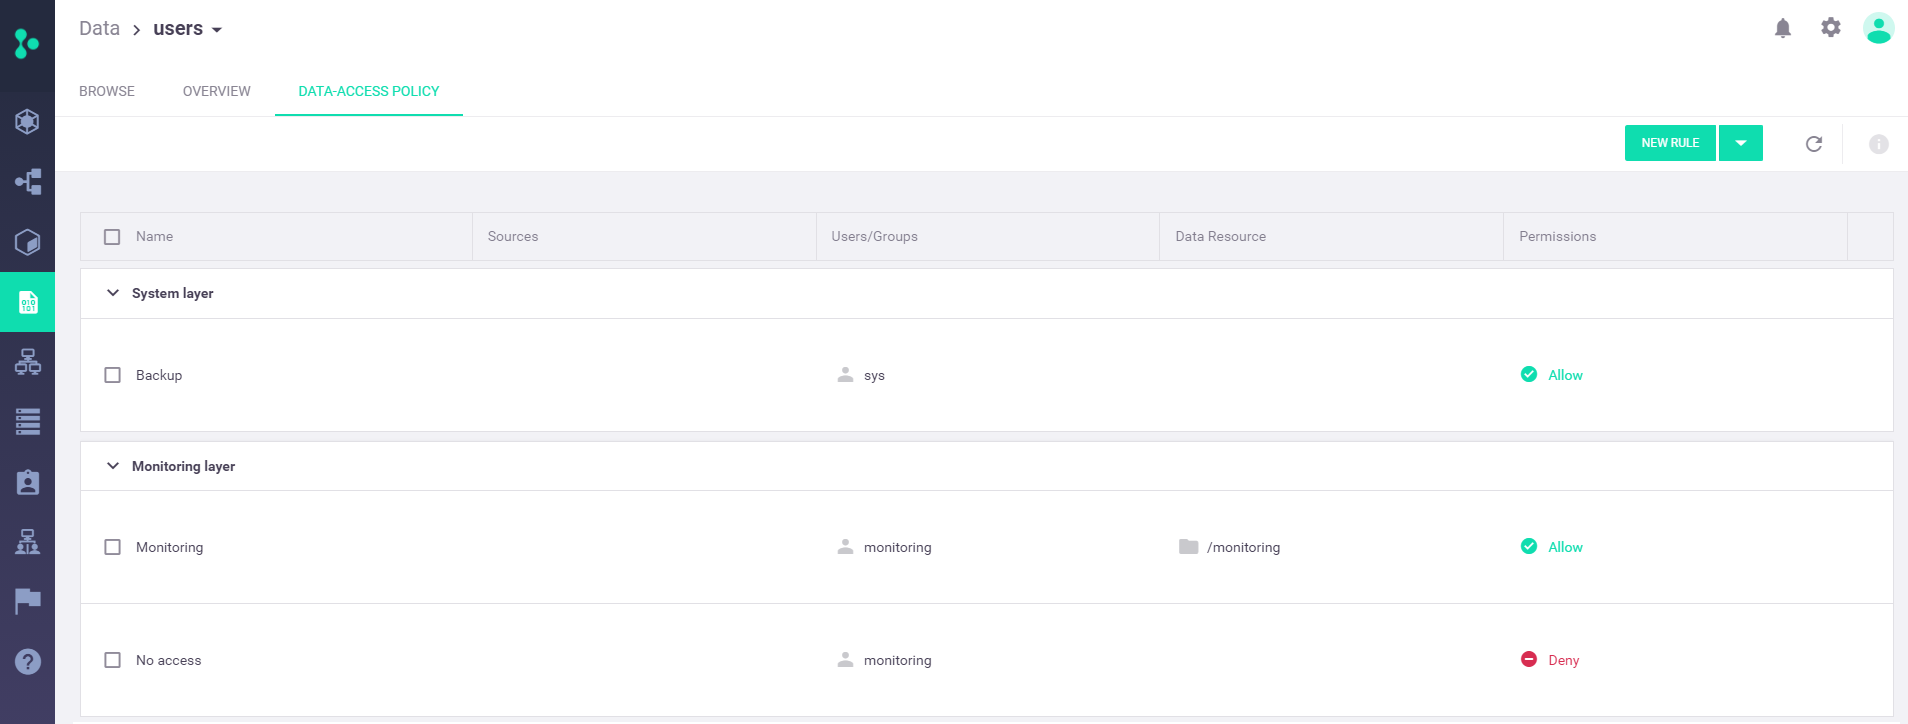
Predefined Rules and Layers
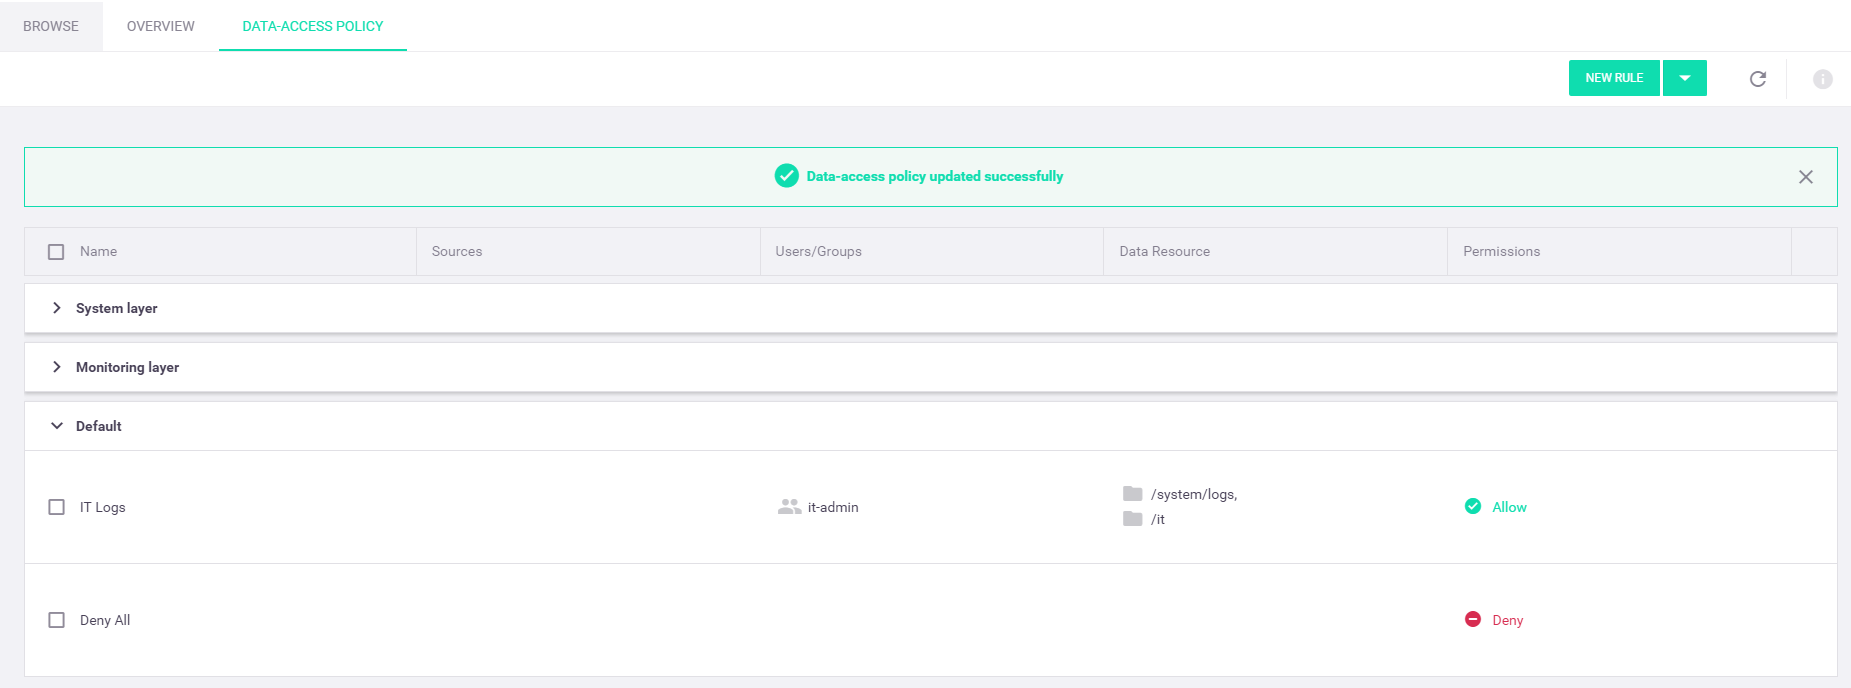
The platform predefines the following data-access policy layers and rules for each data container, except where otherwise specified:
-
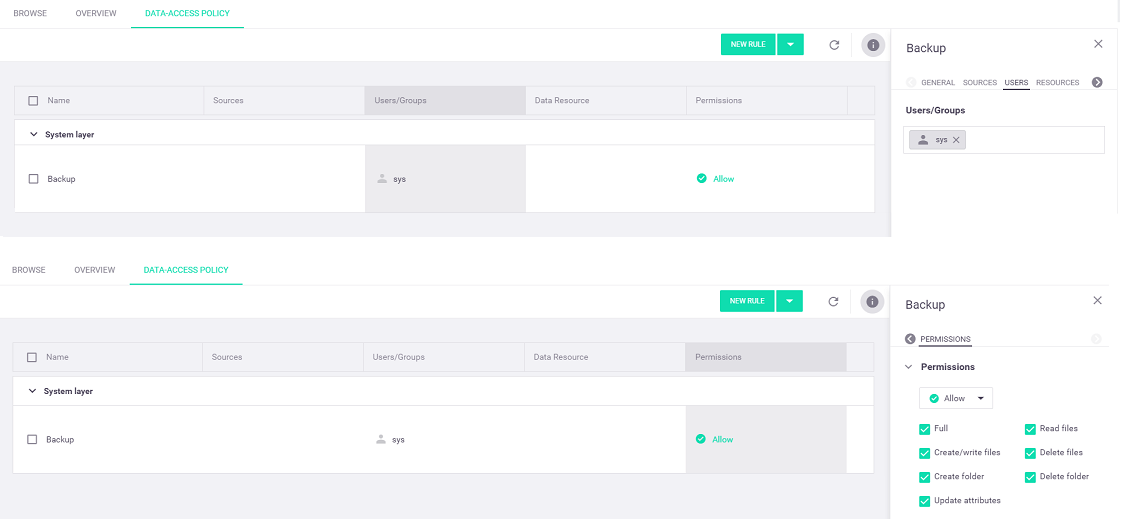
System layer—A system-administration layer that has the following predefined rule:
-
Backup—This rules grants the predefined "sys" backup user full data access, to support data backups. It's recommended that you keep this rule as the first rule in your processing order.
-
-
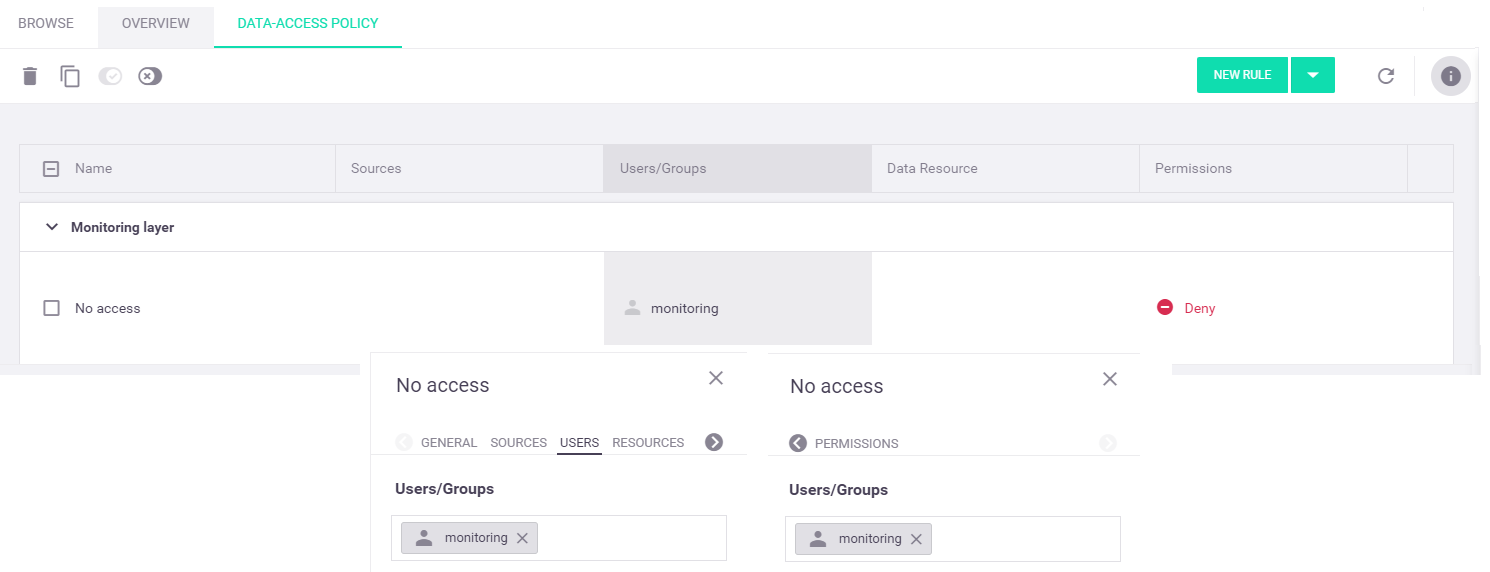
Monitoring layer—A monitoring-service layer that has the following predefined rules:
-
Monitoring—This rule is defined only for the predefined "users" container and grants the predefined "monitoring" user full data access to the
monitoring directory, which is automatically created in the root directory of this container for use by the monitoring service.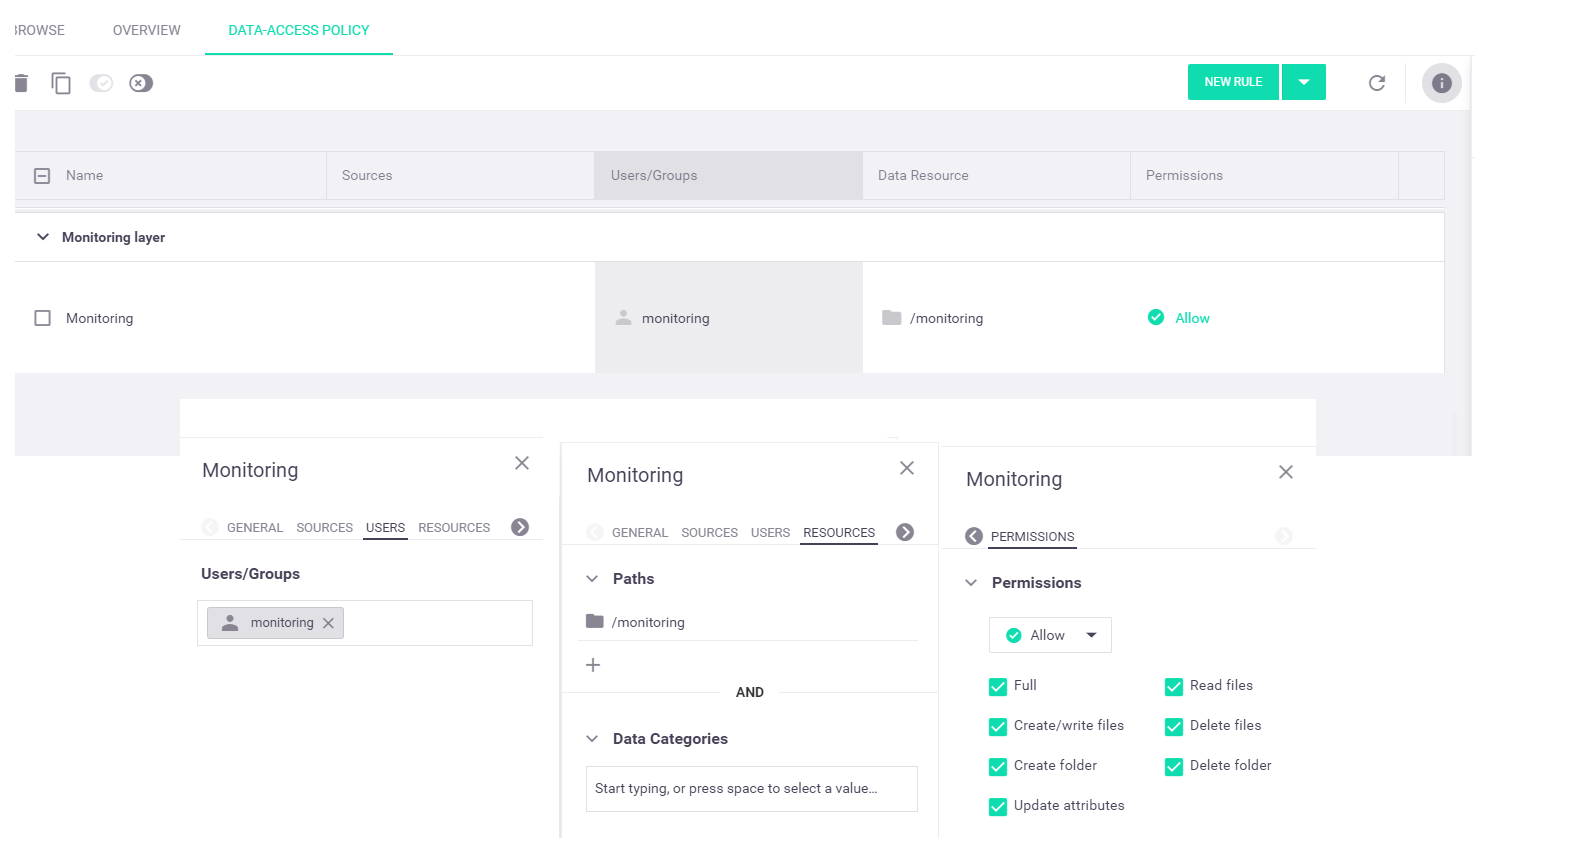
-
No access—This rule denies the predefined "monitoring" user all data access. Note that on the "users" container, this rule must not precede the "Monitoring" rule, as the first rule takes precedence (see the rules processing order).
-
Examples
The predefined data-access policy rules provide examples of granting and restricting data access for a specific user and/or resource (data directory).
Following is a step-by-step example of adding your own custom data-access policy rules from the dashboard
-
Create a new "Default layer" layer: from the top action toolbar, select the drop-down arrow on the
New Rule button and select theNew Layer option from the menu. In theCreate new layer dialog window, enter your selected layer name—"Default layer" for this example:
Keep the new layer after the predefined layers in the rules table (default).
-
Define a custom "IT Logs" rule that grants members of the "it-admins" user group full permissions to access any log or document file in either the
system/logs orit directories in the parent container:NoteTo define and test this rule, you need to create an "it-admins" group from theIdentity | Groups dashboard tab, assign users to this group, and create the directories that are specified in the match criteria. Alternatively, you can change the match criteria to accommodate your environment and needs.-
From the top action toolbar, select the
New Rule option. In theCreate new rule dialog window, enter your selected rule name—"IT Logs" for this example.
-
Select the
Users/Groups cell of the "IT Logs" rule in the rules table to display theUsers tab in the rule pane on the right. In theUsers/Groups input box, start typing "it-admins" and select this group from the list.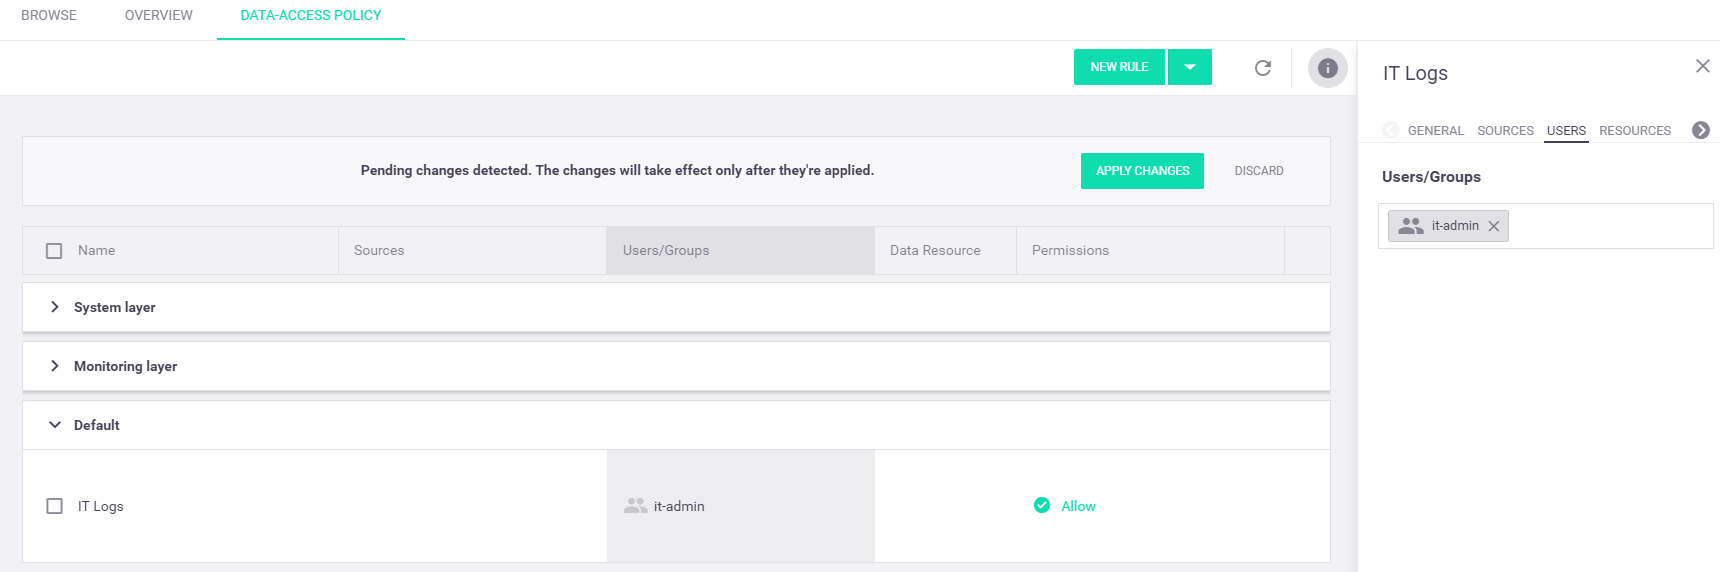
-
Select the
Resources tab in the "IT Logs" rule pane. In thePaths section, select the plus sign (), enter/system/logsin the input box, and selectApply . Repeat this step but this time enter the path/it.
-
In the
Permissions tab, keep the default allow-all permissions.
-
-
Define a custom "Deny All" rule that denies all data access, as recommended in the rule-processing section:
-
Create a new rule in the "Default layer" layer and name it "Deny All".
-
Select the
Permissions cell of the "Deny All" rule in the rules table. In thePermissions rule tab, select theDeny option from the permissions drop-down box and keep all permission check boxes checked to deny all data-access permissions.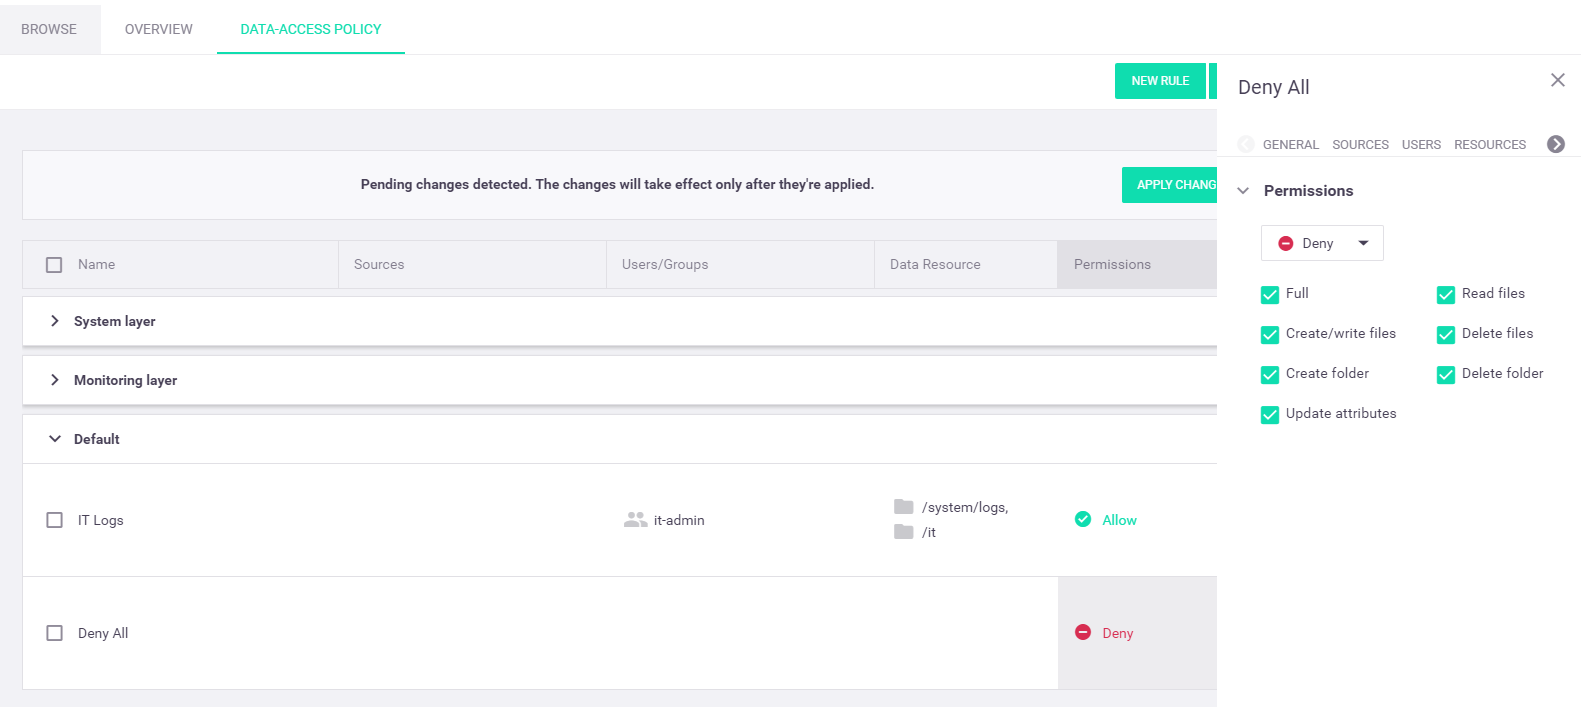 Note
Note- The deny-all rule must be the last rule in the data-access policy rules table; any rules that appear after it will be ignored. You can move the rule to another layer, if you wish.
- You might want to disable this rule during the initial stages of your development and testing, as it blocks all data access that isn't explicitly permitted in other (preceding) data-access policy rules.
-
-
Select
Apply Changes from the pending-changes toolbar to save your changes:
You can now see your new layer and rules in the data-access policy rules table:
Data Categories
The following table lists the supported data categories, which can be used to define a resource for a data-access policy rule, and the file extensions that each category represents:
| Resource Category | File Extensions |
|---|---|
| Archives | 7Z, ACE, AR, ARC, ARJ, B1, BAGIT, BZIP2, CABINET, CFS, COMPRESS, CPIO, CPT, DGCA, DMG, EGG, GZIP, ISO, KGB, LBR, LHA, LZIP, LZMA, LZOP, LZX, MPQ, PEA, RAR, RZIP, SHAR, SIT, SQ, SQX, TAR, TAR.GZ, UDA, WAD, XAR, XZ, Z, ZIP, ZIPX, ZOO, ZPAQ |
| Audio | AIFF, AIFCDA, M4A, M4B, MID, MIDI, MP3, MPA, OGG, WAV, WMA, WPL |
| Data | AVRO, CSV, DAT, DATA, JSON, MDB, ORC, PARQUET, RC, SAV, TSV, XML |
| Documents | DOC, DOCX, KEY, ODT, ODP, PDF, PPS, PPT, PPTX, RTF, TEX, TXT, WKS, WPS, WPD, XLS, XLSX |
| Logs | LOG |
| Pictures | ANI, ANIM, APNG, ART, BMP, BPG, BSAVE, CAL, CIN, CPC, CPT, CUR, DDS, DPX, ECW, EXR, FITS, FLIC, FLIF, FPX, GIF, HDRI, HEVC, ICER, ICNS, ICO, ICS, ILBM, J2K, JBIG, JBIG2, JLS, JNG, JP2, JPEG, JPF, JPG, JPM, JPX, JXR, KRA, LOGLUV, MJ2, MNG, MIFF, NRRD, ORA, PAM, PBM, PCX, PGF, PGM, PICTOR, PPM, PNM, PNG, PSB, PSD, PSP, QTVR, RAS, RBE, SGI, TGA, TIF, TIFF, UFO, UFP, WBMP, WEBP, XBM, XCF, XPM, XR, XWD |
| Programs/Binaries | BIN, CER, CFM, CGI, CLASS, COM, CPP, CSS, DLL, EXE, H, HTM, HTML, JAVA, JS, JSP, PART, PHP, PL, PY, RSS, SH, SWIFT, VB, XHTML |
| Software Packaging | APK, DEB, EAR, JAR, JAVA, MSI, RAR, RPM, VCD, WAR |
| System Files | BAK, CAB, CFG, CPL, CUR, DMP, DRV, ICN, INI, LNK, SYS, TMP |
| Video | 3G2, 3GP, AVI, FLV, H264M4V, MKV, MOV, MP4, MPG, RM, SWF, VOB, WMV |
| Virtual-Machine (VM) Images | NVRAM, VMDK, VMSD, VMSN, VMSS, VMTM, VMX, VMXF |