Authentication
Authentication is the process of validating a user's identity before granting the user access to a specific resource. Before granting a user access to resources, the platform verifies (authenticates) the identity of the user and then ensures that the user has the required permissions to perform the requested operation (see Authorization).
Authentication without SSO
Without SSO, the platform uses time-limited sessions and access keys. The time-to-live (TTL) session period is 24 hours.
Authentication of data-access requests is done using data sessions, which are handled transparently by the platform.
Authentication of management requests is done using management sessions, which are created transparently when performing operations from the platform dashboard, or handled by the user using the platform's RESTful management APIs [Beta]. These APIs use a session-based HTTP scheme to support user authentication and authorization: access to management API resources requires a time-limited session cookie that is used to authenticate the sender of the request with a username and password, and determine the sender's authorization to perform the requested operation.
In addition, the platform's web APIs support user authentication by using either the username/password Basic HTTP authentication scheme or custom access-key (session-key) authentication. With either method, the user provides an authentication header with user credentials that are verified by the platform as a condition for sending the request. See HTTP User Authentication in the Securing Your Web-API Requests reference.
Access keys are not time-bound, and are used mainly for programmatic purposes. Access keys are created by authenticated users and can allow only the actions in the scope of the user creating the key: each specific resource access is defined by the management policies of the user.
Access keys are specific to either the data plane, the control plane, or to both. The data plane is relevant to operations on the data itself (put object, write to stream, read kv etc.). The control plane includes create, read, update, and delete, operations on all resources that aren't specifically data in the containers, for example: projects, users, groups, management policies, the containers themselves (not the data inside them), services, etc.
Access keys are not limited to a specific use or environment. They can be delegated and passed on to other entities. The clients running inside Jupyter use the access key from Jupyter and pass it to the resources they create. For example, when MLRun SDK is running inside Jupyter, it passes the access key to the MLRun jobs it creates.
Since access keys be used by anyone who has access to them, they should be closely watched, and their usage should be well monitored.
To create access keys, press the user icon (![]() ), then press
), then press
In certain wizards, you must add an access key that includes the control plane, for example the create and deploy functions, and the create job and scheduled job. The Auto-generate access key, in the
Identity Provider (IdP) The authentication of the user credentials can be done locally, using the platform's built-in user management, or using an external Identity Provider (IdP)—currently Microsoft Active Directory (AD). When an IdP is configured, it is used to authenticate the identity of all its imported users in the platform. This doesn't prevent you from also defining local users and using the platform to authenticate them. For more information about using an IdP, see Using an External Identity Provider (IdP).
Authentication with Keycloak
- External IDP configuration in Keycloak is the responsibility of the client. Iguazio guarantees that the Keycloak service and its auxiliaries work, and the user creation in Iguazio after it has been created in Keycloak.
- User groups are not imported from external IDPs.
SSO
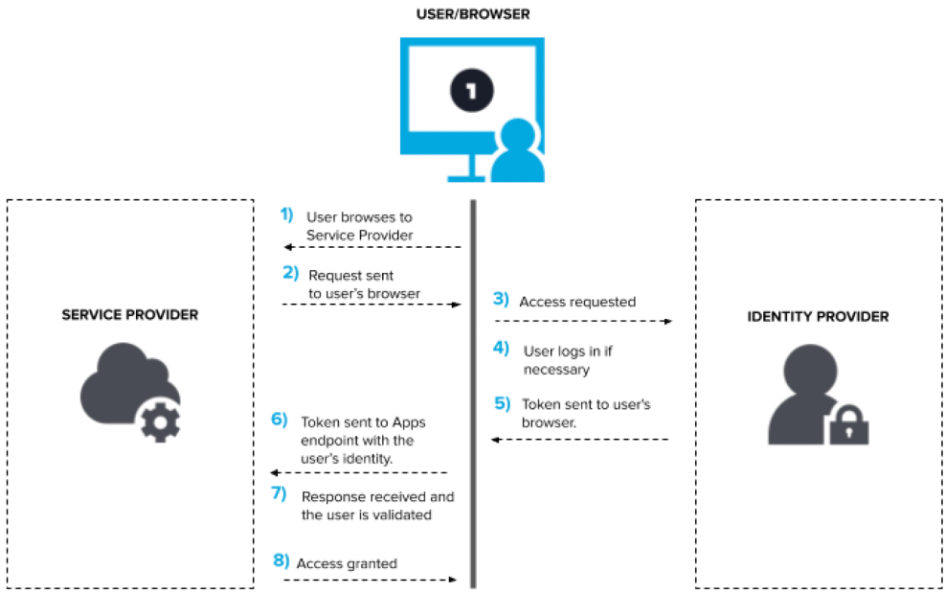
Single Sign On or SSO is an authentication protocol that leverages underlying protocols to enable an identity trust system between two applications. This trust system enables users to log in only to one application acting as the identity provider, maintain just one set of credentials, and use the sessions from the identity provider application to access the service provider application.
As illustrated in the following diagram, the service provider actually redirects the entire login process to the identity provider application, where a session and a token can be created. The user gets redirected back to the service provider with that token, and then gets access to the service provider.
JWTs
JSON Web Tokens are signed tokens that can be verified with a public key. The token is an encoded string separated by "." into three sections: <base64 header>.<base64 claim>.<signature>
- Header: Token metadata. Usually contains information about how to validate the token. For example, a key id to request from an Identity Provider to receive the public key.
- Claim: Contains user information (username, email, first/last name, etc.) needed for the session.
- Signature: HashingAlg (
“<base64 header>.<base64 claim>”, cert-public-key)
The header and the claim get decoded into two JSONs. Here is an example claim from an SSO enabled Iguazio System:
{
  "exp": 1708631401,
  "iat": 1708588201,
  "auth_time": 1708588201,
  "jti": "d3121f1a-ea2b-4bde-8b95-57ed0457b286",
  "iss": "https://keycloak-iguazio-platform.default-tenant.app.dev71.lab.iguazeng.com/realms/default-tenant",
  "aud": "default-tenant-oauth",
  "sub": "565b0b35-6232-46fc-98ef-d45529c76fe2",
  "typ": "ID",
  "azp": "default-tenant-oauth",
  "nonce": "gaXfD-TD4KVTZDD95TG43gtt3v6TGhGf$TgKi2lSirZo",
  "session_state": "54e95541-92c6-4dbe-b5fa-c456ae2e0f74",
  "at_hash": "o5b-0crerujsdfUUX5T6uQ",
  "acr": "1",
  "sid": "54e95e71-92c6-ef76-b5fa-c4a8712e0f74",
  "email_verified": false,
  "name": "John Smith",
  "preferred_username": "Johnny",
  "given_name": "John",
  "family_name": "Smith",
  "email": "john.smith@company.ai"
}
Other than the obvious preferred_username, email, given_name, family_name, the other important fields to note here are:
- sid: The ID of the session related to the JWT (not the ID of the token itself)
- jti: The unique ID of JWT token itself
- iss: The issuer of the JWT
- exp: Session expiration
- iat: Time that the JWT was issued
- auth_time: Time that the session authentication started
Keycloak
Keycloak is an open source tool for identity and user access management. It supports many of the identity features needed in an enterprise grade system, for example:
- Identity management (users, groups)
- Authentication flows both custom and pre-compiled
- Permission management
- Identity tokens
- External IDPs
- Identity Brokering
- User Federation
OAuth2Proxy
The OAuth2 flow is a commonly used open source protocol for initiating authentication against a web server. OAuth2Proxy is a component that fully implements that flow against an Identity Provider. It can be utilized both as an authentication initiator and as an authentication validator of existing sessions.
Keycloak integration with the platform
This figure illustrates the logical relationships between the components in the system.
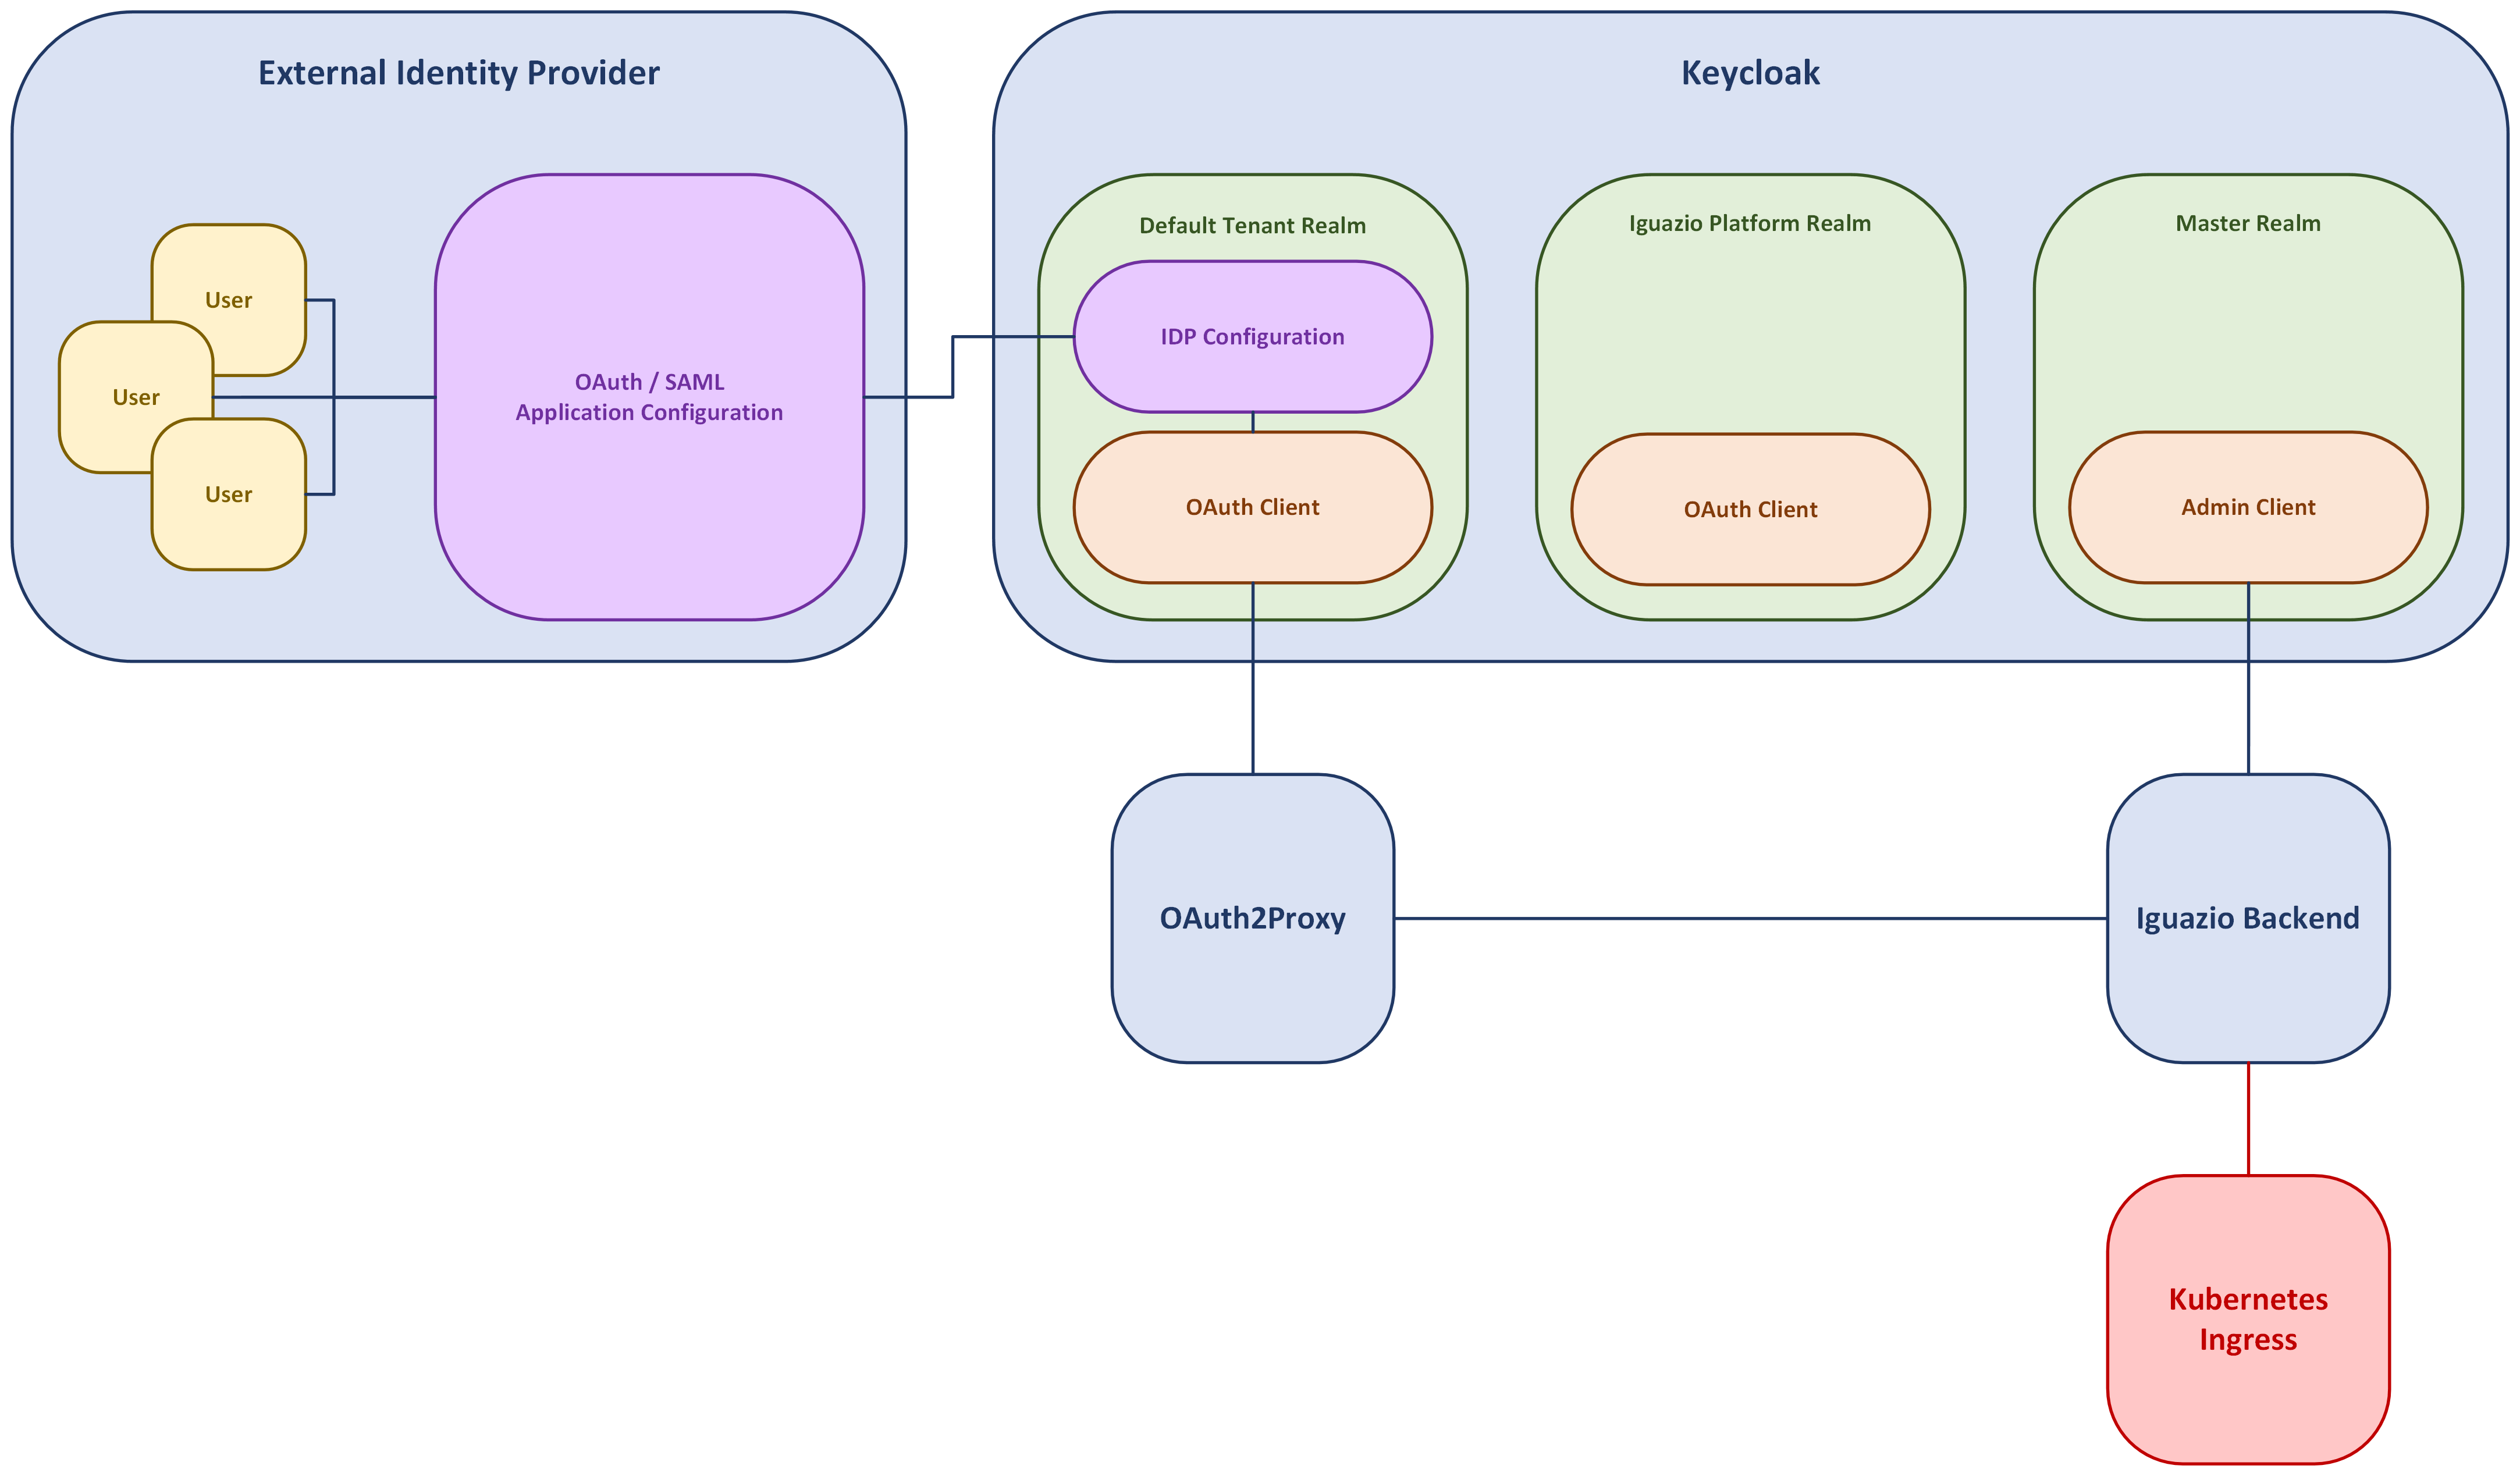
Keycloak is divided into separate realms:
Each realm contains separate configurations, users, groups, sessions etc. The platform implements multi-tenancy where each realm is equivalent to a tenant. The realms are a default-tenant realm and an iguazio-platform realm.
Each realm has a set of clients. The clients are "listening ports" for incoming communication and can have different permissions, different authentication methods, etc. Each tenant's realm has an oauth client (default-tenant-oauth, iguazio-platform-oauth) used for the authentication flow.
Each realm can be configured to have an IDP Configuration connected to their external IDP via the OpenID Connect or SAML protocols. Keycloak supports many templates for officially supported IDPs, and also supports custom OpenID Connect and SAML configurations. You must manage the access to the SSO on the External IDP end. Keycloak accepts any user that the IDP deems valid and authenticated. Therefore if there are users in your organization that you want to block from the platform, you must block them from the OpenID Connect or SAML application in the IDP.
The OAuth2Proxy (in each app tenant) is configured directly against Keycloak with the realm's oauth client. It has two main functions in the system:
- Authentication initiation via the OAuth2 flow (redirected from the UI).
- Requesting JWTs from Keycloak on authenticated sessions (requested from the platform and potentially from users).
The platform backend communicates with both OAuth2Proxy and Keycloak.
- When receiving a sessions verifications request with an
_oauth2_cookiethe platform can verify authentication against OAuth2Proxy with the cookie and receive a JWT with a claim on the user trying to access the system. This JWT is verified against Keycloak, and against internal information in the backend's DB. If everything is verified, the request passes. - When receiving a sessions verifications request with a JWT as a Bearer token, the platform can skip the first step and go straight to verifying the JWT against keycloak and continuing.
- In addition, the platform backend configures Keycloak's realms and clients and configues for session revocation upon user logout.
Physical Component Locations
The platform contains the Docker-based data cluster, and the Kubernetes app cluster, as illustrated in this figure:
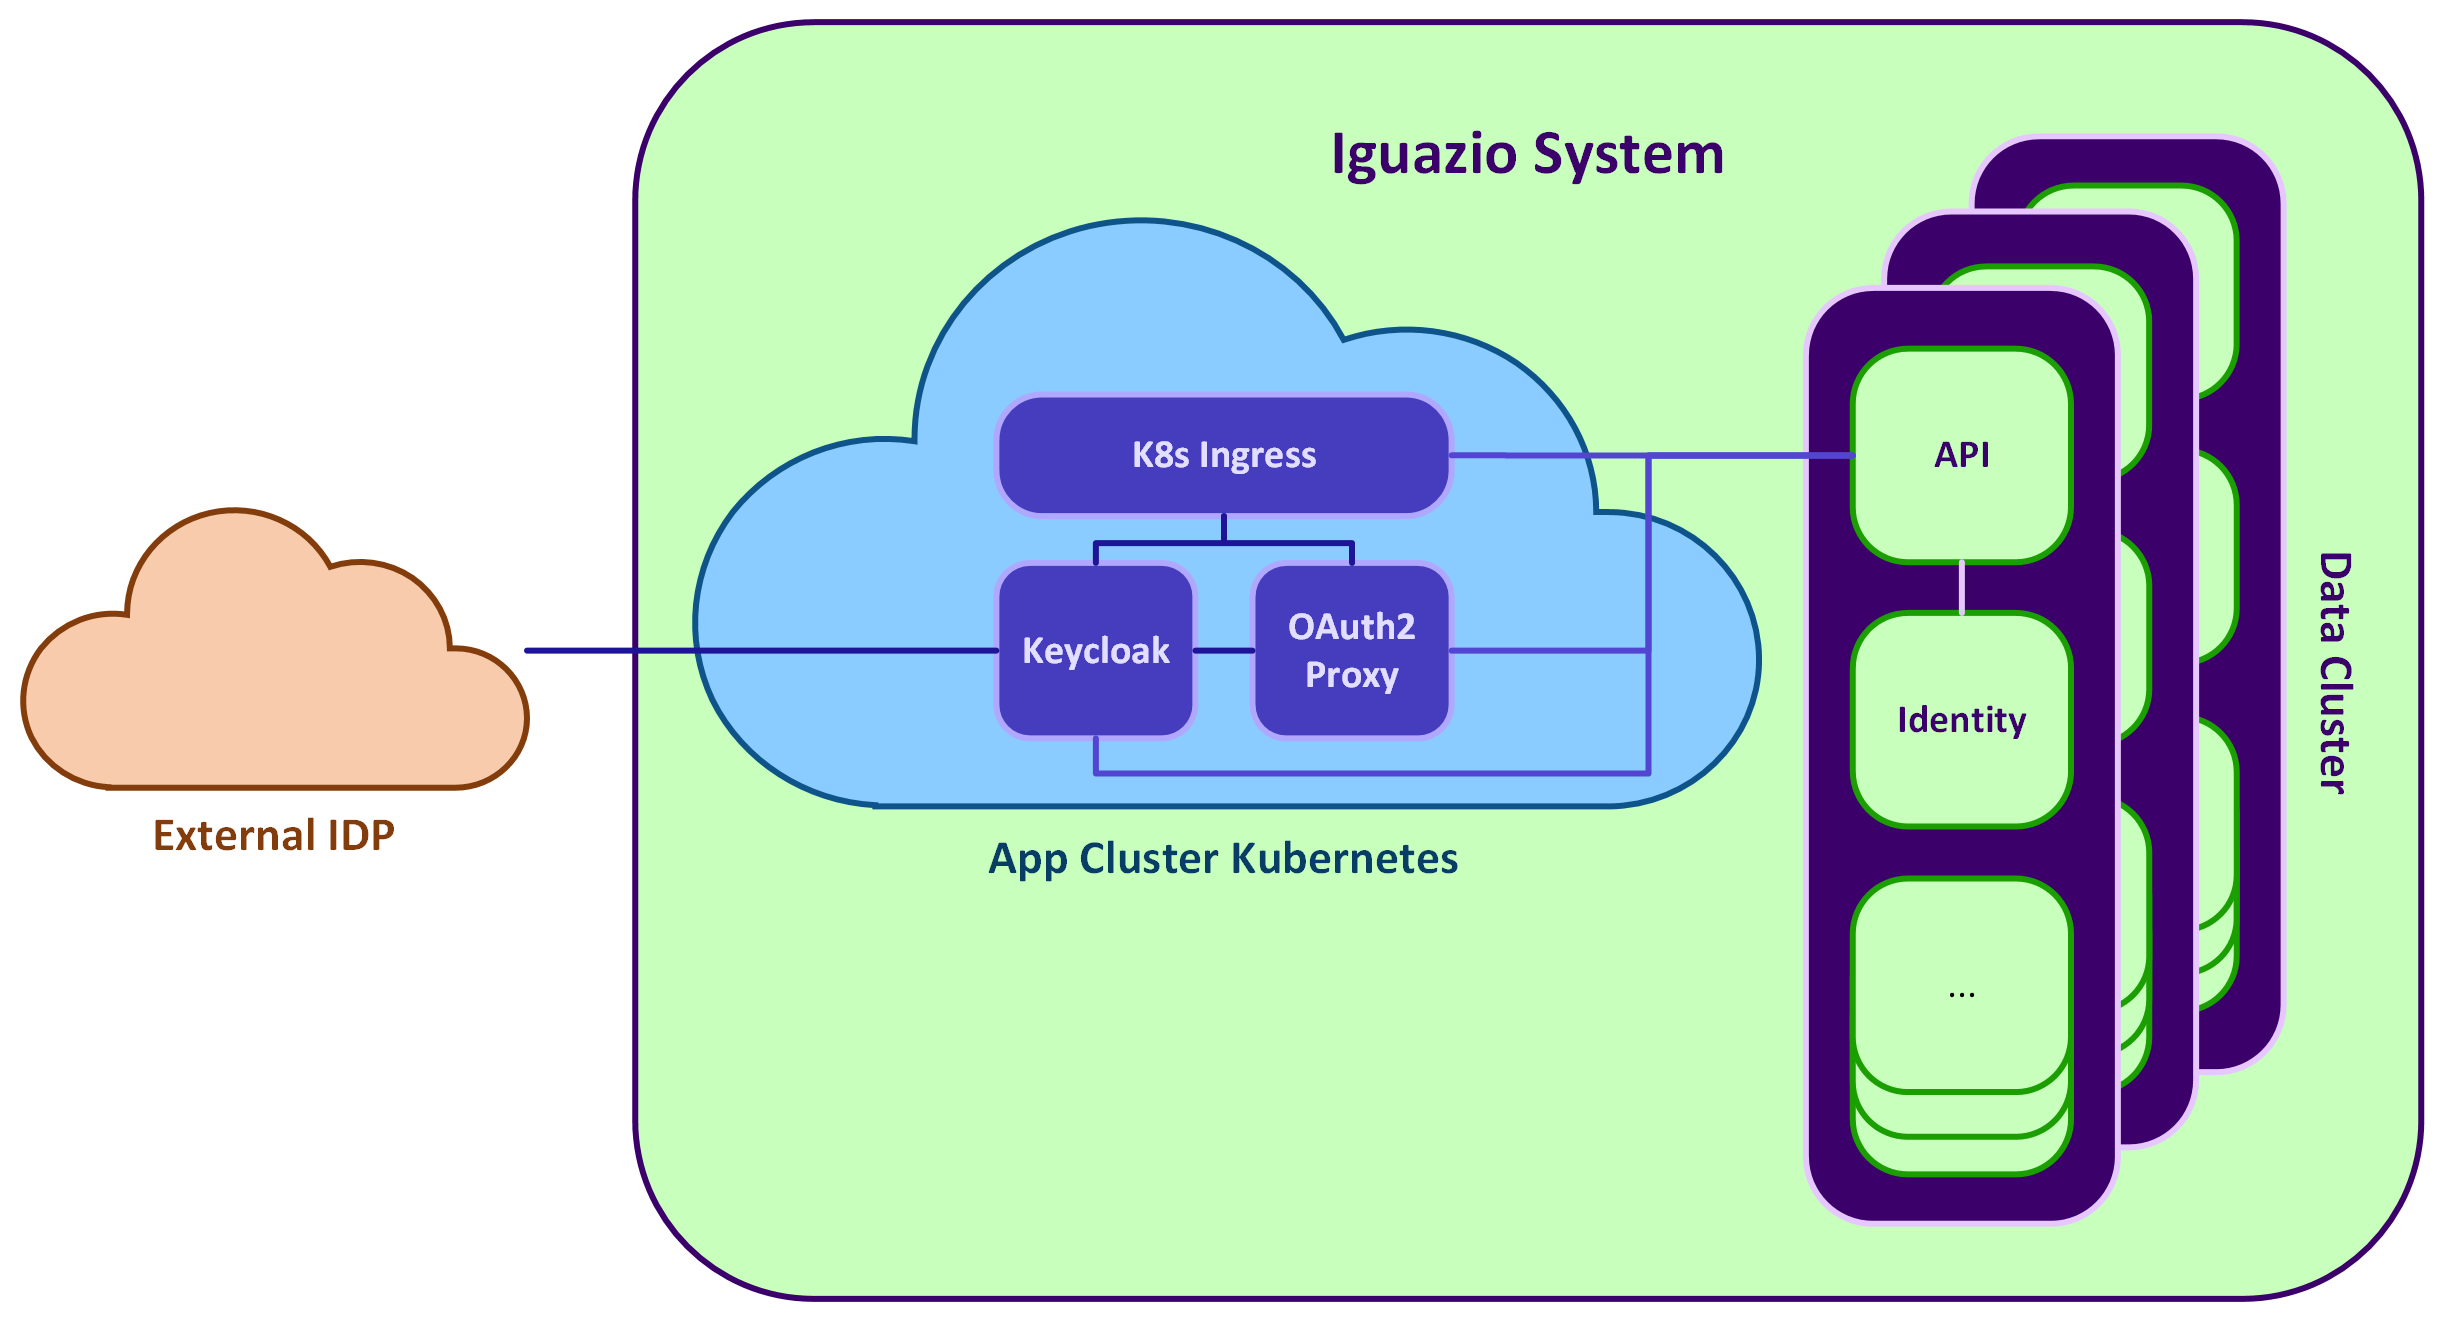
- Keycloak is a pod in the Kubernetes app cluster, only in the platform Tenant.
- OAuth2Proxy is a pod that has a replica in each tenant. Each replica is connected to their realm in the single Keycloak service.
- platform backend
- The API service in the data cluster handles the session verification process and communicates with both OAuth2Proxy and Keycloak
- The Identity service handles the Iguazio session creation and user creation when needed
Authentication Flow
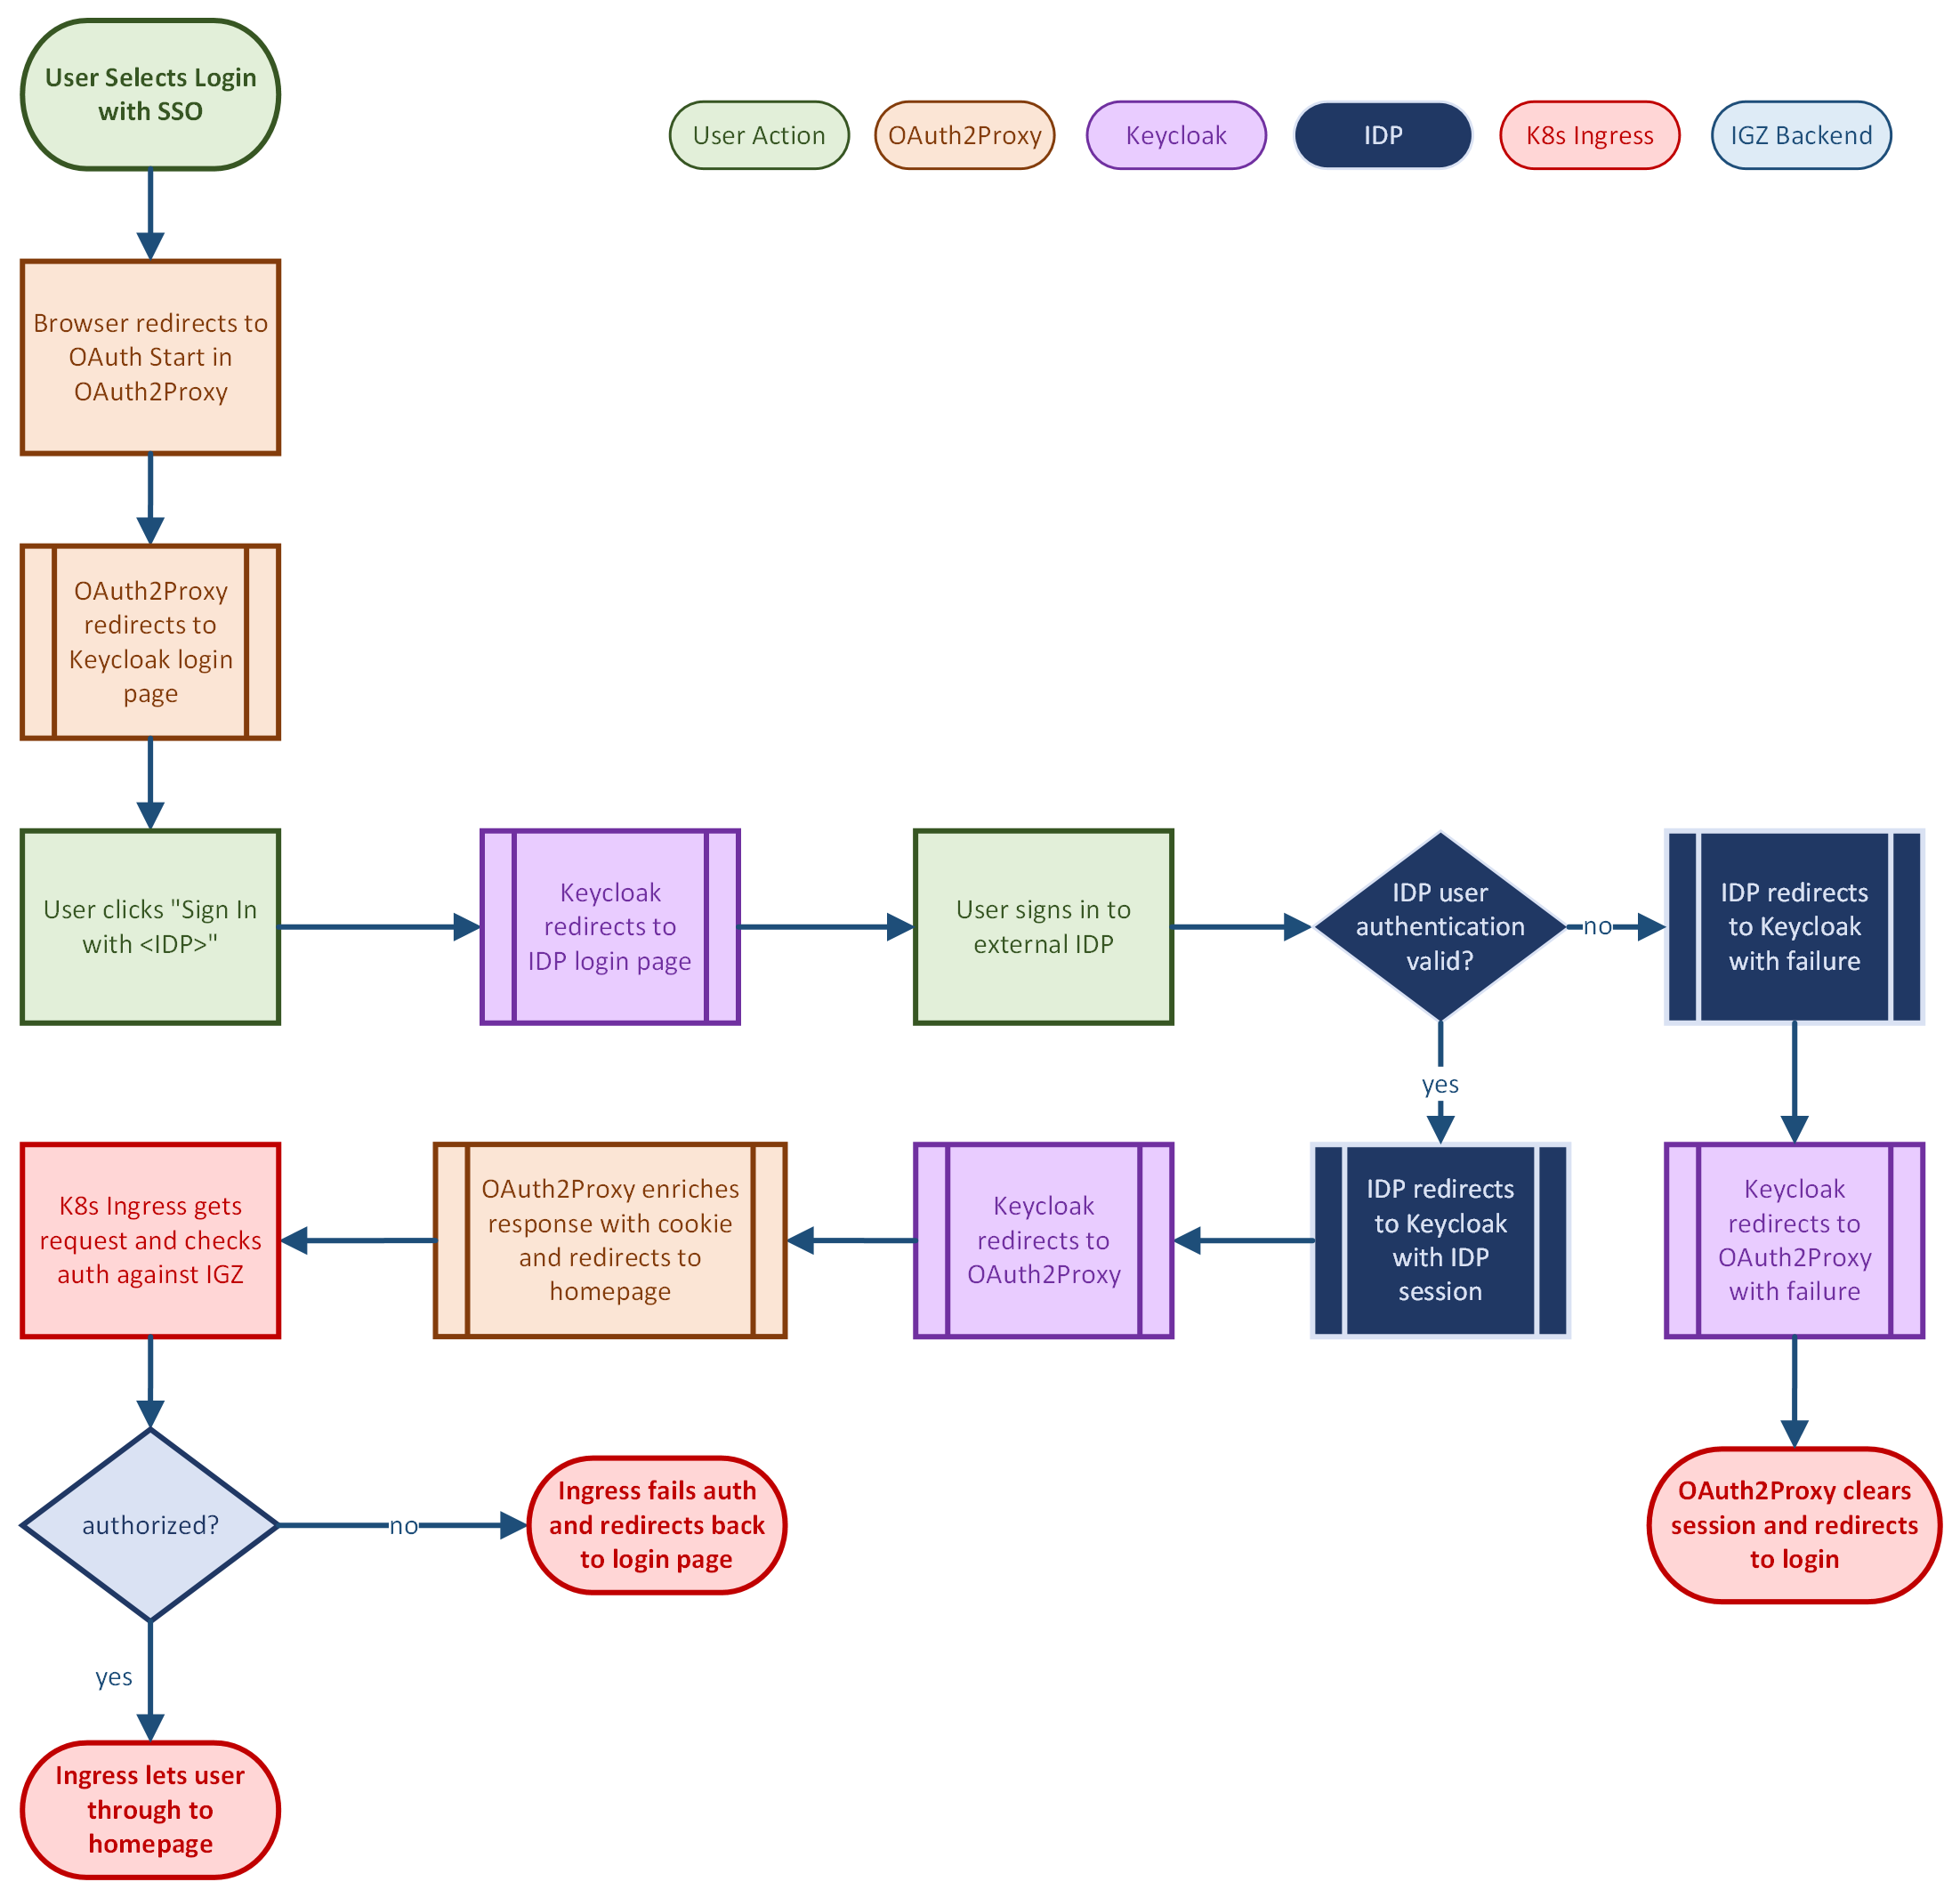
The authentication flow is complicated and there might be edge cases that are not described. Sometimes these edge cases result in an undesirable 500 error page. It can happen that these 500 error pages persist due to stale, hard-to-remove, OAuth2 or Keycloak cookies that persist in your browser. The only way to remedy this is to clear cookies from your browser (or go incognito) or wait 12 hours for the cookies to expire.
Configuring Keycloak
Prerequisite: An external Identity Provider from Keycloak's supported list (Google, Github, etc).
The list of users in your IdP are given login access to the platform, but you need to assign management policies to the users by one of the following methods:
- Before users log in for the first time: The security admin creates platform users with their SSO username, and assigns the relevant policies.
- If a user was not created in the platform, the initial user login via SSO creates the user with no management policies. (There is a warning banner informing the user.) Then the security admin must assign the relevant policies.
Read Best Practices before configuring Keycloak.
To configure SSO:
- Create an OAuth/SAML/OpenID-Connect Configuration in the app of your choice, and specify your users.
- Log in to the Iguazio dashboard with Security Admin permissions.
- In the
Identity page, pressKEYCLOAK'S CONSOLE . The Keycloak app opens. - Log in with your Keycloak credentials:
- The username for the Keycloak console is
admin - The password is the password of the security_admin of the platform
- This login gives you limited permissions.
- The username for the Keycloak console is
- Press
Identity Providers and select the app that has your configured OAuth.
Best Practices
The security admin must be extremely diligent when creating SSO access. Potential scenarios to be aware of:
- A typo in a user name gives unintended access rights to a user that happens to have that name.
- In a multiple-IdP scenario: The security admin creates a user with username X and an SSO login method. From the time the user is created until the user logs in, any user from any IDP connected to that Iguazio system, that happens to have the username X, can log in to the system and assume the X Iguazio user. If this user comes from another IdP, the initial, intended user X is now locked out of the system and the other user X has assumed their identity within the Iguazio system.
If you have multiple IdPs, one option to ensure that all user names are unique across all of the IdPs is to use email addresses as usernames when importing users, under the assumption that all email addresses are unique.
Mappers
Identity Provider (IdP) Mappers are a critical component of Keycloak's Identity Brokering feature. They define the rules for transforming and synchronizing user data received from an external Identity Provider (IdP) into the canonical Keycloak User Model. The primary function of an IdP Mapper is to mediate the schema disparity between the claims/assertions sent by the external IdP and the internal structure of Keycloak user attributes, roles, and groups. It may be required to configure a Mapper to meet Iguazio's user naming policies.
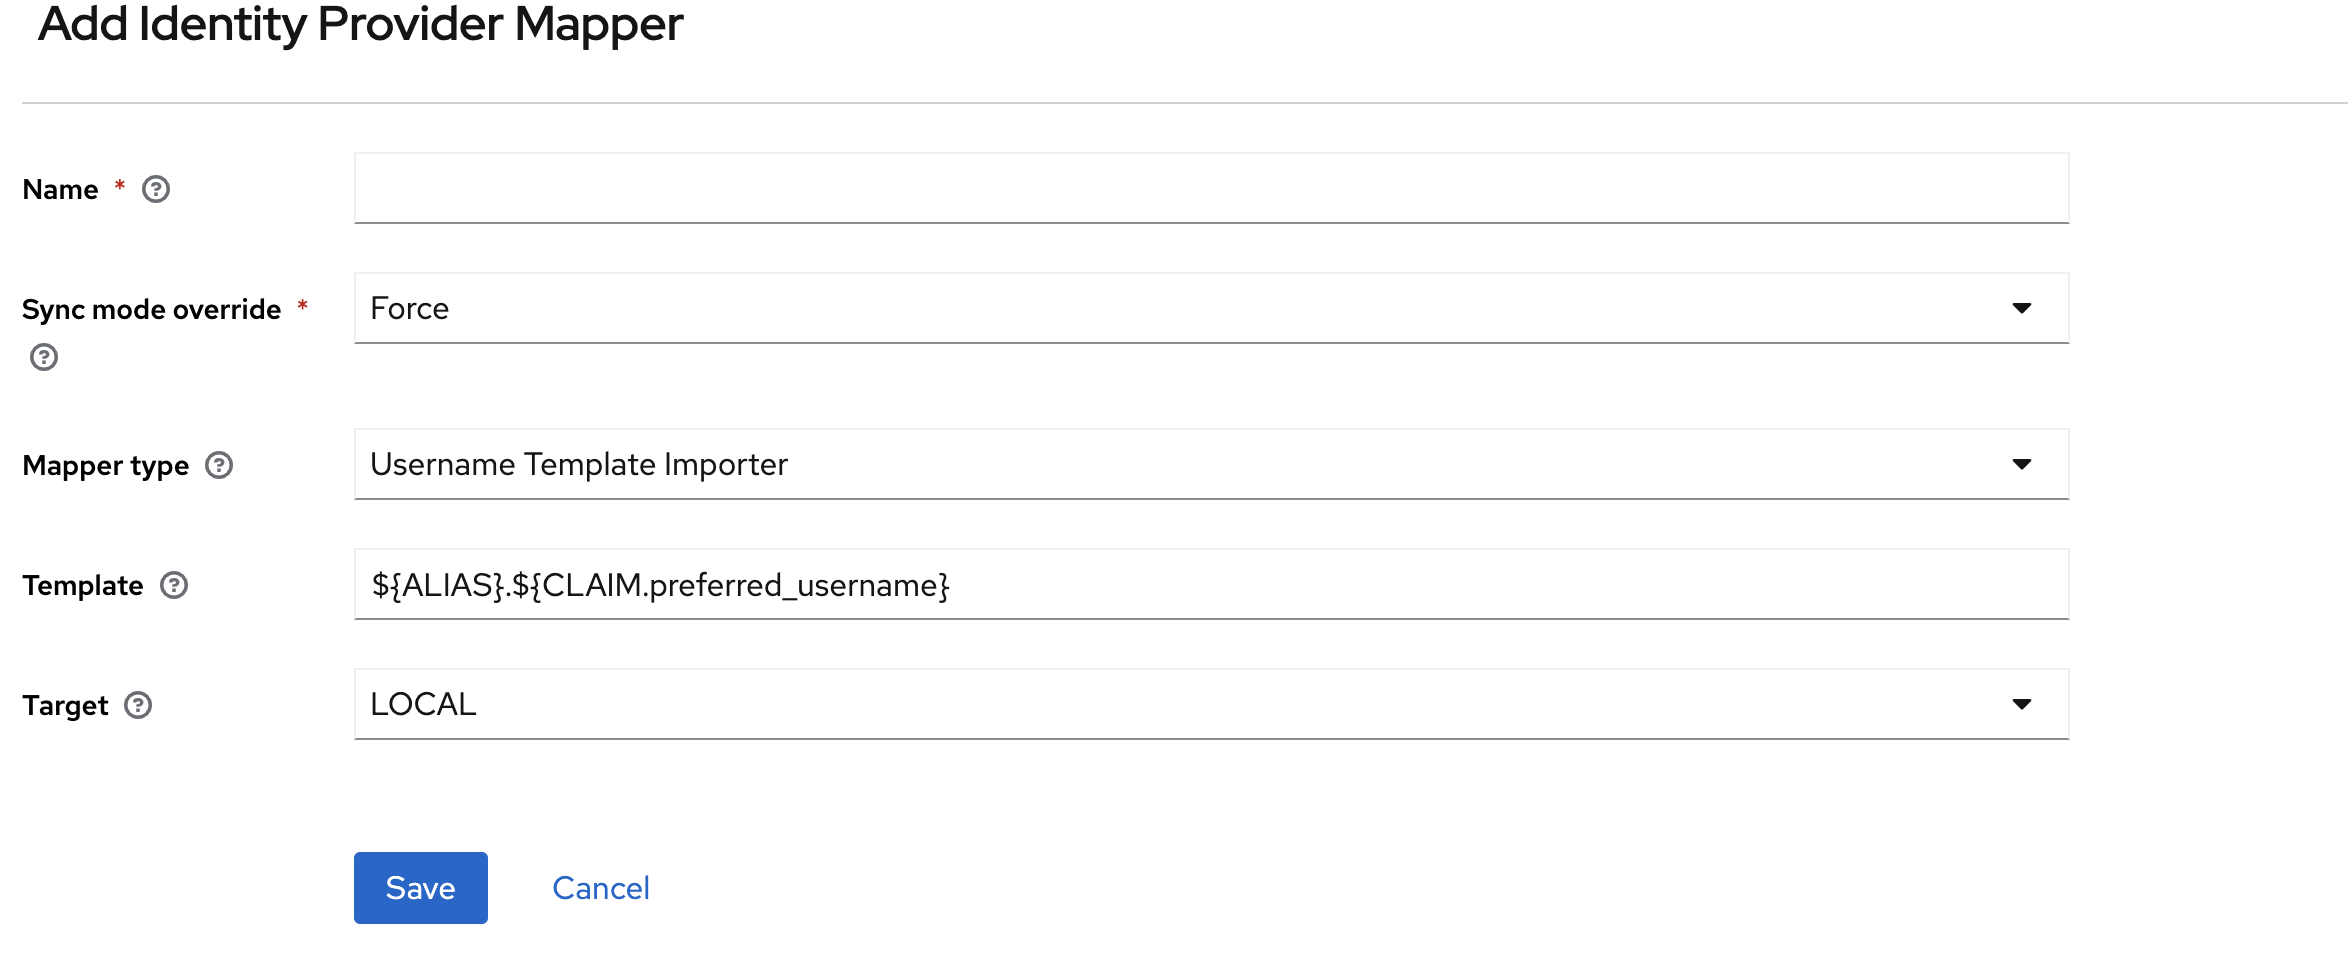
The screenshots that follow demonstrate how to map IDP users to KC/IGZ users using the email property. The screenshots, however, are an example only. Field names can vary between IDPs. You would do this once for each IdP.
- In the Keycloak console Identity providers > Provider details, press the Mappers tab.
- Add a new mapper using the following details, and click
Save .
- Sync mode override: Force
- Mapper type: Username Template Importer
- Template: ${CLAIM.email}
- Target: LOCAL
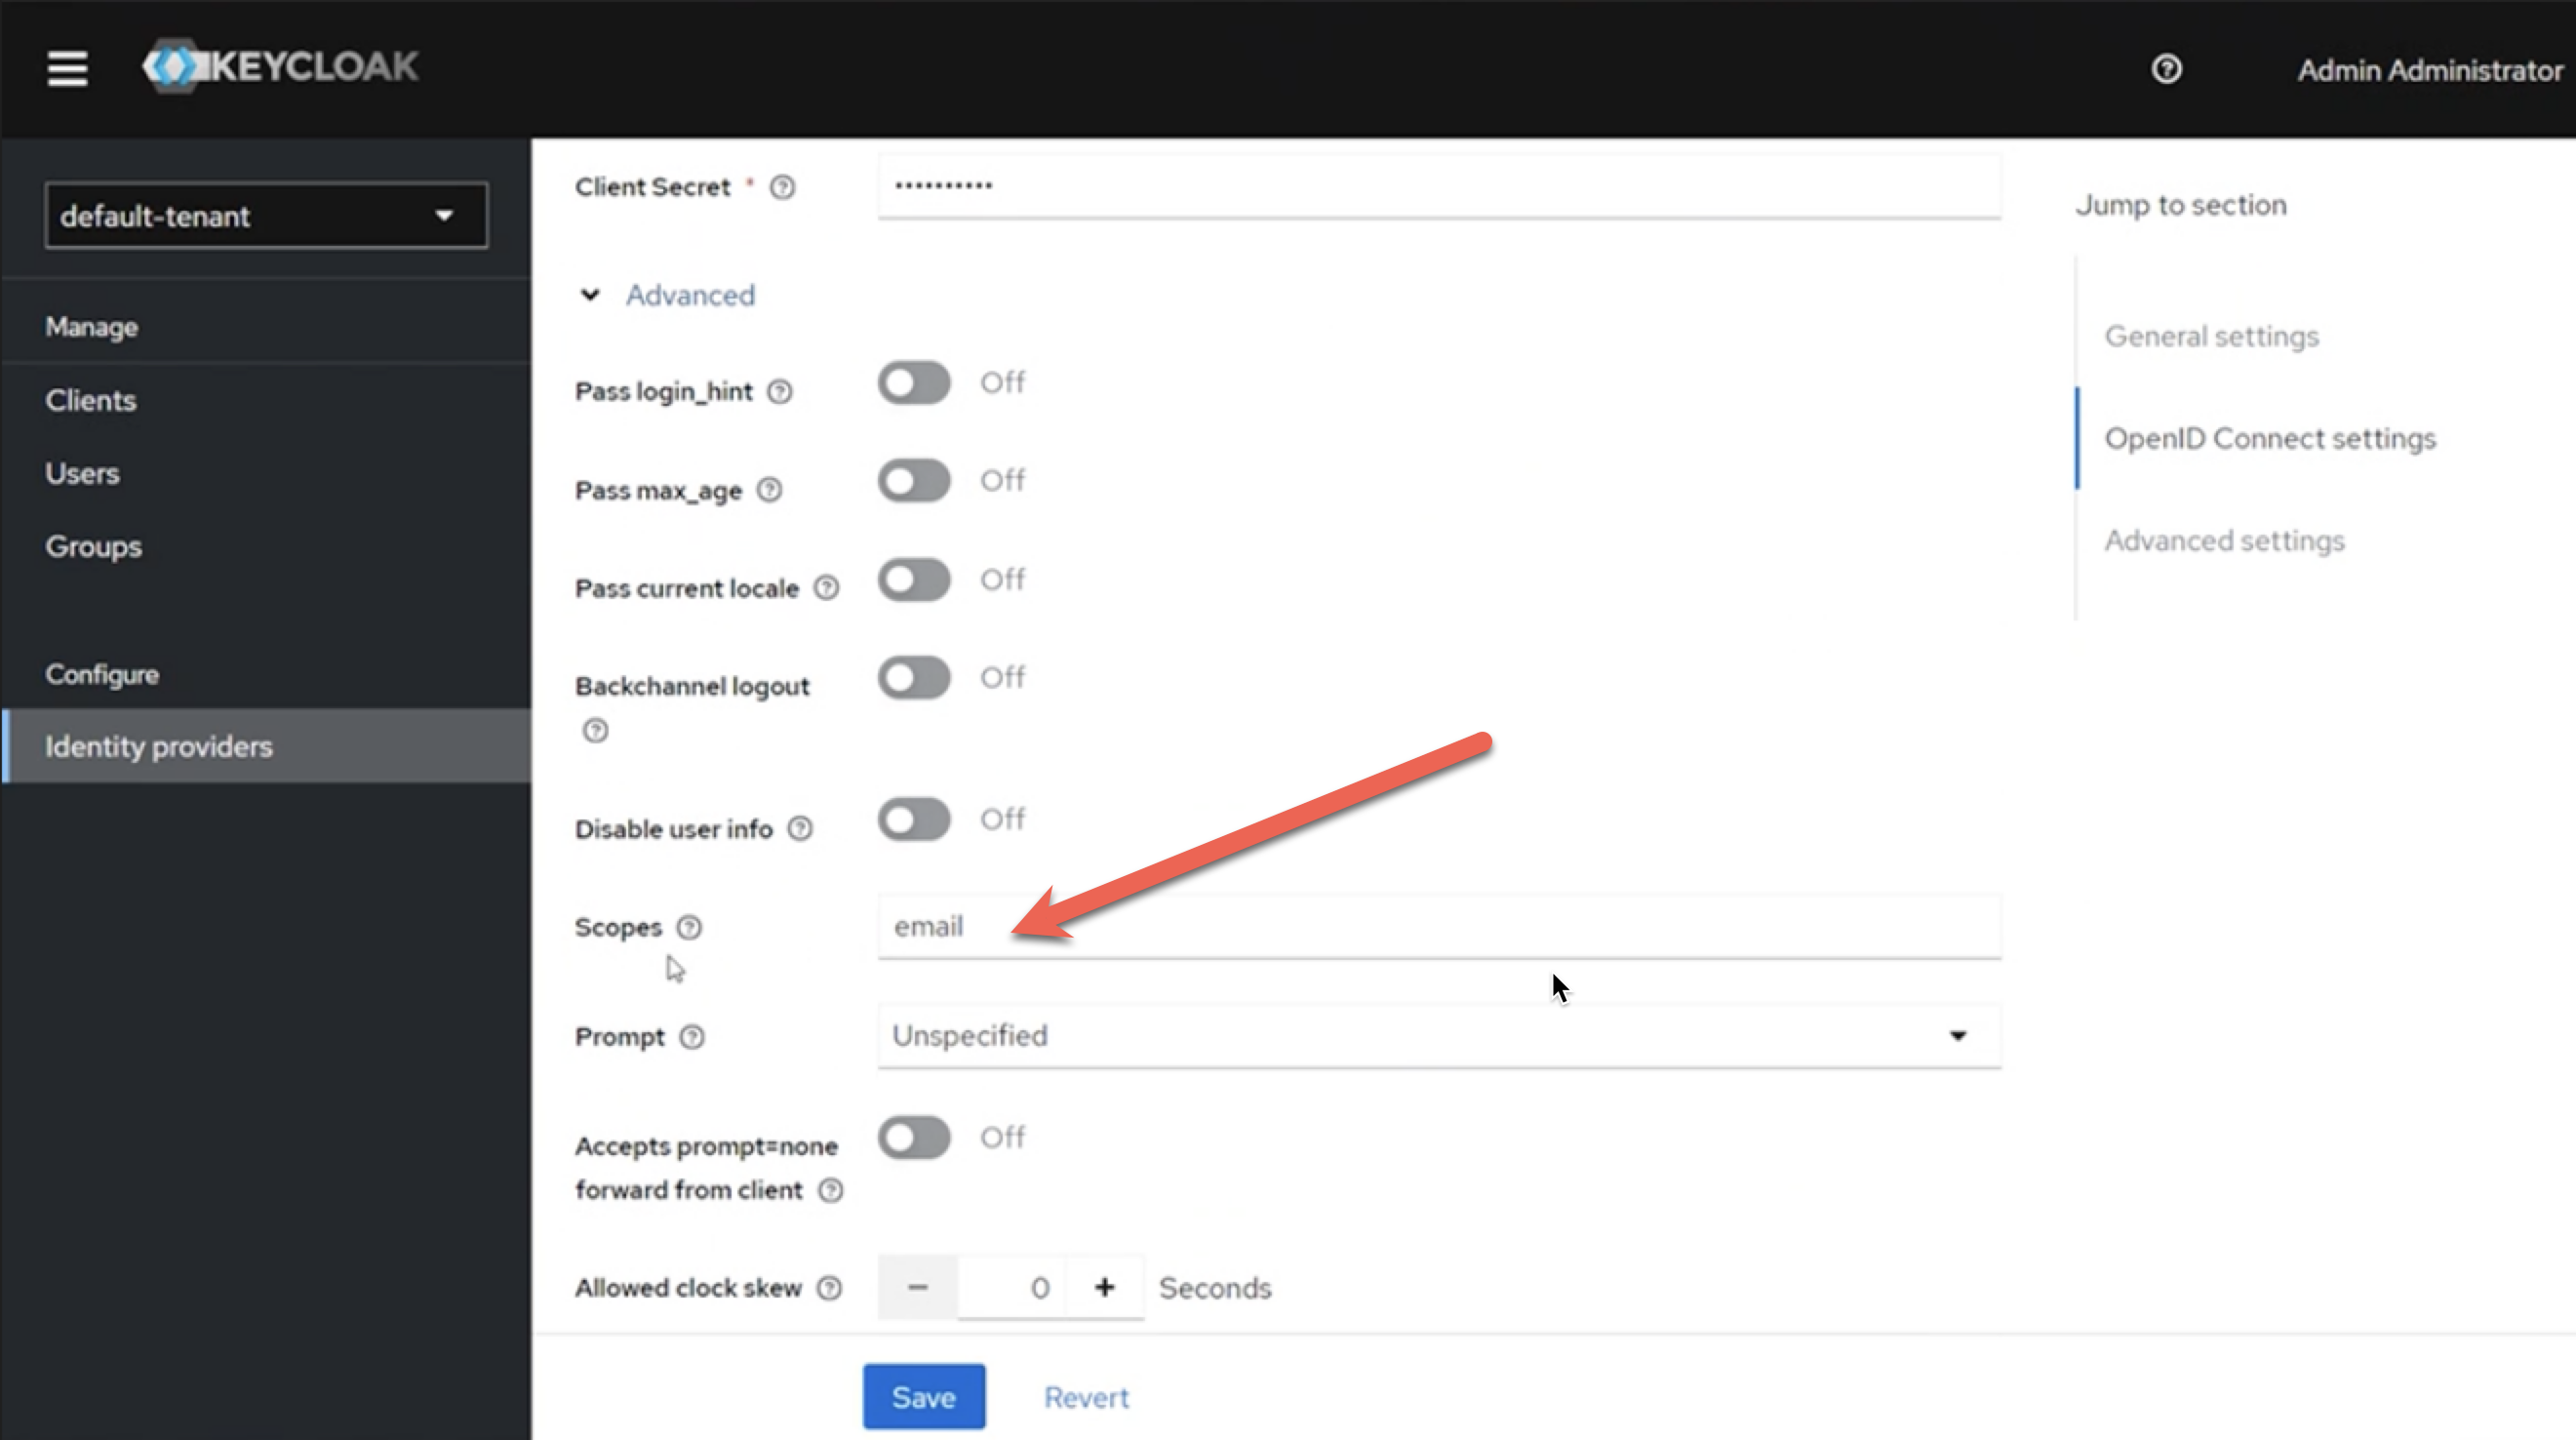
If a user is still not being created in Keycloak, it may be due to the email coming empty from the external IDP. You can try to adjust the scope under the Identity provider’s Advanced configuration and put email in the Scopes field.