Installing the Platform on an AWS Cloud
Overview
This guide outlines the required steps for installing (deploying) an instance of the Iguazio AI Platform ("the platform") to an Amazon Web Services (AWS) cloud. When you complete the procedure, you'll have a platform instance running under your AWS account. The installation is done by using the platform installer — Provazio — with your AWS credentials.
-
The deployment procedure requires proficiency in Systems Operations on AWS, and is typically completed in 1–2 hours.
-
Do not use the AWS root user for any deployment operations.
-
Subscribing to AWS Business Support, or higher, for all production instances provides a faster response time from AWS Support and is strongly recommended.
-
Provisioning of the servers is handled automatically by the platform installer (Provazio).
Don't attempt to provision the servers manually prior to the deployment. -
The data-node instances include Non-Volatile Memory Express (NVMe) SSD-based instance storage, which is optimized for low latency, very high random I/O performance, and high sequential read throughput. The data doesn't persist on the NVMe if the instance is stopped.
Don't attempt to shut down any of the data nodes, as it will erase the data.
Prerequisites
Before you begin, ensure that you have the following:
- A Provazio API key and a Provazio vault URL, received from Iguazio.
- Administrative access to an AWS account.
- Confirmation from Iguazio's support team that platform Amazon Machine Images (AMIs) were configured with proper permissions for your AWS account.
- A machine running Docker.
- Access to the internet, or a preloaded Provazio Docker image (
gcr.io/iguazio/provazio-dashboard:stable ), received from Iguazio as an image archive (provazio-latest.tar.gz ).
Deployment Steps
To deploy an instance of the platform to an AWS cloud, execute the following steps.
Step 1: Configure your AWS Site for either Role-based or User-based Deployment | Step 2: Configure the installation environment for either Role-based or User-based Deployment | Step 3: Run the platform installer | Step 4: Access the installer dashboard | Step 5: Choose the AWS scenario | Step 6: Configure general parameters | Step 7: Configure cluster parameters | Step 8: Configure cloud parameters | Step 9: Review the settings | Step 10: Wait for completion
Step 1: Configure your AWS Site for either Role-based or User-based Deployment
You can base your deployment on either role or user. User-based configuration requires creation of keys/secrets that need to be updated on the cluster if they are modified. Role-based configuration does not require any upkeep.
Perform one of:
- Configuring for User-based Deployment
- Configuring for Role-based Deployment
Step 2: Configure the Installation Environment for either Role-based or User-based Deployment
Create a
For the user-based configuration, use this template:
dashboard:
  frontend:
    cloud_provider_regions:
      aws:
      - <AWS Region>

client:
  infrastructure:
    ec2:
      access_key_id: <Access Key ID>
      secret_access_key: <Secret Access Key>
      data_cluster_instance_profile: IguazioDataScienceNode
      app_cluster_instance_profile: IguazioDataScienceNode

  vault:
    api_key: <Provazio API Key>
    url: <Provazio vault URL>

provisioning:
  whitelisted_services: ["*"]
For the role-based configuration, use this template:
 dashboard:
  frontend:
    cloud_provider_regions:
      aws:
      - <AWS Region>
client:
  infrastructure:
    ec2:
      role_arn: dummy
      secret_access_key:
      data_cluster_instance_profile: IguazioDataScienceNode
  vault:
    api_key: <Provazio API Key>
    url: <Provazio vault URL>
provisioning:
  whitelisted_services: ["*"]
Replace the <...> placeholders with the information for your environment:
- AWS Region
- A list of one or more AWS regions that you'd like to choose from (for example, "us-east-2").
- Access Key ID
- The AWS Access Key ID for the IAM user created in Step 1. Not relevant for role-based configuration.
- Secret Access Key
- The AWS Secret Access Key for the IAM user created in Step 1. Not relevant for role-based configuration.
- Provazio API Key
- A Provazio API key, received from Iguazio (see the installation prerequisites).
- Provazio Vault URL
- A Provazio vault URL, received from Iguazio (see the installation prerequisites).
Step 3: Run the Platform Installer
Run the platform installer, Provazio, by running the following command from a command-line shell:
docker pull gcr.io/iguazio/provazio-dashboard:stable && docker run --rm --name provazio-dashboard \
    -v /tmp/env.yaml:/tmp/env.yaml \
    -e PROVAZIO_ENV_SPEC_PATH=/tmp/env.yaml \
    -p 8060:8060 \
    gcr.io/iguazio/provazio-dashboard:stable
Step 4: Access the Installer Dashboard
In a web browser, browse to localhost:8060 to view the Provazio dashboard.
Press the plus-sign icon (
Step 5: Choose the AWS Scenario
On the 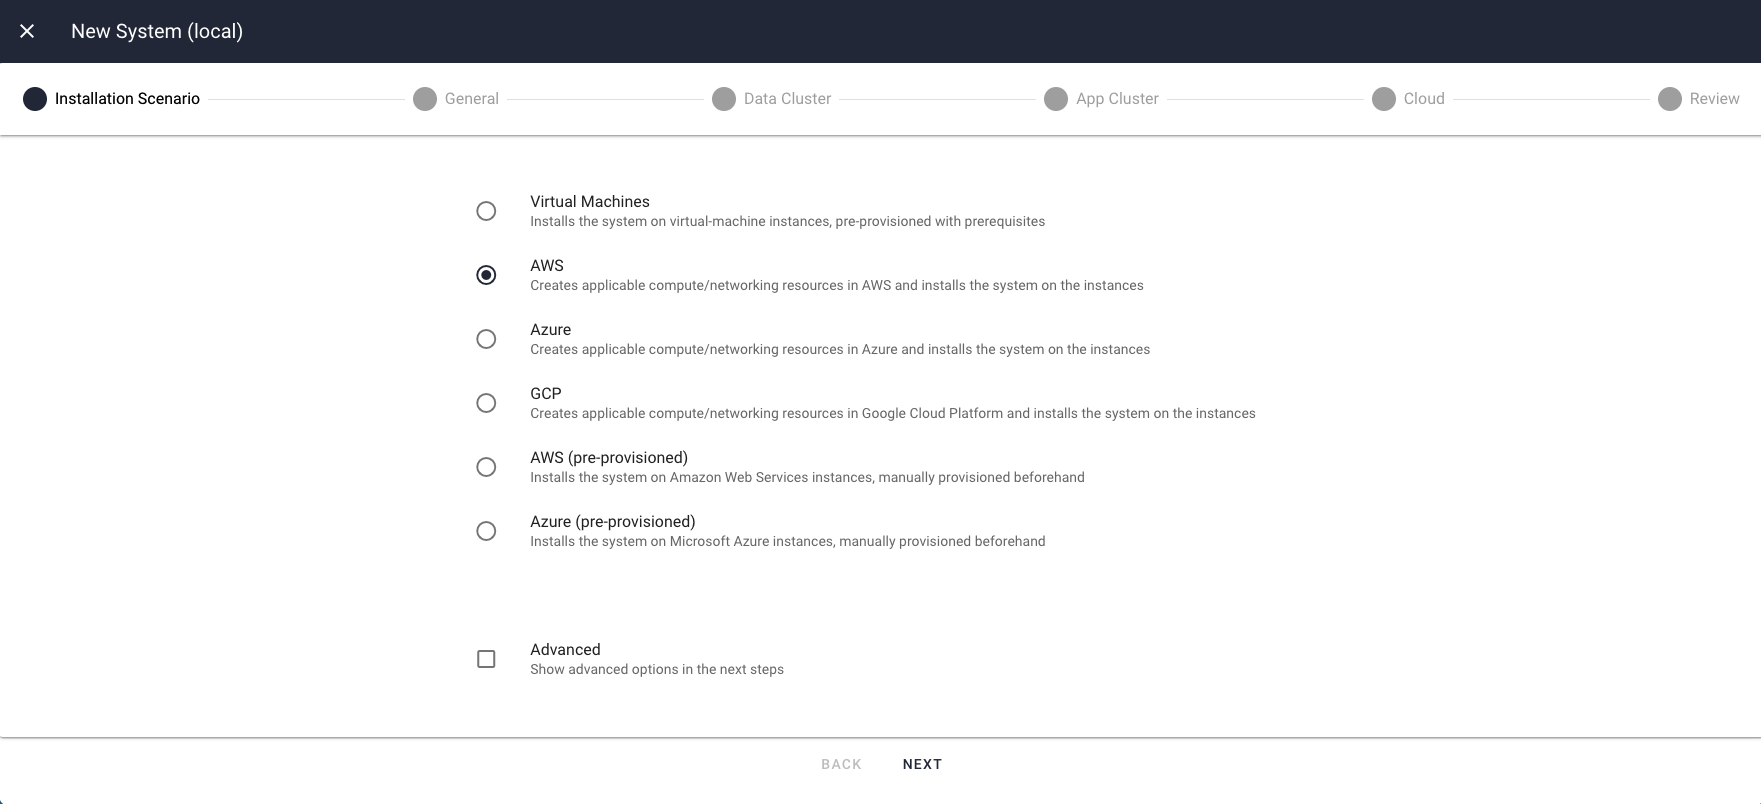
Step 6: Configure General Parameters
On the 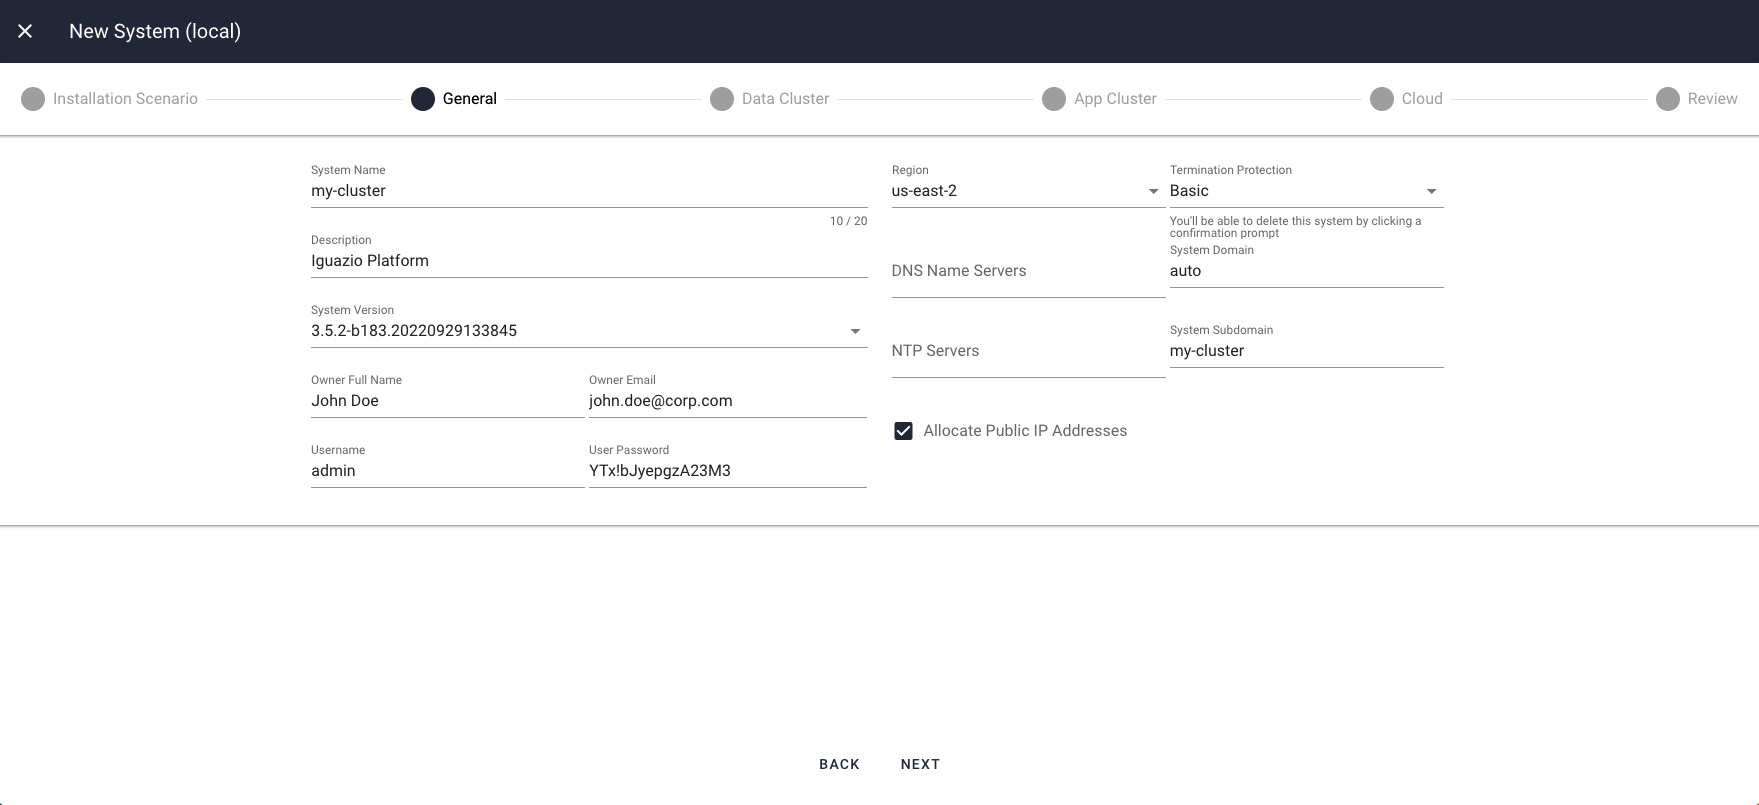
- System Name
A platform name (ID) of your choice (for example, "my-platform-0"). The installer prepends this value to the value of
System Domain parameter to create the full platform domain.- Valid Values: A string of 1–12 characters; can contain lowercase letters (a–z) and hyphens (-); must begin with a lowercase letter
- Default Value: A randomly generated lowercase string
- Description
- A free-text string that describes the platform instance.
- System Version
The platform version. This is auto-populated based on the AMIs that you have access to in the region, so make sure to set the
Region parameter.- Owner Full Name
- An owner-name string, containing the full name of the platform owner, for bookkeeping.
- Owner Email
- An owner-email string, containing the email address of the platform owner, for bookkeeping.
- Username
The username of a platform user to be created by the installation. This username will be used together with the configured
password to log into platform dashboard. You can add additional users after the platform is provisioned.- User Password
A platform password for the user generated by the installation — to be used with the configured
username to log into platform dashboard; see the password restrictions. You can change this password after the platform is provisioned.- Region
- The region in which to install the platform.
- System Domain
A custom platform domain (for example, "customer.com"). The installer prepends the value of the
System Name parameter to this value to create the full platform domain.- Allocate Public IP Addresses
- Check this option to allocate public IP addresses to all of the platform nodes (EC2 instances).
- Termination Protection
- The protection level for terminating the platform installation from the installer dashboard.
Step 7: Configure Cluster Parameters
On the
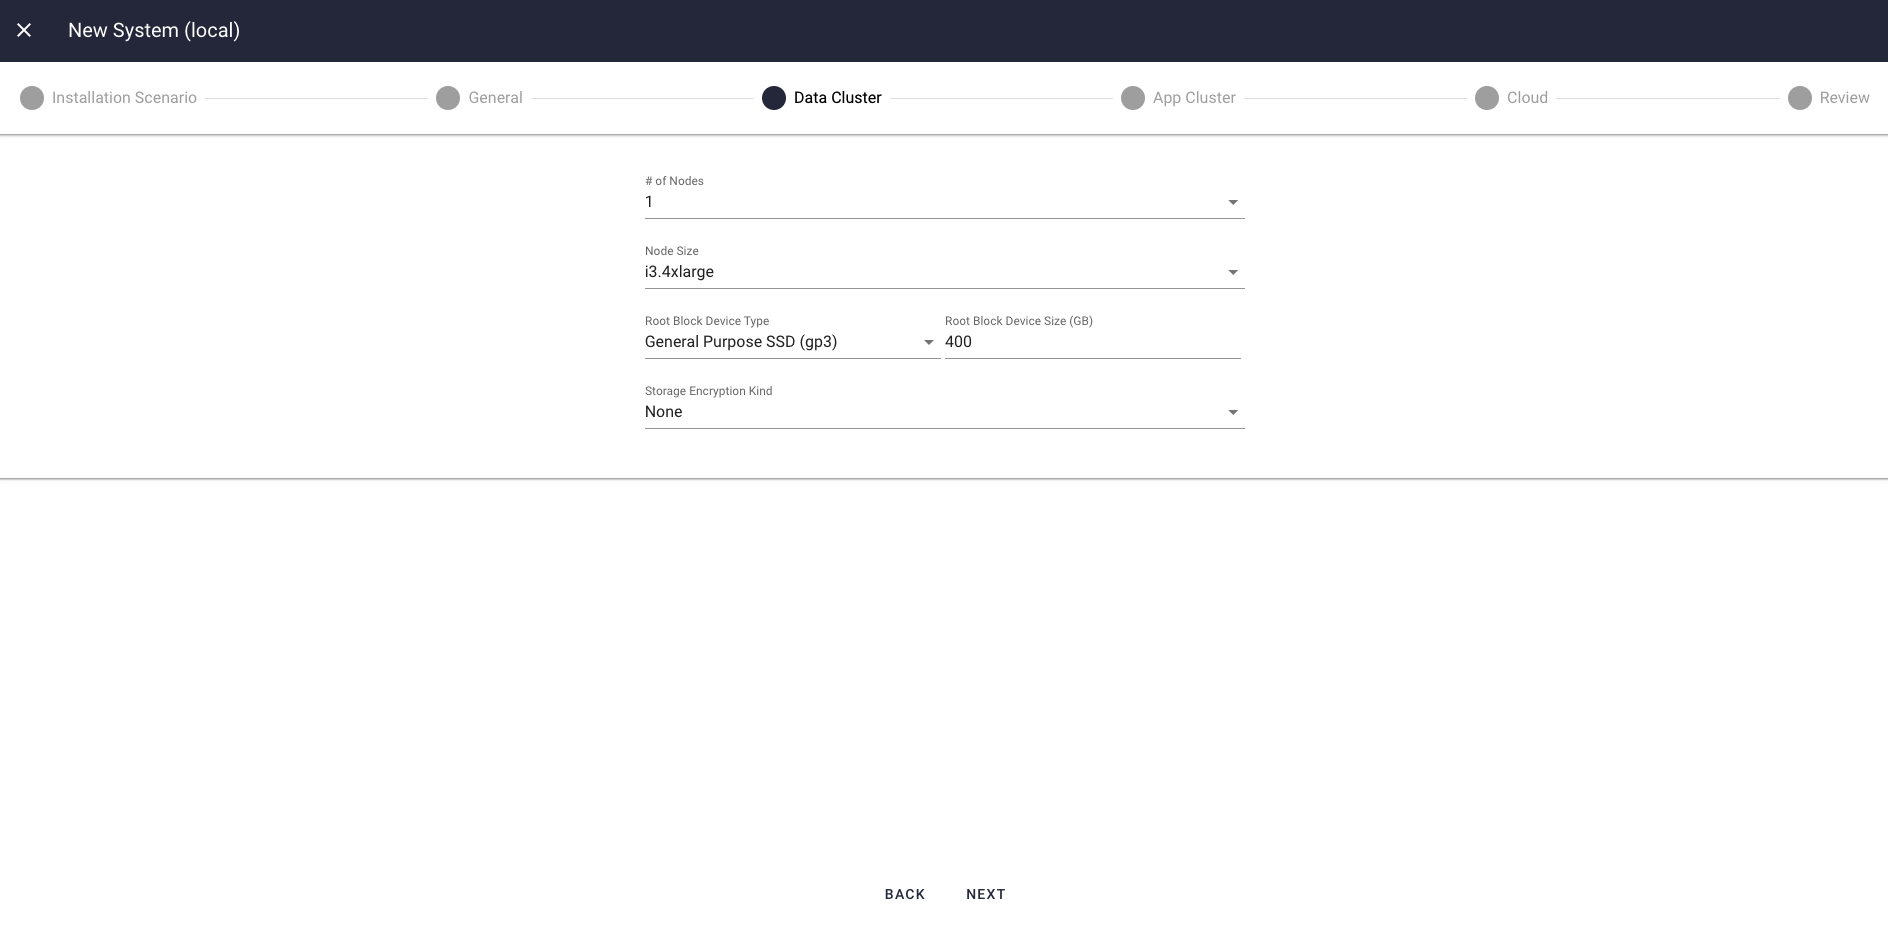
Common Parameters (Data and Application Clusters)
The following parameters are set for both the data and application clusters. Node references in the parameter descriptions apply to the platform's data nodes for the data cluster and application nodes for the application cluster.
- # of Nodes
- The number of nodes (EC2 instances) to allocate for the cluster.
- Node Size
- The EC2 instance type, which determines the size of the clusters' nodes.
- Root Block Device Type
The Amazon Elastic Block Store (EBS) type for the control plane.
- Default Value: EBS General Purpose SSD (gp2), which provides a good balance between performance and cost. Note that the data plane uses high-speed NVMe storage.
- Root Block Device Size
- The size of the EBS for the control plane.
- Storage Encryption Kind
- The type of encryption to be applied. For details about LUKS encryption, see LUKS for Storage Encryption Kind.
Application-Cluster Parameters
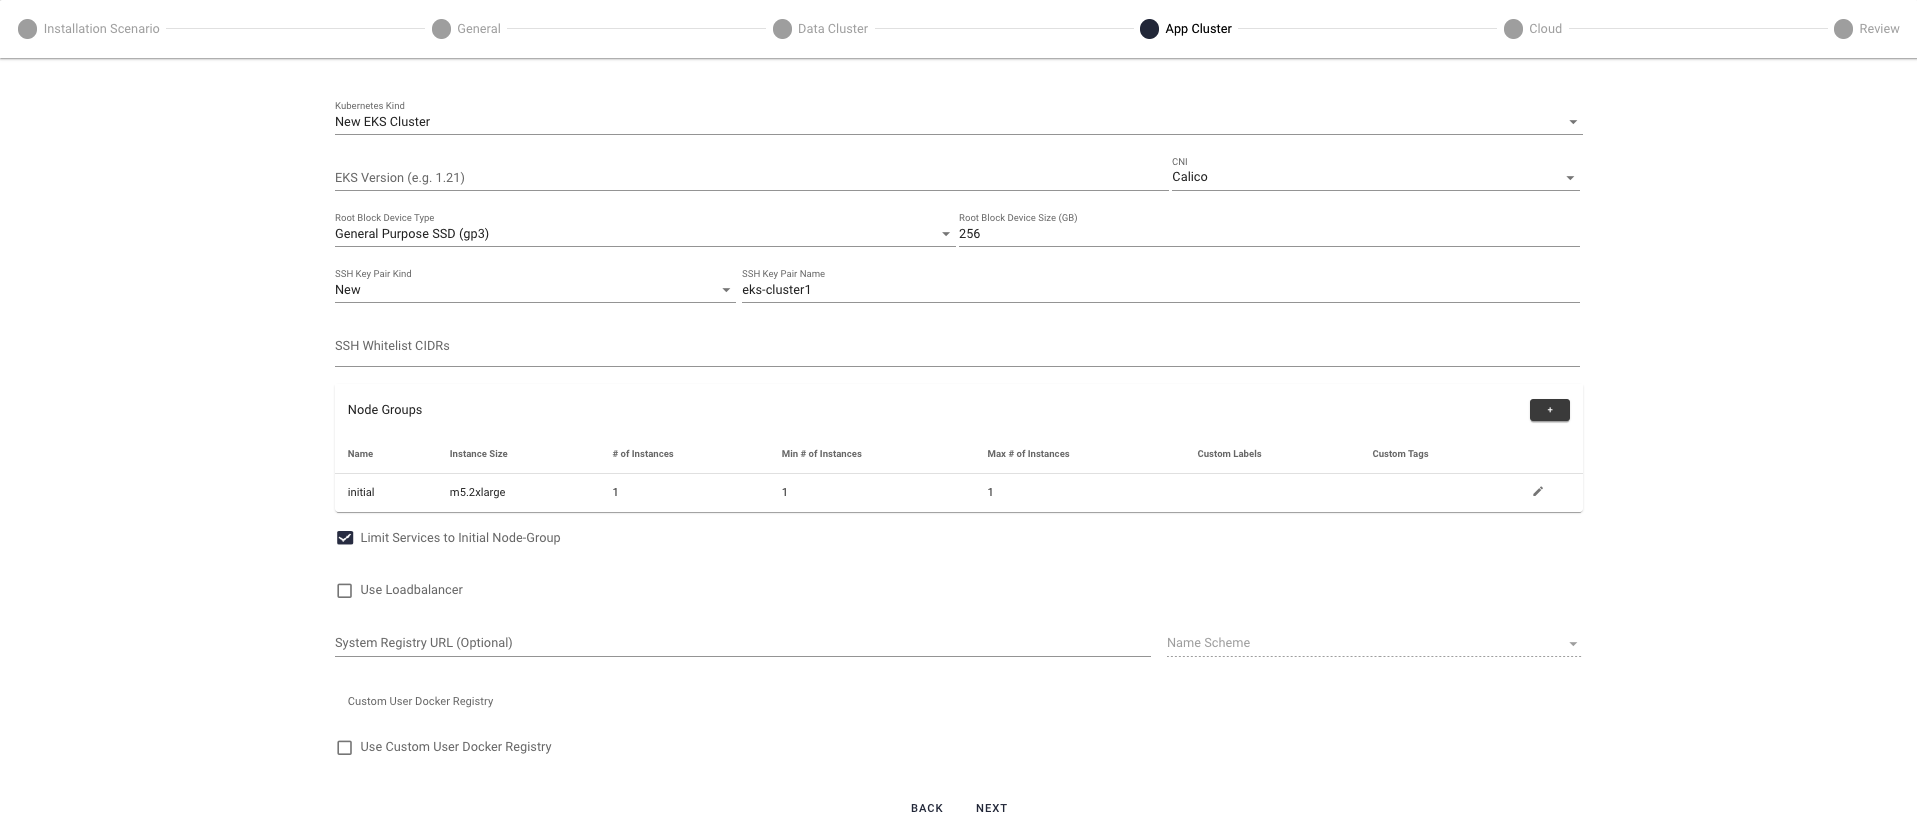
- Kubernetes Kind
- One of:
New EKS Cluster orExisting if the EKS was pre-provisioned, in which case you need to enter the kubeconfig. - EKS Version
- The Kubernetes version that EKS uses to provision an AWS cluster. Leave this blank, it is filled in automatically.
- CNI (Container Network Interface)
- Choose the carrier network infrastructure. Options are aws-node and Calico. It's strongly recommended to use Calico.
- Root Block Device Type
- Leave this set to
General Purpose SSD . - Root Block Device Size
- The size of the EBS for the control plane.
- SSH Key Pair Kind
The type of key pairing to use for SSH connections to the EKS application cluster:
New — Create a new SSH key. To set a new key you also need to specify the SSH Whitelist CIDRs. If not defined, the whitelist defaults to 0.0.0.0/0 for port 22.Existing — Use an existing SSH key.None — Don't use any SSH key.
Note that when this option is set, you cannot use SSH to connect to the EKS application nodes.
- SSH Key Pair Name
- An identifying name of your choice.
- SSH Whitelist CIDRs
- Leave this empty.
- Node Groups
You can group application nodes in the EKS application cluster into groups.
The installer predefines a default node group named "initial", which cannot be deleted. Press the edit icon for this group to edit its configuration. The minimum number of instances (
Min # of instances ) for the default node group is 1, and currently not configurable.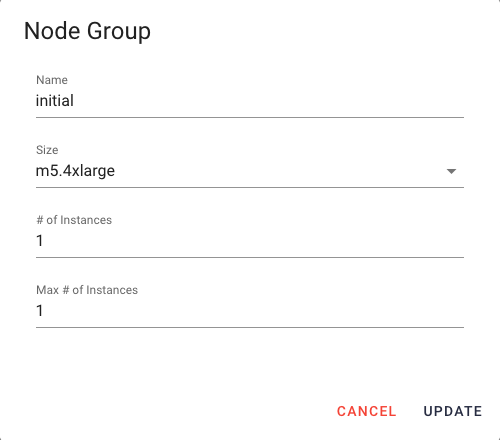
Additional Node Groups
Press the plus-sign icon (
+ ) to define one or more additional, custom node groups.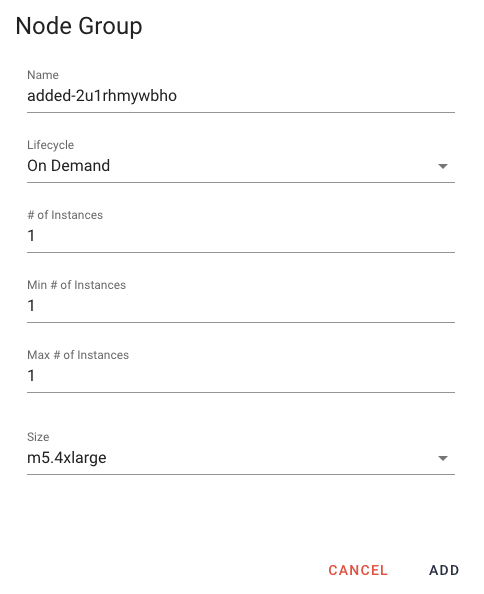
- Name — The name of the node group.
- Lifecycle — The EC2 instance lifecycle type:
- On Demand —recommended for applications with workloads that cannot be interrupted. (default)
- Spot —cost-effective instances that are flexible about when applications are run and if they can be interrupted
- # of Instances — The number of instances (nodes) to deploy for this group.
- Min # of Instances — The minimum number of nodes in the group.
For the default node group, the value of this parameter is currently not configurable.
For additional groups, you can set this parameter to any positive number or to zero.
For high availability, it's recommended to have a minimum of two application nodes in each group. - Max # of Instances — The maximum number of nodes in the group.
- Size — The EC2 instance size for the nodes in the group. Required for On Demand lifecycle type.
- Min # of CPUs — The minimum number of CPUs in each node. Required for Spot lifecycle type.
- Max # of CPUs — The maximum number of CPUs in each node. Required for Spot lifecycle type.
- Min # of GPUs — The minimum number of GPUs in each node. Required for Spot lifecycle type.
- Max # of GPUs — The maximum number of GPUs in each node. Required for Spot lifecycle type.
- Min amount of memory (GB) — The minimum amount of memory (GB) in each node. Required for Spot lifecycle type.
- Max amount of memory (GB) — The maximum amount of memory (GB) in each node. Required for Spot lifecycle type.
- Limit Services to Initial Node-Group
- Select this to assign the Iguazio core application services to the initial node group.
- Use Loadbalancer
- Select if you want to use load balancing. Node ports cannot be used when load balancing is enabled.
- Use System Registry URL (Optional)
Specify ECR URL to store the container images used for installation of your system (mlrun api image, nuclio dashboard image, v3io image, flex-fuse image, etc.). This is useful if you need to store your system images on your own registry. You must ensure that the Kubernetes is deployed with a role that allows it to read/write to the specified registry.
Type in the registry URL, and select the Name Scheme from the drop-down list.
If not specified, managed Kubernetes deployments use the Iguazio default container registry: gcr.io/iguazio.
- Use Custom User Docker Registry
- The User Registry stores the user container images, for example, Nuclio container image, MLRun run function image. Operational clusters require a Custom User Docker Registry (that you provide). You can connect to it by specifying the URL and credentials either during installation, or post-installation. See more details in Docker Registry.
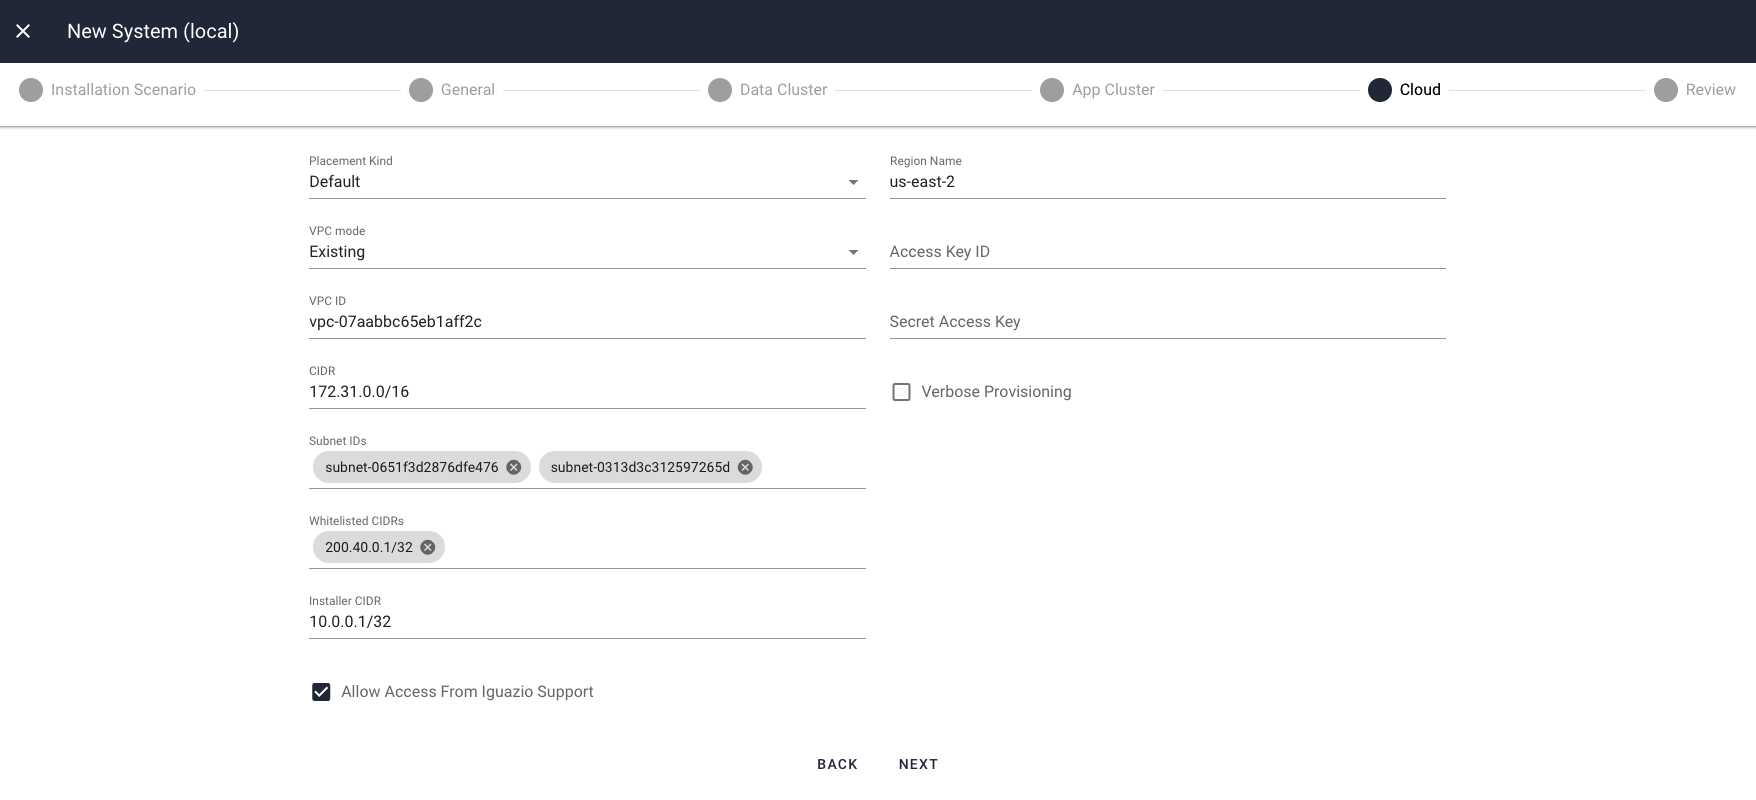
Step 8: Configure Cloud Parameters
On the
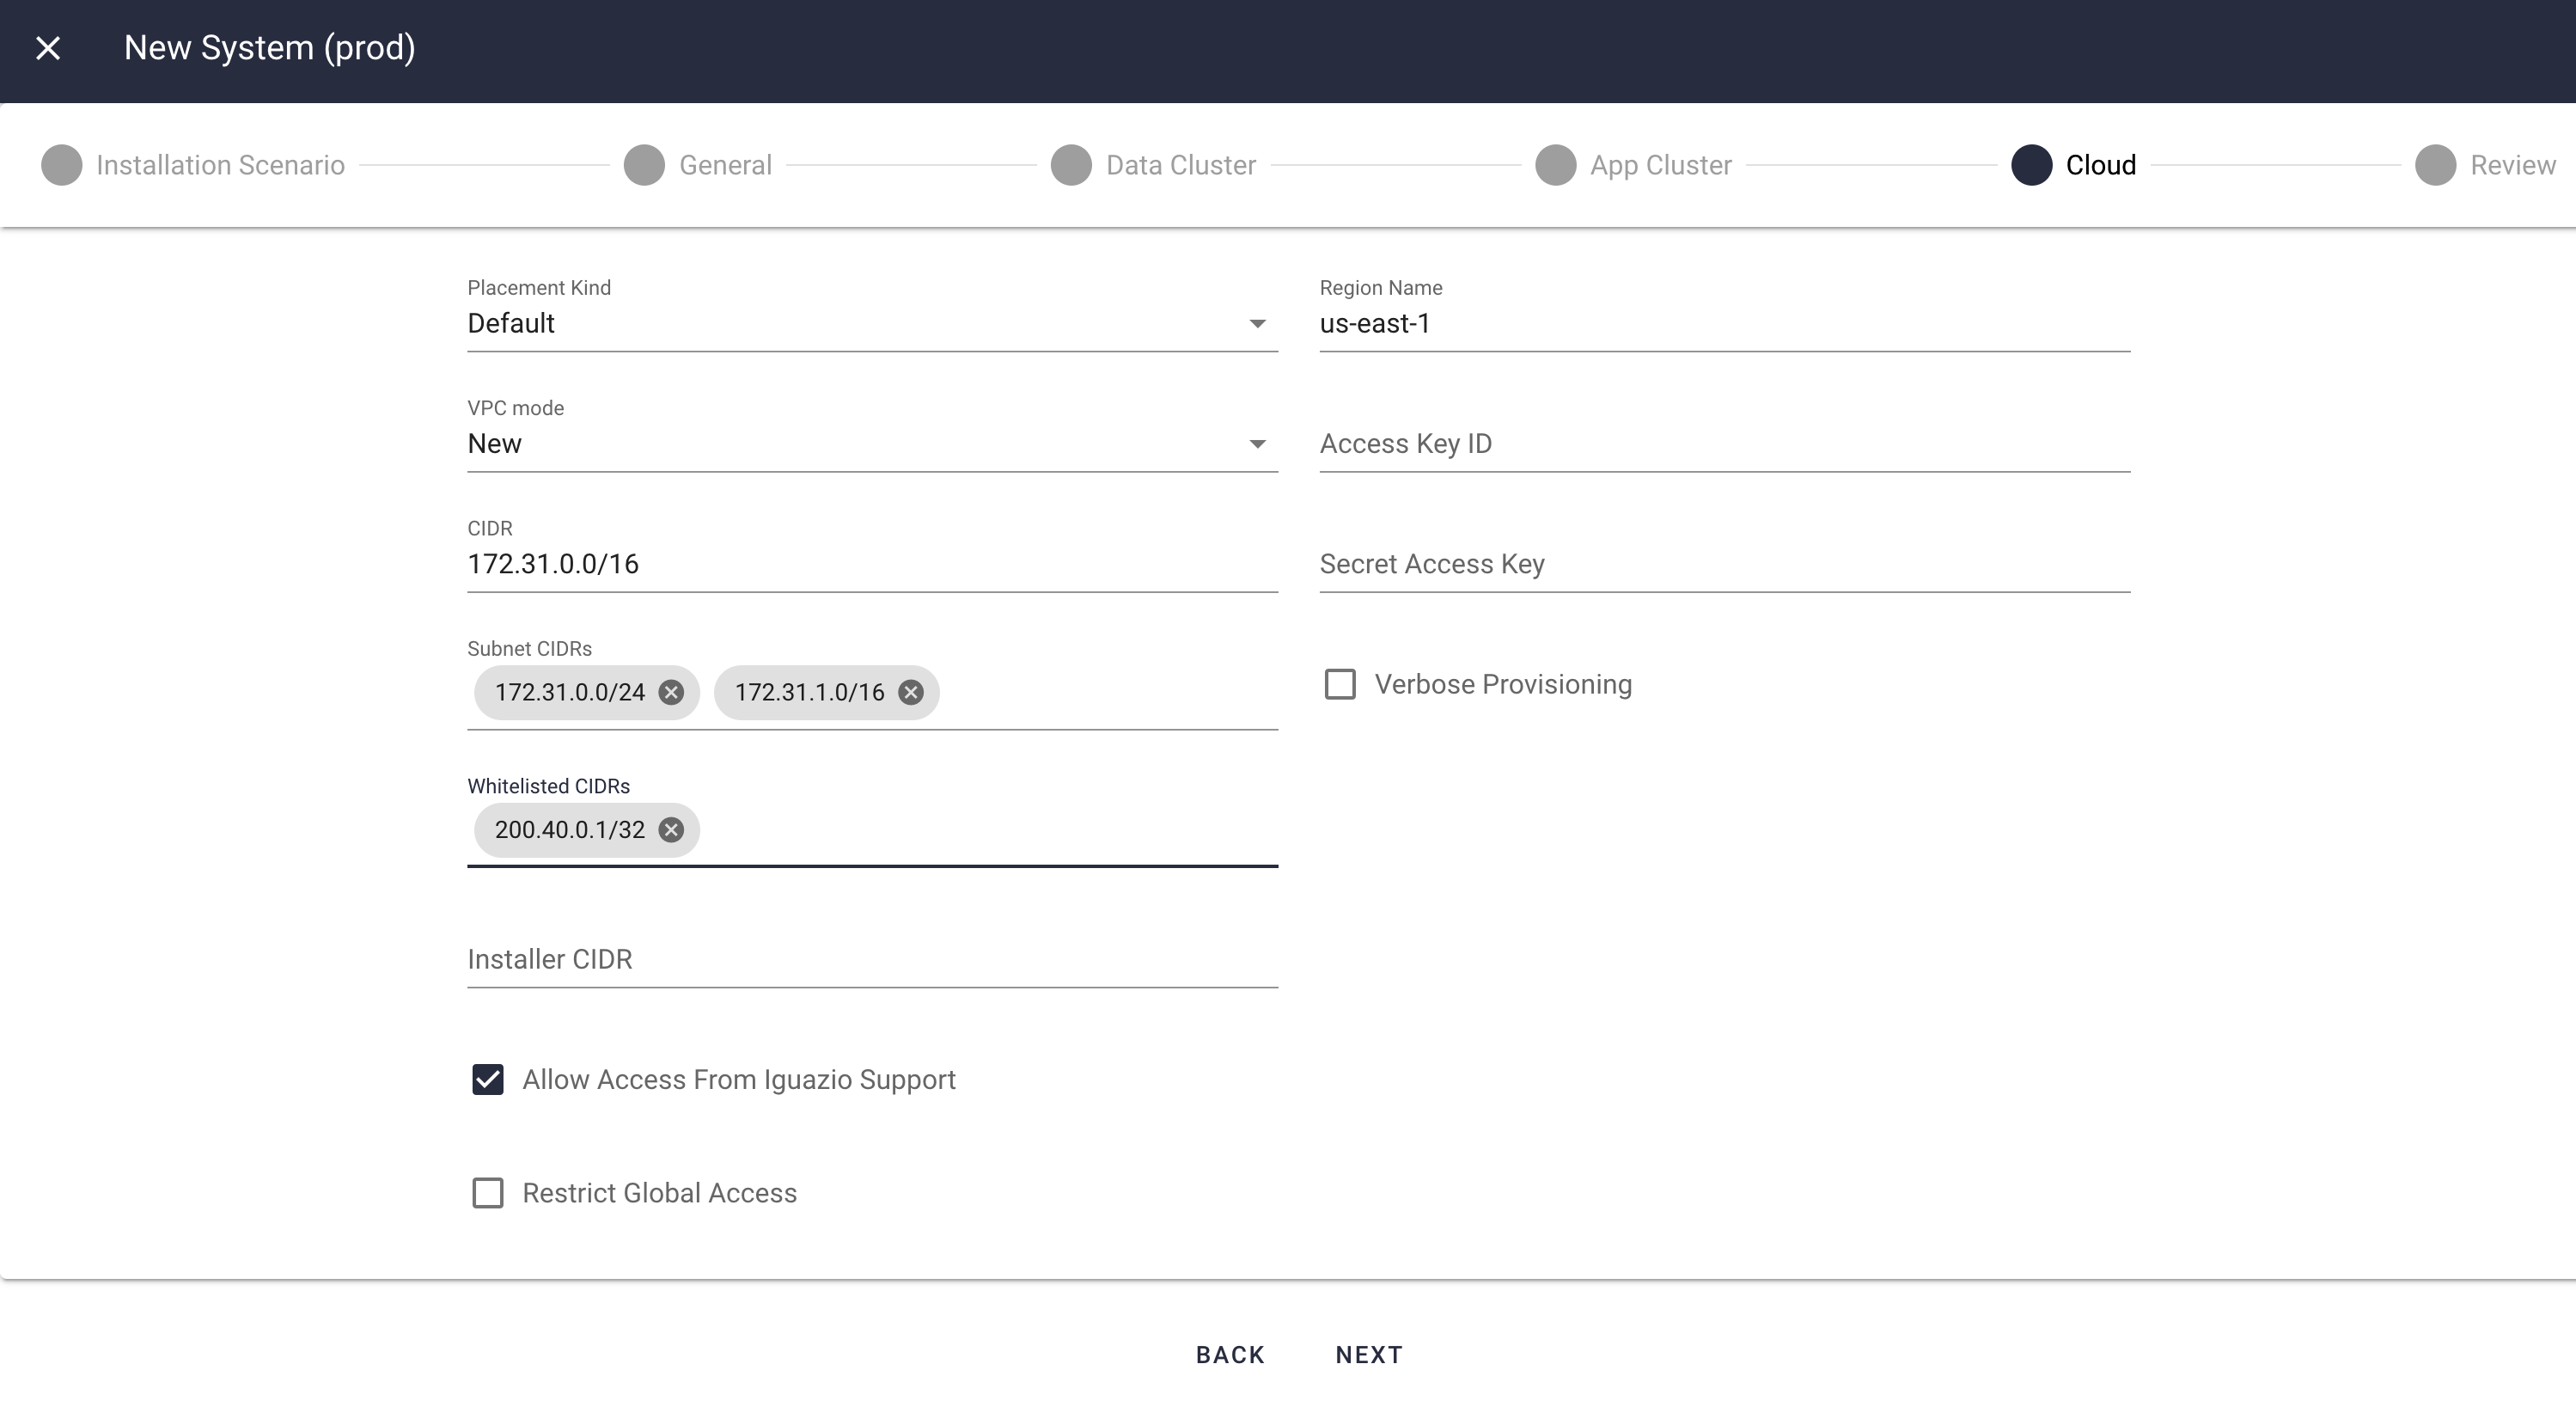
- VPC mode
The cloud configuration configures the platform's virtual private cloud (VPC) networking. You can select between two alternative VPC modes:
New — Create a new VPC and install the platform in this VPC.Existing — Install the platform in an existing VPC.
The following optional parameters are applicable to both VPC modes; (see the example UI screen shots for the different VPC-mode configurations later in this step):
- Region Name
Overrides the value of the
Region general-configuration parameter.- Access Key ID
Overrides the value of the
Access Key ID environment-configuration parameter.NoteThis parameter should typically not be set.- Secret Access Key
Overrides the value of the
Secret Access Key environment-configuration parameter.NoteThis parameter should typically not be set. If you find the need to set it, consult Iguazio personnel first.- Verbose Provisioning
Configures very verbose logs.
NoteLeave this parameter unchecked unless instructed otherwise by Iguazio personnel.- Placement Kind
-
NoteDon't change the default value of this parameter unless instructed otherwise by Iguazio personnel.
The following parameters are used for configuring network security groups. For more information, see the AWS network security-groups configuration guide.
- Whitelisted CIDRs
- A list of classless inter-domain routing (CIDR) addresses to be granted access to the platform's service port (for example, "200.40.0.1/32"). This parameter is typically relevant when the platform has public IP addresses. For a platform without public IP addresses, you can leave this parameter empty, assuming you have access to the VPC from your network.
- Installer CIDR
- The CIDR of the machine on which you're running the platform installer (for example, "10.0.0.1/32").
- Allow Access from Iguazio Support
Check this option to allow Iguazio's support team to access the platform nodes from the Iguazio network This parameter is applicable only when the platform has public IP addresses (see the
Allocate Public IP Addresses general-configuration parameter).- Restrict Global Access
- Check this option to restrict access to the web service (HTTP and HTTPS only)to only the IPs listed in Whitelisted CIDRs (does not open 0.0.0.0 over port 443,80).
In addition to the common parameters, there are parameters that are specific to the selected VPC mode:
New-VPC Configuration
The following parameters are applicable only to the
- CIDR
- The CIDR of the VPC.
- Subnet CIDRs
The CIDRs of the VPC's subnets. The number of CIDRs translates to the number of subnets.
NoteYou need to configure two subnets (for two availability zones) to fulfill EKS requirements; however, the platform uses only the first configured subnet. To use multiple availability zones (via multiple subnets), contact Iguazio for a quote. Note that while deployment with multiple availability zones offers improved availability when an availability zone is down, it has a performance impact and entails high network-utilization costs, and therefore might not fit your requirements.
Existing-VPC Configuration
The following parameters are applicable only to the
- VPC ID
- The ID of the VPC in which to install the platform.
- CIDR
- The IP address of the CIDR of the chosen VPC (as some VPCs have multiple CIDRs).
- Subnet IDs
The IDs of the subnets within the VPC or of a subset of these subnets.
The installation currently supports two subnets for an EKS application cluster and only a single subnet otherwise. For details, see the note for theSubnet CIDRs new-VPC configuration parameter.- Security Group Mode
- Leave this set to
New .
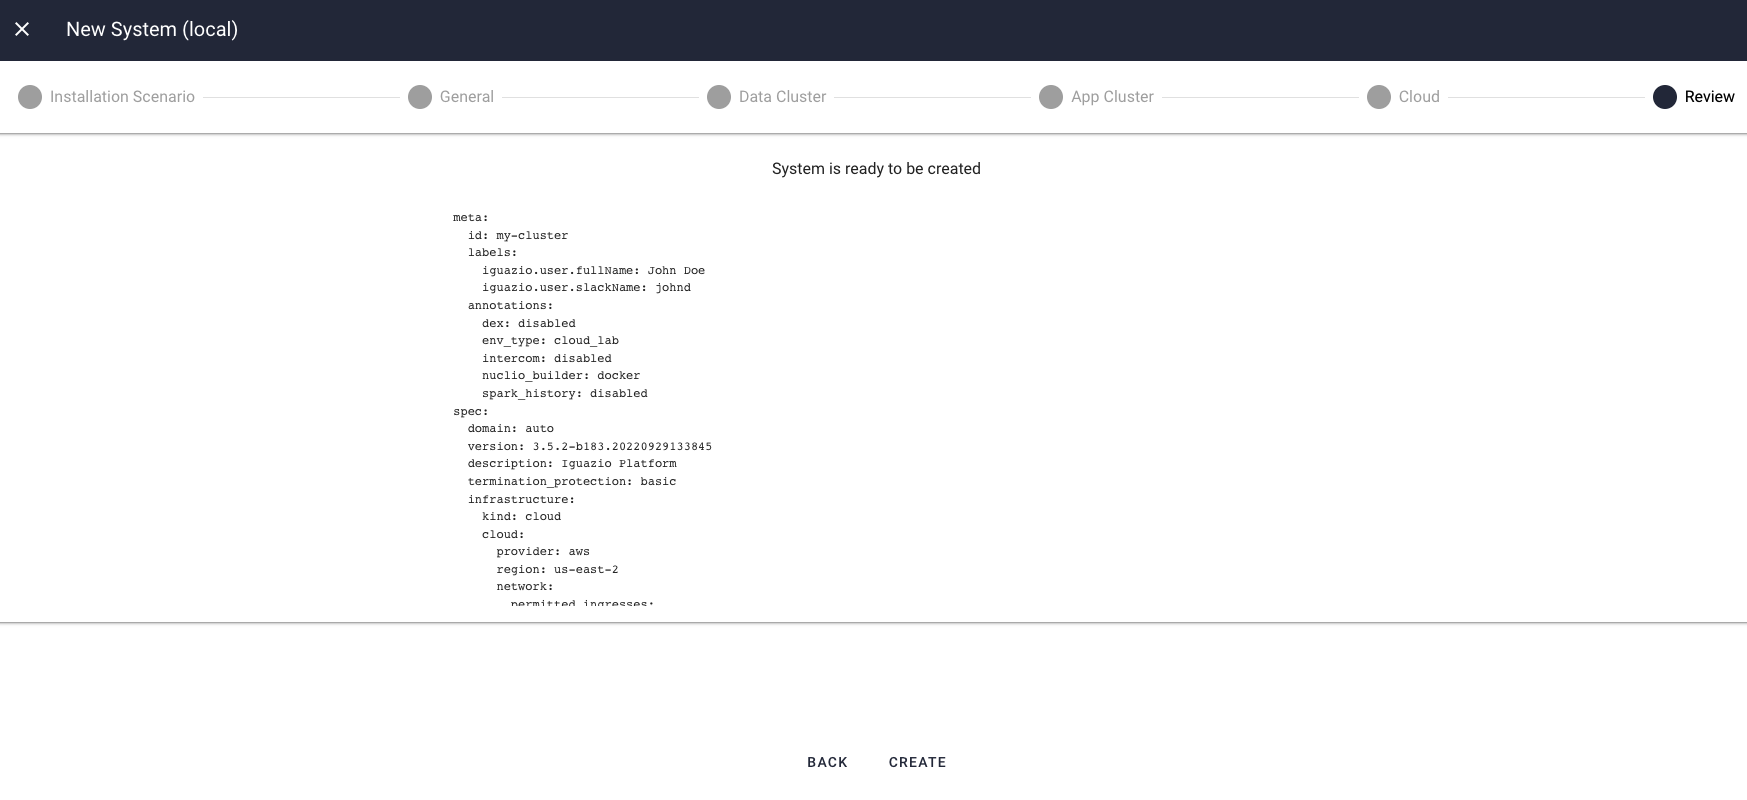
Step 9: Review the Settings
On the
Step 10: Wait for Completion
Provisioning a new platform instance typically takes around 30–40 minutes, regardless of the cluster sizes.
You can download the provisioning logs, at any stage, by selecting
You can also follow the installation progress by tracking the Provazio Docker container logs.
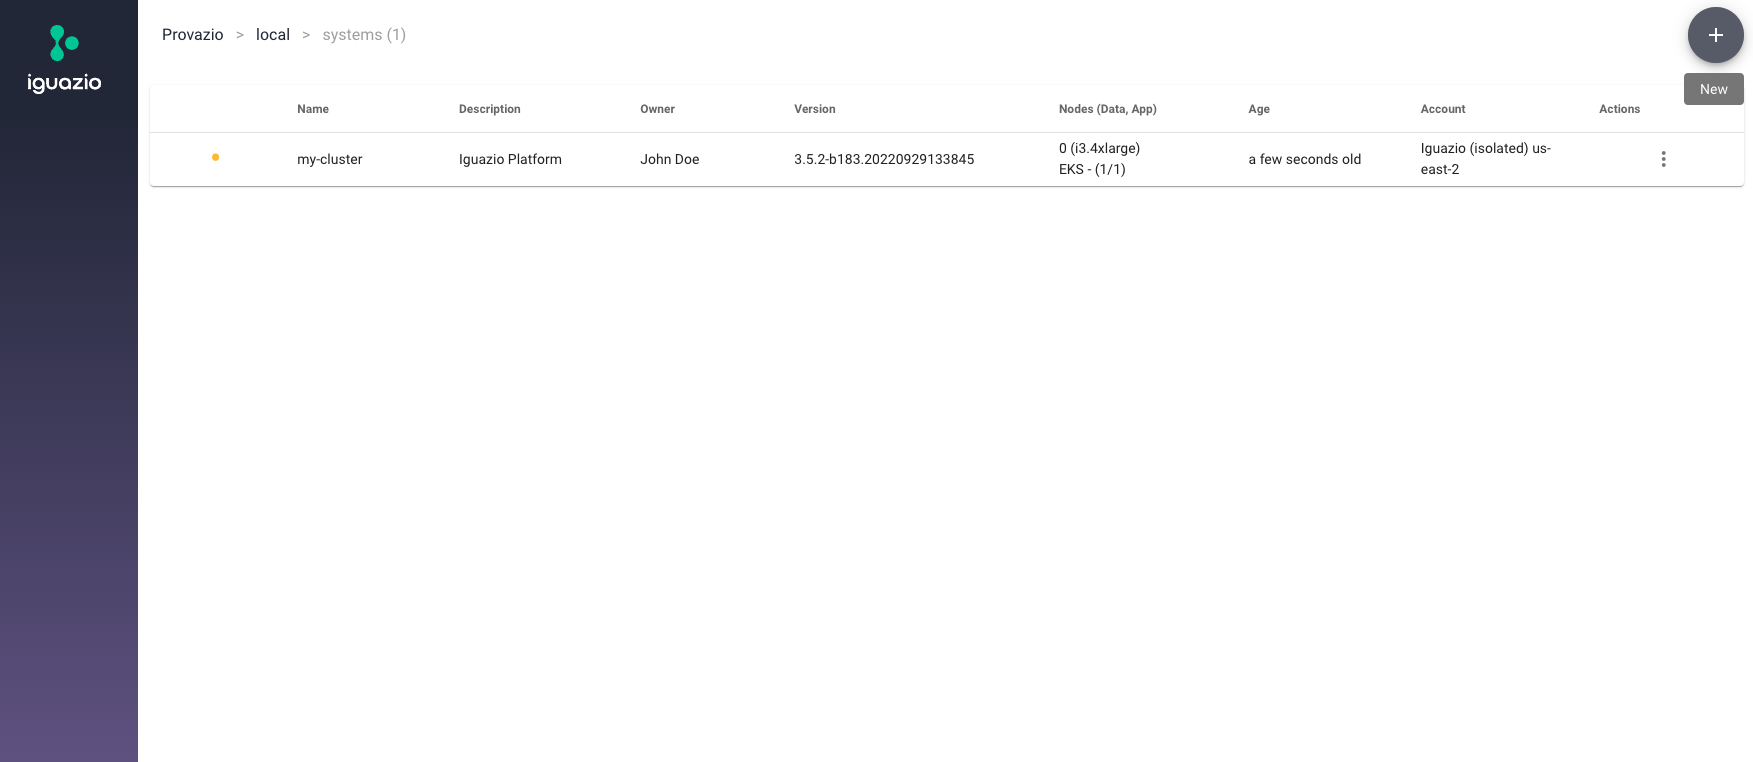
When the installation completes, you should have a running instance of the platform in your cloud. You can use the Provazio dashboard to view the installed nodes (EC2 instances). Then, proceed to the post-deployment steps.
Post-Deployment Steps
When the deployment completes, follow the post-deployment steps.