Attaching Data Disks to the Data-Node VMs (vSphere)
On This Page
Overview
The platform installation requires that you attach data disks (block-storage devices) of a specific type and minimal capacity, which are configured with raw device mapping (RDM), directly to each of the platform's data-node VMs ("the data nodes"), as outlined in this guide.
Prerequisites
Before you begin, ensure that you have the following:
At least two 1 TB enterprise-grade SSDs for each of the data nodes.
Note that you need a separate set of disks for each data node.
Attaching Data Disks to the Data Nodes
To configure RDM on local storage devices (data disks) and attach the disks to the platform's data-node VMs, execute the following procedure on each ESXi host that has deployed data-node VMs:
Establish an SSH connection to the ESXi host.
List the disks (block devices) that are attached to the ESXi host by running the following command:
~# ls /vmfs/devices/disks | grep -v "vml\|:"
In the returned output, identify the data disks that you want to attach and copy their names.
The device names are likely to be prefixed with "t10.", as demonstrated in the following example command output:
Take care not to perform any manipulations on data-store devices.
For each disk that you want to attach to a data-node VM, run the following command to configure the disk as an RDM device and map it to a new RDM-pointer VMDK file in the target data-node VM directory:
vmkfstools -z /vmfs/devices/disks/<disk name> /vmfs/volumes/<data store name>/<VM directory>/<VM name>.vmdk
For example, the following command configures and maps four SSDs to ssd<n>.vmdk files in a data-node VM directory in a "datastore1" data store on the ESXi host:
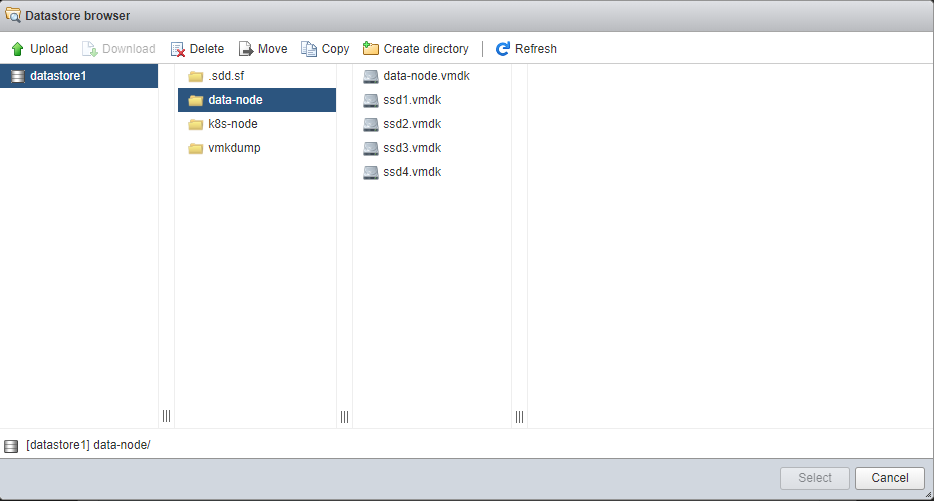
Verify that the configured VMDK files were created in the target data-node VM directory:
ls -la /vmfs/volumes/<data-store name>/<VM directory>/
For example:
ls -la /vmfs/volumes/datastore1/data-node/
Following is an example command output:
total 419431552
drwxr-xr-x    1 root     root         77824 Feb 26 08:10 .
drwxr-xr-t    1 root     root         73728 Feb 26 07:23 ..
-rw-------    1 root     root     429496729600 Feb 26 07:24 data-node-flat.vmdk
-rw-------    1 root     root           495 Feb 26 07:23 data-node.vmdk
-rw-r--r--    1 root     root             0 Feb 26 07:23 data-node.vmsd
-rwxr-xr-x    1 root     root          2391 Feb 26 07:23 data-node.vmx
-rw-------    1 root     root     450098159616 Feb 26 08:10 ssd1-rdmp.vmdk
-rw-------    1 root     root           494 Feb 26 08:10 ssd1.vmdk
-rw-------    1 root     root     450098159616 Feb 26 08:10 ssd2-rdmp.vmdk
-rw-------    1 root     root           494 Feb 26 08:10 ssd2.vmdk
-rw-------    1 root     root     450098159616 Feb 26 08:10 ssd3-rdmp.vmdk
-rw-------    1 root     root           494 Feb 26 08:10 ssd3.vmdk
-rw-------    1 root     root     450098159616 Feb 26 08:10 ssd4-rdmp.vmdk
-rw-------    1 root     root           494 Feb 26 08:10 ssd4.vmdk
Attach each RDM data disk to the respective data-node VM by using the generated VMDK file:
Log into the vSphere Web Client.
Right-click the target data-node VM and select Edit Settings.
Select: Add.
On the Device Type page, select the device type Hard Disk, and then select Next.
On the Select a Disk page, select Use an existing virtual disk to display the Datastore browser page.
Browse to the target data-node VM directory.
Select the relevant VMDK file, and then choose Save on the Edit settings - <data-node VM> page.
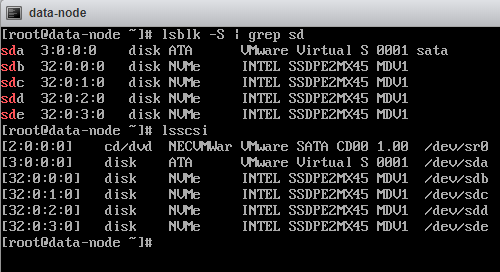
Verifying the Procedure
When you're done, for each data-node VM to which you attached devices, on all relevant ESXi hosts —
Open the VM console from the vSphere Web Client and run the following command to list the examples in the previous steps; you can optionally add options and filters to the command:
lsblk
You can also run the following command to check the disks' SCSI configuration:
lsscsi
Verify that the data disks that you attached to the data node appear in the output, and save the disks' names.
In the following example output, the data-node VM directory has four attached data disks — "sdb", "sdc", sdd", and "sde":