Attaching Data Disks to the Data-Node VMs (PVE)
Overview
The platform installation requires that you attach data disks (block-storage devices) of a specific type and minimal capacity directly to each of the platform's data-node VMs ("the data nodes"), as outlined in this guide.
Prerequisites
Before you begin, ensure that you have the following:
- Administrative access to a platform PVE cluster with the required networks configuration (see Configuring Virtual Networking (PVE)) and deployed VMs for each of the platform nodes (see Deploying the Platform Nodes (PVE)).
- At least two 1 TB enterprise-grade SSDs for each of the data nodes. Note that you need a separate set of disks for each data node.
Attaching Data Disks to the Data Nodes
To attach local storage devices (data disks) to the platform's data-node VMs, execute the following procedure on each PVE host that has deployed data-node VMs:
-
List the disks (block devices) that are attached to the PVE host by running the following command:
~# lsblk -o name,size,vendor,model,serialIn the returned output, identify the disks that you want to attach and copy their serial numbers.
Following is an example command output:
NAME                           SIZE VENDOR   MODEL                   SERIAL
sda                           44.7G ATA      INTEL_SSDSCKKR048H6     CVLY609000MU048A
sdb                          953.9G ATA      SanDisk_SD8SB8U1T001122 164108420934
├─sdb1                        1007K
├─sdb2                         512M
└─sdb3                       953.4G
  ├─pve-root                    96G
  ├─pve-swap                     8G
  ├─pve-data_tmeta             8.3G
  │ └─pve-data-tpool         816.7G
  │   ├─pve-data             816.7G
  │   ├─pve-vm--101--disk--0   400G
  │   └─pve-vm--102--disk--0   400G
  └─pve-data_tdata           816.7G
    └─pve-data-tpool         816.7G
      ├─pve-data             816.7G
      ├─pve-vm--101--disk--0   400G
      └─pve-vm--102--disk--0   400G
sdc                          953.9G ATA      SanDisk_SD8SB8U1T001122 163493421984
sdd                          953.9G ATA      SanDisk_SD8SB8U1T001122 163493420112
In this example, disk "sdb" is the PVE partition disk on which the PVE host is installed (note the
pve-<...>partitions). You can select to attach disks "sdc" and/or "sdd" as data disks to either of the host's two data nodes (ID 101 and 102).WarningTake care not to perform any manipulations on data-store devices, such as the PVE partition disk. -
Locate the unique data paths for the disks that you want to attach to the data nodes, by running the following command; replace
<disk serial number>with the disk serial numbers that you copied in the previous step:~# lsblk ls /dev/disk/by-id/* | grep -v part | grep <disk serial number>Copy the data paths for your selected disks.
The following example shows the commands and output for attaching disks "sdc" and "sdd" from the example in the previous step; note that the command filters the results by the disks' serial numbers, as identified in the previous step — 163493421984 and 163493420112 (respectively):
root@pve-intel1:~# ls /dev/disk/by-id/* | grep -v part | grep 163493421984 /dev/disk/by-id/ata-SanDisk_SD8SB8U1T001122_163493421984 root@pve-intel1:~# ls /dev/disk/by-id/* | grep -v part | grep 163493420112 /dev/disk/by-id/ata-SanDisk_SD8SB8U1T001122_163493420112 -
Configure the VM options for each data disk that you want to attach, by running the following command; replace the
<...>placeholders, as explained later in this step:dev=/dev/disk/by-id/<data-disk data path> ; qm set <data-node ID> --scsi<n> ${dev[}[,iothread=1],snapshot=0,backup=0,serial=$(lsblk -nd -o serial ${dev})<data-disk data path>is the disk's data path, as identified in the previous step.- The
--scsi<n> option configures the name of the disk's computer system interface (SCSI). Assign a unique name by replacing<n>with a unique numeric SCSI ID.NoteThe VM's boot disk is mapped to interface "scsi1". Therefore, for the data disks, start with "scsi1", and then increment the SCSI ID in each command (--scsi1 ,--scsi2 , etc.). - Use the
--serial option to pass the disk's serial numbers to the VM. Note that the command extracts the serial number from the provided data path, so you don't need to enter it manually. - You can optionally set
iothread=1to creates a separate I/O thread per disk, which improves performance.
The following example maps the two selected data disks from the previous example — "sdc" (data path "ata-SanDisk_SD8SB8U1T001122_163493421984") and "sdd" (data path "ata-SanDisk_SD8SB8U1T001122_163493420112") — to interfaces "scsi1" and "scsi2" on the first data node (VM ID 101):
dev=/dev/disk/by-id/ata-SanDisk_SD8SB8U1T001122_163493421984 ; qm set 101 --scsi1 ${dev},iothread=1,snapshot=0,backup=0,serial=$(lsblk -nd -o serial ${dev})
dev=/dev/disk/by-id/ata-SanDisk_SD8SB8U1T001122_163493420112 ; qm set 101 --scsi2 ${dev},iothread=1,snapshot=0,backup=0,serial=$(lsblk -nd -o serial ${dev})
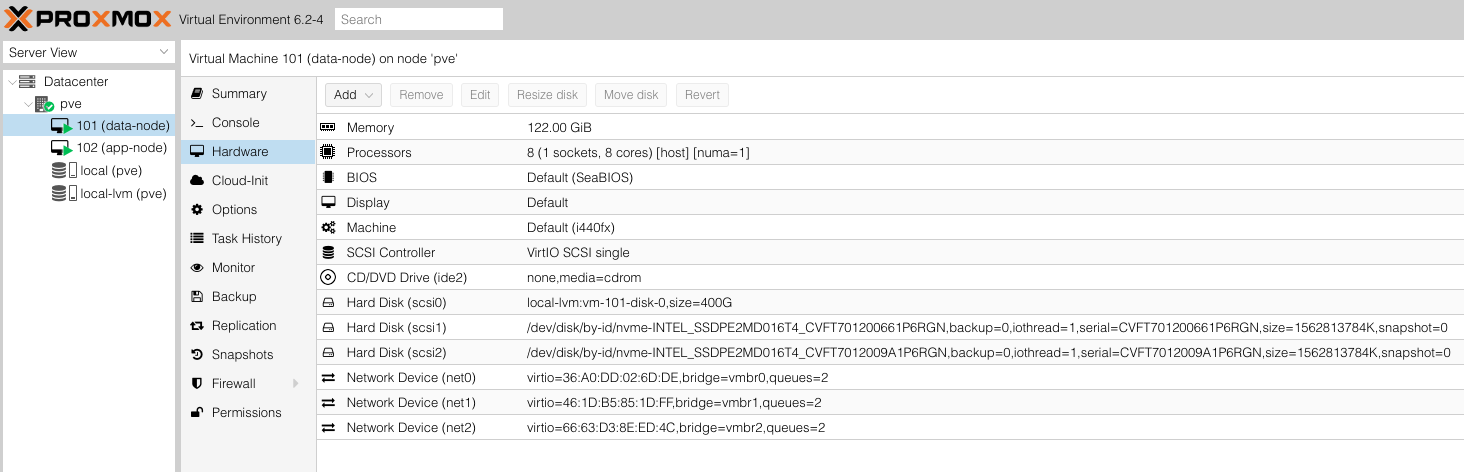
Verifying the Procedure
When you're done, for each data-node VM to which you attached devices, on all relevant PVE hosts, check the devices list under